文章目录(Table of Contents)
简介
这一篇会简单介绍一下 Python 中 format 和 f-string 的使用,特别是关于截断长度,保留位数和填充的问题。
format 是在 Python 3 中添加的高级字符串格式化(advanced string formatting)机制,它的表达能力比老式 C 风格的格式字符串要强,且不再使用 % 操作符。我们针对需要调整格式的 Python 值,调用内置的 format 函数,并把这个值所应具备的格式也传给该函数,即可实现格式化。本文主要内容均参考自下面的链接,详细的可以看下面的链接。
f-string 是在 Python 3.6 中添加了一种新的特性,叫做插值格式字符串(interpolated format string,简称 f-string)。新语法特性要求在格式字符串的前面加字母 f 作为前缀,这跟字母 b 与字母 r 的用法类似,也就是分别表示字节形式的字符串与原始的(或者说未经转义的)字符串的前缀。
参考链接 : https://pyformat.info/
format 简单使用
我们首先来介绍以下 format 的原理:系统先把 str.format 方法接收到的每个值传给内置的 format 函数,并找到这个值在字符串里对应的 {},同时将 {} 里面写的格式也传给 format 函数。
例如系统在处理 value 的时候,传的就是 format(value, '.2f')。然后,系统会把 format 函数所返回的结果写在整个格式化字符串 {} 所在的位置。
简单的使用
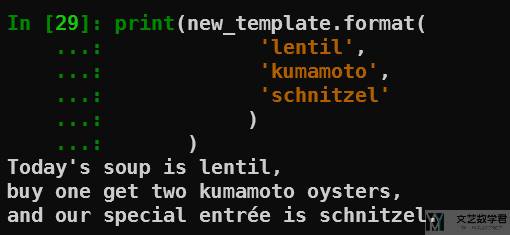
首先是关于 format 的简单使用。这里为了演示方便,我们创建一个 template,并使用 format 对 template 来进行格式化(下面的方式可以创建多行的字符串):
- new_template = (
- 'Today\'s soup is {}, \n'
- 'buy one get two {} oysters, \n'
- 'and our special entrée is {}. \n'
- )
在定义了 template之后,我们可以使用 format 向这个 template 来填充内容:
指定元素顺序
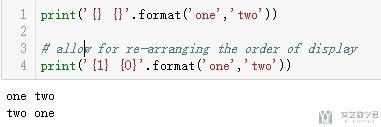
我们可以指定 format 后面元素的顺序,这样不需要调整 format 后面的内容:
- print('{} {}'.format('one','two'))
- # allow for re-arranging the order of display
- print('{1} {0}'.format('one','two'))
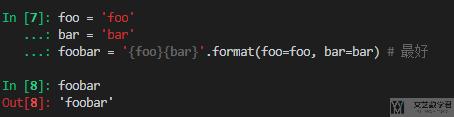
format 指定名称
除了上面使用 0 或是 1 来对应后面 format 内的内容,我们也可以直接指定名称。如下面的例子所示,我们指定名称为 foo 和 bar:
- foo = 'foo'
- bar = 'bar'
- foobar = '{foo}{bar}'.format(foo=foo, bar=bar) # 最好
最终的结果如下所示:
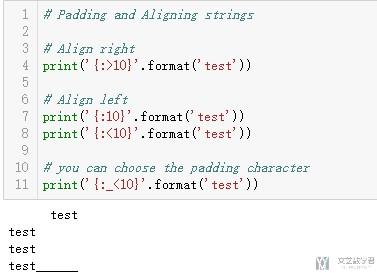
填充和对齐
我们可以在 {} 里写个冒号(:),然后把格式说明符写在冒号的右边,用以规定 format 方法所接收的这个值应该按照怎样的格式来调整。
下面的例子我们来规定 format 方法的填充和对齐方式:
- # Padding and Aligning strings
- # Align right
- print('{:>10}'.format('test'))
- # Align left
- print('{:10}'.format('test'))
- print('{:<10}'.format('test'))
- # you can choose the padding character
- print('{:_<10}'.format('test'))
四个操作分别对应的是右对齐,左对齐的两种方式和填充.
format 三种对齐方式
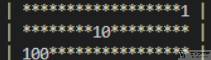
下面介绍三种对齐方式,分别是 > 为左对齐,^ 为居中,< 为右对齐。
- print("|", "{:*>19}".format(1),"|") # 左对齐
- print("|", "{:*^19}".format(10),"|") # 居中对齐
- print("|", "{:*<19}".format(100),"|") # 右对齐
我们运行上面的代码,得到如下图所示的结果,可以看到数字出现在不同的位置:
format 填充介绍
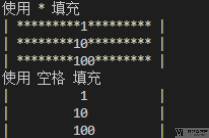
我们可以使用不同的字符进行填充,使得输出的结果长度一样。下面我们比较使用「星号」与「空格」分别进行填充:
- print('使用 * 填充')
- print("|", "{:*^19}".format(1),"|") # 居中对齐
- print("|", "{:*^19}".format(10),"|") # 居中对齐
- print("|", "{:*^19}".format(100),"|") # 居中对齐
- print('使用 空格 填充')
- print("|", "{:^19}".format(1),"|") # 居中对齐
- print("|", "{:^19}".format(10),"|") # 居中对齐
- print("|", "{:^19}".format(100),"|") # 居中对齐
运行上面的代码,结果如下图所示:
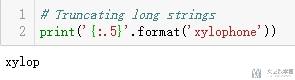
截断操作
截断操作是在小数点(.)后面加上截断的位数。
- # Truncating long strings
- print('{:.5}'.format('xylophone'))
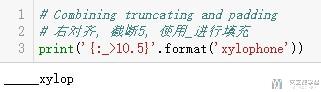
format 综合应用
我们可以看一个比较综合的使用。这里要做的操作是右对齐,截断5,最后使用_进行填充.
- # Combining truncating and padding
- # 右对齐, 截断5, 使用_进行填充
- print('{:_>10.5}'.format('xylophone'))
format 转义符
如果想把 str 里面的 {} 照原样输出,那么得转义。连写两个 {{}} 表示转义。我们看一下下面的例子:
- In [1]: "{{{}}}".format(1)
- Out[1]: '{1}'
参考链接:str.format输出花括号本身
format 对数字的操作
正数与小数的简单操作
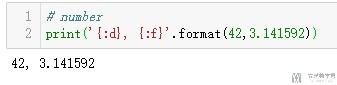
- # number
- print('{:d}, {:f}'.format(42,3.141592))
对齐, 填充与截断
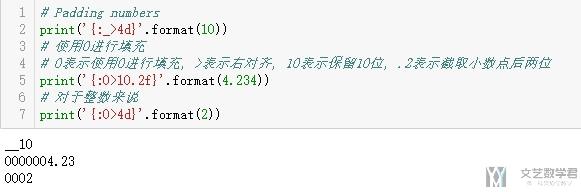
- # Padding numbers
- print('{:_>4d}'.format(10))
- # 使用0进行填充
- # 0表示使用0进行填充, >表示右对齐, 10表示保留10位, .2表示截取小数点后两位
- print('{:0>10.2f}'.format(4.234))
- # 对于整数来说
- print('{:0>4d}'.format(2))
format 对数字操作的例子
这里综合使用一下上面的内容,这个在训练网络的时候打印模型效果的时候,会经常被使用到。
- # Practice
- print('Epoch : {:0>2d} | Loss : {:<6.4f} | Train Accuracy : {:<6.2f}'.format(1,2.000,3121))

f-string 格式化
f-string 是在 Python 3.6 中添加了一种新的特性,叫做插值格式字符串(interpolated format string,简称 f-string)。新语法特性要求在格式字符串的前面加字母 f 作为前缀,这跟字母 b 与字母 r 的用法类似,也就是分别表示字节形式的字符串与原始的(或者说未经转义的)字符串的前缀。
f-string 与上面 format 不同的是,f-string 的 {} 里面引用当前 Python 范围内的所有名称,进而达到简化的目的。我们来看一个例子:
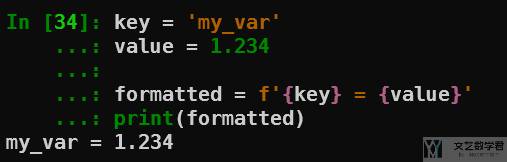
- key = 'my_var'
- value = 1.234
- formatted = f'{key} = {value}'
- print(formatted)
最终的结果如下所示,我们在 f-string 中变量可以直接变为上面定义的变量:
f-string 格式
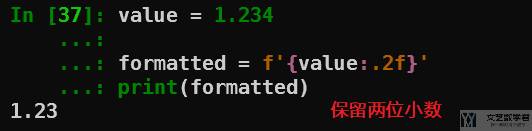
str.format 方法所支持的那套迷你语言,也就是在 {} 内的冒号右侧所采用的那套规则,现在也可以用到 f-string 里面。我们使用 {变量:规则} 来使用,如下所示:
- value = 1.234
- formatted = f'{value:.2f}'
- print(formatted)
最终的结果如下所示:
同时 Python 表达式也可以出现在格式说明符中。例如,下面的代码把小数点之后的位数用变量来表示,然后把这个变量的名字 places,用 {} 括起来放到格式说明符中,这样写比采用硬代码更灵活:
- places = 3
- number = 1.23456
- print(f'My number is {number:.{places}f}')
最终结果如下图所示:

f-string 相邻字符串拼接(adjacent-string concatenation)
当字符串比较长的时候,为了想表达得更清楚一些,可以把 f-string 写成多行的形式,类似于 C 语言的相邻字符串拼接(adjacent-string concatenation)。这个和上面 format 中定义 template 的用法是类似的:
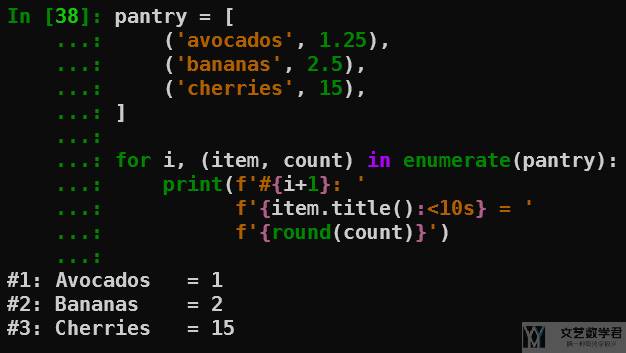
我们甚至还可以在使用 f-string 的时候对填充到 {} 中的变量进行微调。如下所示:
- pantry = [
- ('avocados', 1.25),
- ('bananas', 2.5),
- ('cherries', 15),
- ]
- for i, (item, count) in enumerate(pantry):
- print(f'#{i+1}: '
- f'{item.title():<10s} = '
- f'{round(count)}')
注意上面 print 里面的写法,最终的结果如下图所示:
结语

- 微信公众号
- 关注微信公众号
-

- QQ群
- 我们的QQ群号
-


2019年6月11日 上午9:20 1F
Mathematica是一个软件,集成了很多算法?python是一种编程语言,也可以在Mathematica中使用,是不是?