文章目录(Table of Contents)
简介
尽管随着 web 端和移动端应用的崛起,但是传统的 GUI(Graphical User Interface)桌面应用仍旧有需求。对于想开发这类应用的人来说,有许多的库可以选择,包括 Tkinter,PyQt,PySide 等。在这个系列我们会介绍 PyQt 的使用。本文是这个系列的第一篇,我们简单认识 PyQt 的工作原理。
这一部分主要参考自,Python and PyQt: Building a GUI Desktop Calculator
理解 PyQt
PyQt 是 Qt 与 Python 的绑定。Qt 是一套 C++ 的库,包括 GUI 界面、SQL 数据库等。PyQt 目前有两个版本:
- PyQt4: an edition that's built against Qt 4.x and 5.x
- PyQt5: an edition that's only built against Qt 5.x
尽管 PyQt4 也可以支持 Qt 5.x,但是仅仅兼容一小部分。这就意味着使用 PyQt 4 会失去 PyQt 5 的一些新特性。因此在本系列中,我们会介绍 PyQt 5。
安装 PyQt
我们可以使用 binary wheels 的方式来进行安装对应的库。但是在这里需要注意的,对应 PyQt5 的 wheels 只支持 Python 3.5 或是更高的版本。我们直接使用 pip 来进行安装 PyQt5 :
- pip install pyqt5
如果是 Linux 的系统,我们可以使用 distribution's package manager 进行安装。例如在 Ubuntu 18.04 上,我们可以使用下面的命令进行安装:
- sudo apt install python3-pyqt5
PyQt 参考资料
以下是一些 PyQt 比较好的学习资料。
- 各种各样的PyQt测试和例子,Github 上一个比较好的仓库,里面包含各种 PyQt 的例子;
- Python and PyQt: Building a GUI Desktop Calculator,使用 PyQt 制作计算器;
创建我们第一个 PyQt 应用
在安装好了 PyQt5 之后,我们就可以开始写第一个 GUI 的应用了。我们在这里创建一个显示 Hello World 的应用。下面是主要的步骤:
- Import
QApplicationand all the required widgets fromPyQt5.QtWidgets. - Create an instance of
QApplication. - Create an instance of your application's GUI.
- Show your application's GUI.
- Run your application's event loop (or main loop).
下面的代码主要根据上面的 5 个步骤来完成代码,我们创建一个 hello.py 的文件:
- # Filename: hello.py
- """Simple Hello World example with PyQt5."""
- import sys
- # 1. Import `QApplication` and all the required widgets
- from PyQt5.QtWidgets import QApplication
- from PyQt5.QtWidgets import QLabel
- from PyQt5.QtWidgets import QWidget
我们首先导入 sys,这个库是用来处理应用的退出时的状态。之后,我们会从 QtWidgets 导入QApplication, QWidget, 和QLabel。
接下来第二步,我们创建一个 QApplication 的实例。
- # 2. Create an instance of QApplication
- app = QApplication(sys.argv)
在上面的步骤中,我们创建了一个 QApplication 的实例。因为在 QApplication 会有大量的初始化,因此我们在创建关于 GUI 的相关 object 之前,我们需要初始化 QApplication。我们可以在里面传入 sys.argv 用于之后处理命令。
第三步我们创建一个应用的 GUI 界面。在这个例子中,GUI 界面会基于 QWidget,这是 PyQt 中最基本的用于交互的类。
- # 3. Create an instance of your application's GUI
- window = QWidget()
- window.setWindowTitle('PyQt5 App')
- window.setGeometry(100, 100, 280, 80)
- window.move(60, 15)
- helloMsg = QLabel('<h1>Hello World!</h1>', parent=window)
- helloMsg.move(60, 15)
在上面的代码中:
- 首先初始化一个
QWidget - 接着使用
.setWindowTitle来设置窗口的标题 - 使用
.setGeometry()来定义窗口的大小和在屏幕中显示的位置。关于四个参数的说明,The first two parameters are the x and y coordinates at which the window will be placed on the screen. The third and fourth parameters are the width and height of the window. - 在这里我们使用
QLabel作为小组件来显示内容。并且这里使用parent来指定parent-child的关系。组件之间的从属关系。 QLabel可以接受 html 的文本,因此我们这里使用上面的方式来进行显示。最后我们使用.move将QLabel放置到window中的指定的位置。
在完成了上面的三个步骤之后,我们就可以展示应用最终的 GUI。
- # 4. Show your application's GUI
- window.show()
- # 5. Run your application's event loop (or main loop)
- sys.exit(app.exec_())
在上面代码中,我们使用 window 中的 call 方法,用来添加一个新的 event 到应用的 event 队列中(关于 event 后面会有详细的介绍)。
最后我们使用 app.exec_() 开始应用的 event。我们使用 sys.exit() 包裹住上面的代码,这样可以在推出程序的时候释放内存。
我们运行上面的代码,可以看到如下的窗口显示:

了解 PyQt 的基础知识
接下来我们需要了解关于 PyQt 的一些基本的概念,来帮助我们更好的开发 GUI 的应用。我们会介绍包括以下的一些概念:
- Widgets(小组件)
- Layout managers(布局)
- Dialogs 与 Main Windows(两类应用)
- Applications(关于 QApplication)
- Event loops(事件循环)
- Signals and slots(信号与插槽)
Widgets
QWidget 是所有 widgets 的基类。这里会包含一些矩形的图形组件,我们可以将其放置在应用程序窗口来构建想要的 GUI。窗口组件会包含一系列的属性和方法,可以使用他们对外观和行为进行改变。
这些小组件也会接受「鼠标点击」,「键盘按键」或其他来自用户的事件(event)。每次这些小组件捕获事件后,都会发出一个信号表示其状态的改变。下面是 PyQt5 中常用的一些小组件:
- Buttons(按钮)
- Labels(标签,显示一些文本)
- Line edits(可以编辑文本)
- Combo boxes(下拉选择)
- Radio buttons(选择)
Buttons,我们可以通过初始化 QPushButton来得到一个按钮。例如「确认」,「取消」按钮。当我们点击按钮的时候,可以让计算机执行一些操作。经典的按钮长得像下面这样:

Labels,通过初始化 QLabel来创建 Label。这里 Label 可以让我们显示一些有用的信息,可以以文字或是图片的形式显示。Labels 是支持 html 格式的,所以可以使用 HTML 来进行美化。下面的内容就是使用 Labels 来进行创建的:

Line Edits,通过初始化 QLineEdit 来创建 Line Edits。这个可以让用户很方便的进行输入。下面是 Line Edits 的大致的样子:

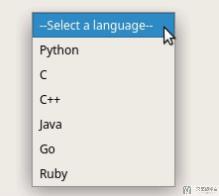
Combo Boxes,通过 QComboBox 来创建 Combo Box。一个 Combo Box 就是一个选择框,如下所示:
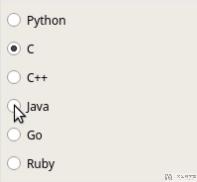
Radio Button,通过 QRadioButton 来创建一个 radio button。这个是一个选择按钮,相比于上面的组件,这个可以将所有的选项同时显示出来。
Layout Managers
上面我们介绍了不同的组件。这里我们会介绍如何将多个组件整齐的放在一起。最简单的我们可以使用 .move 和 .resize 给定组件的绝对位置和大小。但是这样做会有一些缺点:
- 我们需要手工计算很多组件的位置和大小。
- 当布局改变的时候,我们需要进行重新的计算。
- 比较难是的组件是自适应的,即改变了大小之后还布局整齐。
另外一种方式是使用 .resizeEvent() 来动态的计算组件的位置和大小。但是最高效的方式是使用 layout managers,这样可以提示我们的效率和代码的可读性。下面是一段关于 layout managers 的介绍,之后就会介绍layout managers:
Layout managers are classes that allow you to size and position your widgets at the places you want them to be on the application's form. Layout managers automatically adapt to resize events and content changes. They also control the size of the widgets within them. This means that the widgets in a layout are automatically resized whenever the form is resized.
PyQt 提供了 4 种基础的 layout manager 的类,下面依次介绍:
QHBoxLayout(水平布局)QVBoxLayout(垂直布局)QGridLayout(网格方式布局)QFormLayout(双栏,第一栏是 Label,第二栏是 Widget)
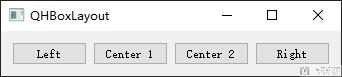
第一个( QHBoxLayout)和第二个(QVBoxLayout)分别是水平布局和垂直布局。我们就用水平布局来举一个例子,下面是实例代码:
- import sys
- from PyQt5.QtWidgets import QApplication
- from PyQt5.QtWidgets import QHBoxLayout
- from PyQt5.QtWidgets import QPushButton
- from PyQt5.QtWidgets import QWidget
- app = QApplication(sys.argv)
- window = QWidget()
- window.setWindowTitle('QHBoxLayout')
- layout = QHBoxLayout() # creates a QHBoxLayout object called layout.
- layout.addWidget(QPushButton('Left')) # dd four buttons to layout with .addWidget()
- layout.addWidget(QPushButton('Center 1'))
- layout.addWidget(QPushButton('Center 2'))
- layout.addWidget(QPushButton('Right'))
- window.setLayout(layout) # sets layout as your window’s layout with .setLayout().
- window.show()
- sys.exit(app.exec_())
我们在上面的代码中添加了四个组件,这四个组件就会从最到右以此布局,最终效果如下所示:
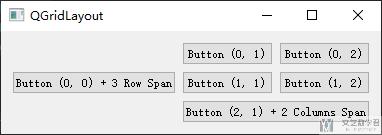
第三种布局方式是网格布局(QGridLayout)。每一个组件会在网格中有一个相对的位置。我们通过告诉组件在网格的第几行,第几列来进行定位。网格布局如下所示:
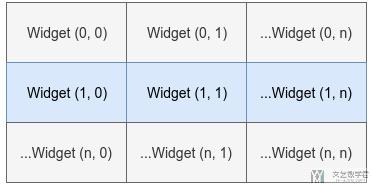
下面是一个关于网格布局的例子,组件是可以跨网格的:
- import sys
- from PyQt5.QtWidgets import QApplication
- from PyQt5.QtWidgets import QGridLayout
- from PyQt5.QtWidgets import QPushButton
- from PyQt5.QtWidgets import QWidget
- app = QApplication(sys.argv)
- window = QWidget()
- window.setWindowTitle('QGridLayout')
- layout = QGridLayout()
- layout.addWidget(QPushButton('Button (0, 0) + 3 Row Span'), 0, 0, 3, 1)
- layout.addWidget(QPushButton('Button (0, 1)'), 0, 1)
- layout.addWidget(QPushButton('Button (0, 2)'), 0, 2)
- layout.addWidget(QPushButton('Button (1, 1)'), 1, 1)
- layout.addWidget(QPushButton('Button (1, 2)'), 1, 2)
- layout.addWidget(QPushButton('Button (2, 1) + 2 Columns Span'), 2, 1, 1, 2)
- window.setLayout(layout)
- window.show()
- sys.exit(app.exec_())
这里 .addWidget() 可以接受四个参数,分别是:
- 1. 所在行;
- 2. 所在列;
- 3. rowSpan, 跨的行数;
- 4. columnSpan, 跨的列数.
运行上面的代码,最终会得到以下的结果:
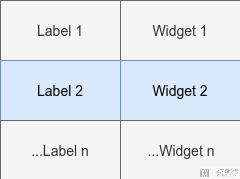
第四种布局的方式是QFormLayout。这种布局方式会将组件以两栏的样式进行布局。第一栏是用来显示 message 的,第二栏通常会包含一些其他的组件。这个布局可以使得用户根据第一栏的信息,在第二栏中输入相关的内容。QFormLayout的布局如下所示:
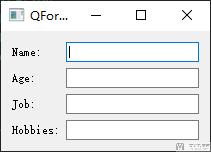
下面的一个例子说明了如何使用QFormLayout 这个布局。
- import sys
- from PyQt5.QtWidgets import QApplication
- from PyQt5.QtWidgets import QFormLayout
- from PyQt5.QtWidgets import QLineEdit
- from PyQt5.QtWidgets import QWidget
- app = QApplication(sys.argv)
- window = QWidget()
- window.setWindowTitle('QFormLayout')
- layout = QFormLayout()
- layout.addRow('Name:', QLineEdit())
- layout.addRow('Age:', QLineEdit())
- layout.addRow('Job:', QLineEdit())
- layout.addRow('Hobbies:', QLineEdit())
- window.setLayout(layout)
- window.show()
- sys.exit(app.exec_())
注意到这里只需要使用 .addRow 即可向布局中添加组件,这里第一个参数是 Label,第二个就是相关的组件。运行上面的代码,得到如下的结果:
Dialog
在 PyQt 中会有两种 GUI 的类型,我们会分别进行介绍:
- A Main Window-Style application: The application's main window inherits from
QMainWindow. - A Dialog-Style application: The application's main window inherits from
QDialog.
首先介绍 dialog-style 类型的应用。为了创建这个类型的应用,我们继承 QDialog 类。对话框窗口始终是顶级窗口,我们可以将其用作 Dialog-Style 应用程序的主窗口。同时这种类型的应用会集成父窗口的任务栏。我们下面看一个例子:
- import sys
- from PyQt5.QtWidgets import QApplication
- from PyQt5.QtWidgets import QDialog
- from PyQt5.QtWidgets import QDialogButtonBox
- from PyQt5.QtWidgets import QFormLayout
- from PyQt5.QtWidgets import QLineEdit
- from PyQt5.QtWidgets import QVBoxLayout
- class Dialog(QDialog):
- """Dialog."""
- def __init__(self, parent=None):
- """Initializer."""
- super().__init__(parent)
- self.setWindowTitle('QDialog')
- dlgLayout = QVBoxLayout()
- formLayout = QFormLayout()
- formLayout.addRow('Name:', QLineEdit())
- formLayout.addRow('Age:', QLineEdit())
- formLayout.addRow('Job:', QLineEdit())
- formLayout.addRow('Hobbies:', QLineEdit())
- dlgLayout.addLayout(formLayout)
- btns = QDialogButtonBox()
- btns.setStandardButtons(
- QDialogButtonBox.Cancel | QDialogButtonBox.Ok)
- dlgLayout.addWidget(btns)
- self.setLayout(dlgLayout)
- if __name__ == '__main__':
- app = QApplication(sys.argv)
- dlg = Dialog()
- dlg.show()
- sys.exit(app.exec_())
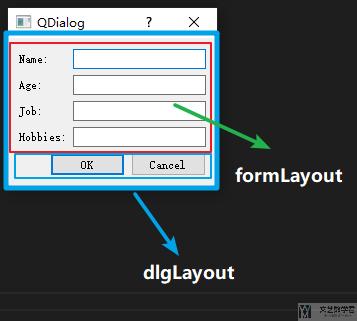
- 在第 10 行的时候,我们创建了
Dialog类,继承自QDiolog。 - 在第 16 行的时候创建了一个
dlgLayout,这个是一个总的布局(垂直布局),里面会包含一个formLayout。这里通过.addLayout的函数向一个布局里面增加布局。 - 在第 17 行的时候创建一个
formlayout,里面会放置name,age等 lineEdit。
最终的效果如下所示:
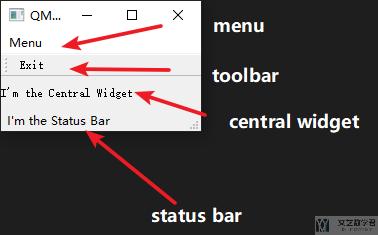
接着我们介绍 main windows 类型的应用,这一类应用会有一个菜单栏,一些工具栏,一个状态栏,以及其他的小部件。同时,这个应用会具有多个 dialog window(也就是上面类型的应用),根据用户的输入来完成不同的操作。
我们继承 QMainWindow 来做 Window-Style 类型的应用。QMainWindow 提供了一个制作 GUI 应用的一个框架。这个类拥有她内置的布局,我们可以对以下内容进行定制:
- 窗口顶部是一个菜单栏(menu bar)。
- 窗口侧边有几个工具栏(toolbar)。工具栏会比较适合方式一些组件,例 QComboBox, QSpinBox。
- 窗口中间的小部件(central widget)。这里可以是一个复合的小窗口。
- 窗口底部的状态栏(status bar at the bottom of the window),底部可以显示应用的一些状态信息。
创建一个 main windows 必须要设置一个 central widget。我们可以通过使用 .setCentralWidget 来设置 central widget。下面是一个 mian window 的例子:
- import sys
- from PyQt5.QtWidgets import QApplication
- from PyQt5.QtWidgets import QLabel
- from PyQt5.QtWidgets import QMainWindow
- from PyQt5.QtWidgets import QStatusBar
- from PyQt5.QtWidgets import QToolBar
- class Window(QMainWindow):
- """Main Window."""
- def __init__(self, parent=None):
- """Initializer."""
- super().__init__(parent)
- self.setWindowTitle('QMainWindow')
- self.setCentralWidget(QLabel("I'm the Central Widget")) # 这个是必须的
- self._createMenu()
- self._createToolBar()
- self._createStatusBar()
- def _createMenu(self):
- self.menu = self.menuBar().addMenu("&Menu")
- self.menu.addAction('&Exit', self.close)
- def _createToolBar(self):
- tools = QToolBar()
- self.addToolBar(tools)
- tools.addAction('Exit', self.close)
- def _createStatusBar(self):
- status = QStatusBar()
- status.showMessage("I'm the Status Bar")
- self.setStatusBar(status)
- if __name__ == '__main__':
- app = QApplication(sys.argv)
- win = Window()
- win.show()
- sys.exit(app.exec_())
最终的生成结果如下所示,每一个部分我都在图中标注出来了:
Application
开发 PyQt 中最基础的类是 QApplication。此类是任何 PyQt 应用程序的核心。每一个PyQt 应用程序都需要有 QApplication。该类主要有以下的作用:
- Handling initialization and finalization(处理初始化和结束)
- Providing the event loop and event handling(提供事件处理和事件循环)
- Handling most of the system-wide and application-wide settings(处理设置)
- Providing access to global information, such as the application's directory, screen size, and so on(全局信息的访问,例如屏幕大小等)
- Parsing common command-line arguments(常见命令的解析)
- Defining the application's look and feel(定义应用程序的外观)
- Providing localization capabilities(提供本地化的功能)
Application 中的一个作用就是处理 event loops(事件循环)。下面我们来仔细看一下 event loop 的相关内容。
Event Loop
GUI 的应用程序是事件驱动的。用户点击操作,下拉框选择,这些都被称之为事件。事件通常由事件循环(event loop)来处理,这是一个无限循环,用来处理来自用户,窗口和其他源的所有事件。事件循环会等待事件发生,然后分配执行某些任务,继续事件循环,直到程序终止。
在事件循环中,如果有事件发生,会检查该事件是否是结束事件,如果是则退出程序。否则事件将会被送到应用程序的事件队列进一步处理,然后循环再次开始。
在 PyQt 中,我们在 QApplication 对象上调用 .exec_() 来运行事件循环。为了触发事件,我们需要将事件与执行的动作联系起来,我们会使用 signal 和 slots 机制来完成,这些会在下面一部分进行介绍。
Signals and Slots
PyQt 中的小组件可以充当事件捕捉器。这个也就意味着每个小部件都可以捕获特定数量的事件,例如鼠标单击,键盘按键等。当捕获这些事件之后,小组件会释放信号,宣布状态变化。
信号本身是不会执行任何操作的。如果想要让信号执行操作,需要将信号连接到插槽(make a signal connect to a slot)。这里插槽可以是一个函数。
我们可以使用以下的语法将信号连接到插槽:
- widget.signal.connect(slot_function)
这里当 signal 被触发时,会执行 slot function。下面是一个完整的例子,用来说明 signals 和 slots 之间的联动:
- import sys
- from PyQt5.QtWidgets import QApplication
- from PyQt5.QtWidgets import QLabel
- from PyQt5.QtWidgets import QPushButton
- from PyQt5.QtWidgets import QVBoxLayout
- from PyQt5.QtWidgets import QWidget
- def greeting():
- """Slot function.
- """
- if msg.text():
- msg.setText("")
- else:
- msg.setText("Hello World!")
- app = QApplication(sys.argv)
- window = QWidget()
- window.setWindowTitle('Signals and slots')
- layout = QVBoxLayout()
- btn = QPushButton('Greet')
- btn.clicked.connect(greeting) # Connect clicked to greeting()
- layout.addWidget(btn)
- msg = QLabel('')
- layout.addWidget(msg)
- window.setLayout(layout)
- window.show()
- sys.exit(app.exec_())
在上面的代码中,我们将鼠标点击的动作连接到 greeting 函数。每当点击的时候,greeting 都会被调用,然后替换 msg 中的内容。最终效果如下所示:
上面我们可以点击按钮触发函数运行。但是这个时候函数是没有传入参数的。如果想要为函数传入参数,我们需要使用 partial。首先我们简单介绍一下 partial,看下面的例子:
- from functools import partial
- def add_num(a, b):
- print('a, {}; b, {}.'.format(a, b))
- return a + b
- plus3 = partial(add_num, b=3)
- print(plus3(4))
- """
- a, 4; b, 3.
- 7
- """
当使用 partial 包住一个函数的时候,我们可以提前传入一些参数。例如上面我们提前指定 b=3,这个时候再使用 plus 的时候,相当于赋值只是 a 的值。
于是我们修改上面的代码,使其可以传入参数,首先修改 greeting 这个函数,可以接受一个参数:
- def greeting(your_name):
- """Slot function.
- """
- if msg.text():
- msg.setText("")
- else:
- msg.setText("Hello {}!".format(your_name))
后面我们只需要修改绑定的时候,使用 partial 包裹住就可以了。
- btn.clicked.connect(partial(greeting, your_name='A'))
最终可以有如下的效果:
- 微信公众号
- 关注微信公众号
-

- QQ群
- 我们的QQ群号
-


评论