文章目录(Table of Contents)
简介
Tkinter 模块是 Python 的标准 Tk GUI 工具包的接口。Python 有许多的 GUI 的库,但只有 Tkinter 是唯一一个 Python 内置的标准库。Tkinter 有许多优势,首先他是跨平台的,相同的代码可以在 Windows,macOS,和 Linux 上进行工作。Tkinter 中可视化的组件使用操作系统自带的组件,所以这个应用看上去会比较自然。
但是 Tkinter 被诟病的一个地方是,他做出来的 GUI 看上去会是比较过时的。如果你想要一个更加 modern 的界面,更加现代化的交互,那么 Tkinter 不是现在你想要的。同时,使用 Tkinter 构建界面会比较麻烦,没有像 Qt Designer 一样的工具可以直接绘制。(关于 QT Designer 的相关教程,可以参考链接,使用 PyQt 快速搭建带有 GUI 的应用(3)–Qt Designer)
尽管界面会有一些不是很美观、同时构建界面不是很便捷。但是因为 Tkinter 内置的库,而且还是跨平台的,所以一些简单的任务,还是可以首先考虑 Tkinter 的。
参考资料
- Python GUI Programming With Tkinter,本文的主体框架根据这一篇翻译而来,这里有关于 Tkinter 的基础的用法;
- 知乎上关于使用 Tkinter 的一个例子,python之:tkinter画哆啦A梦
- 如果想要来完成更多复杂的 GUI 应用,推荐使用 PyQt 来进行完成,PyQt 的相关教程链接为,使用 PyQt 快速搭建带有 GUI 的应用(1)–初识 PyQt
如果想要制作更加复杂的窗口界面,可以尝试使用 PyQt 来进行制作,下面是一些教程:
- 使用 PyQt 快速搭建带有 GUI 的应用(1)–初识 PyQt
- 使用 PyQt 快速搭建带有 GUI 的应用(2)–制作计算器
- 使用 PyQt 快速搭建带有 GUI 的应用(3)–Qt Designer
- 使用 PyQt 快速搭建带有 GUI 的应用(4)–多线程的使用
- 使用 PyQt 快速搭建带有 GUI 的应用(5)–鼠标悬浮操作
- 使用 PyQt 快速搭建带有 GUI 的应用(6)–动态添加组件
- 使用 PyQt 快速搭建带有 GUI 的应用(7)–打开文件和文件夹
- 使用 PyQt 快速搭建带有 GUI 的应用(8)–多窗口之间跳转
使用 tkinter 制作第一个 Python GUI 应用
Tkinter GUI 的最根本的元素是 window。Windows 会包含所有其他的 GUI 的元素,包括 text boxes,labels,或是 buttons,这些都被称作 widgets(小组件)。
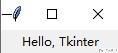
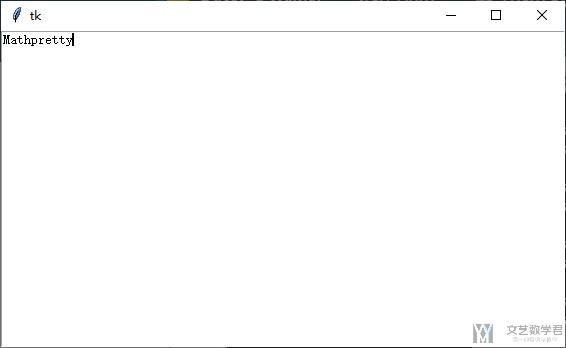
作为第一个例子,我们首先创建一个 window,里面只包含一个组件(widget)。下面是一个完整的代码,我们在每一句后面都添加了注释:
- import tkinter as tk
- window = tk.Tk() # 首先对 tkinter 的 Tk 进行实例化,创建一个 windows
- greeting = tk.Label(text="Hello, Tkinter") # 接着我们创建一个 Label widget
- greeting.pack() # 将 widget 添加到 windows。这里使用 pack 添加
- window.mainloop() # run event loop
上面运行之后,会出现如下的界面:
上面有两个需要注意的点:
- 创建了 widget 之后,我们需要将它添加到 window上。这里使用 pack 来添加,后面会介绍其他的方式。
- 在程序最后,都需要添加
window.mainloop()。如果我们不添加window.mainloop()在程序的最后,那么 Tkinter 应用不会运行,什么也不会显示。这个方法会监听所有的事件,包括鼠标的点击或是键盘摁下。
Tkinter 中的 widget 介绍
上面我们介绍了第一个 Tkinter 的例子。这里我们来介绍 Tkinter 中的插件。用户通过这些插件来与程序进行交互。下面是一些可用的插件:
- Label: A widget used to display text on the screen;
- Button: A button that can contain text and can perform an action when clicked;
- Entry: A text entry widget that allows only a single line of text;
- Text: A text entry widget that allows multiline text entry;
- Frame: A rectangular region used to group related widgets or provide padding between widgets;
使用 Label 显示文字
Label widgets 可以用来显示文本和图片。通过 Label widget 显示的内容是无法被用户修改的,这个只是用来作为显示。
在默认情况下,Label widgets 会以系统默认的颜色来进行显示字体颜色和背景颜色,通常情况下会是文字是黑色,背景色是白色。但是我们可以设置不同的颜色。同时,我们也可以设置 label 的大小,使用 width 和 height 来修改 Label 的宽和高。
- label = tk.Label(
- text="Hello, Tkinter",
- foreground="white", # Set the text color to white
- background="#34A2FE", # Set the background color to black
- width = 10,
- height= 10
- )
最终的显示效果如下所示:
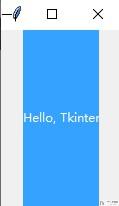
我们看到,上面将 width 和 height 都设置为 10,但是最终的形状不是正方形。这是因为这里宽和高都是字符单位。(This is because the width and height are measured in text units.)
- 一个水平单位的宽度是由「0」的宽度决定的;
- 一个垂直单位的高度是有「0」的高度决定的;
如果要修改 Label 的中的 text 的内容,可以直接指定 text 来进行修改,下面是一个简单的例子。
- self.tmpLabel2['text'] = '修改后的名称'
使用 Button 显示可点击按钮
Button 可以用来显示可点击的按钮。他可以在设置用定义一个函数,每当点击这个 Button 都可以触发这个函数。我们可以理解 Button 就是一个可以点击的 Label,创建的方式就和上面创建 Label 的方式是一样的。
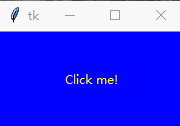
- button = tk.Button(
- text="Click me!",
- width=25,
- height=5,
- background="blue",
- foreground="yellow",
- )
当我们点击此时的 Button 的时候,会有一个动画效果:
使用 Entry 获得用户的输入
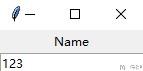
当我们需要从用户处获得一些文本的时候,例如姓名,或是邮件地址,我们需要使用 Entry 这个组件。他可以显示一个小的文本框,用户可以在其中进行打字。创建 Entry 的方式和上面创建 Label 和 Button 的方式非常的相似。
- window = tk.Tk() # 首先对 tkinter 的 Tk 进行实例化,创建一个 windows
- label = tk.Label(text="Name")
- entry = tk.Entry()
- label.pack() # 将 widget 添加到 windows。这里使用 pack 添加
- entry.pack()
- window.mainloop() # run event loop
我们可以通过下面的三种方式,来丢 Entry 中的内容进行修改和操作:
- Retrieving text with
.get(),例如上面可以使用 entry.get 来获得 Entry 中的内容。 - Deleting text with
.delete(),这里 delete 的输入是一个或多个整数。- 若是
entry.delete(0),则表示删除第一个字符; - 若是
entry.delete(0,4),则表示删除前四个字符; - 若是
entry.delete(0, tk.END),则表示删除所有的字符;
- 若是
- Inserting text with
.insert()entry.insert(0, "Python"),在指定位置插入字符;- 我们可以使用 insert 来设置 Entry 的默认的显示内容;
使用 Text 获得用户的多行输入
Text widgets 可以用来输入文本,就像上面介绍的 Entry 一样。但是 Entry 和 Text 不同在于,Text可以包含多行的文本。使用 Text,用户可以输入一整个段落。就像 Entry 一样,Text 也有三个主要的功能,分别如下所示,这里的使用与上面的 Entry 会稍有不同:
- Retrieve text with
.get()- 因为 Text 可以输入多行多列的内容,所以这里 get会有多个参数;
- 例如,
text_box.get("1.0"),表示 first character on the first line; - 例如,
text_box.get("2.4"),表示 the fourth character on the second line; - 例如,text_box.get("1.0", "1.5"),表示第一行的第一个字符到第四个字符(这里 end index 要比最后一个 index 要大 1)。
- Delete text with
.delete()- 例如,
text_box.delete("1.0", tk.END),表示整个 Text 的框的清空。
- 例如,
- Insert text with
.insert()- 例如,
text_box.insert(tk.END, "\nPut me on a new line!"),表示在末尾添加一个新的一行。
- 例如,
下面我们来使用 Text 来创建一个 Text 来做一个简单的例子。
- text_box = tk.Text()
- text_box.pack()
这时候默认情况下,使用 Text 会创建出一个更大的空间。
使用 Frame 将 Widget 分配到 Frame
Frame widgets 是用来组织我们在一个应用中的 widget 的布局的。(Frame widgets are important for organizing the layout of your widgets in an application.)
首先我们看一下 Frame 是如何工作的,如何可以将 widget 分配给 Frame。下面我们创建一个空的 Frame 并将其分配到主应用程序的窗口。
- window = tk.Tk() # 首先对 tkinter 的 Tk 进行实例化,创建一个 windows
- frame = tk.Frame()
- frame.pack()
- window.mainloop() # run event loop
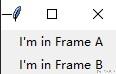
一个空的 Frame 是不可见的。Frame 是其他的组件的容器。你可以分配一个组件到 Frame 中。我们可以创建两个 Label,添加到 Frame 中去。
- frame = tk.Frame()
- label_a = tk.Label(master=frame, text="I'm in Frame A")
- label_b = tk.Label(master=frame, text="I'm in Frame B")
- label_a.pack()
- label_b.pack()
- frame.pack()
上面我们介绍的四个组件,Label, Button, Entry, and Text,都有一个 master 属性。我们可以使用 master 来安排各个组件之间的布局。 Frame 移动之后,Frame 中的所有组件都会一起进行移动。
调整 Frame 的外观
Frame widgets 可以通过调整 relief 属性来创建一个 border。relief 可以按照下面的值来进行设置:
tk.FLAT: Has no border effect (the default value).tk.SUNKEN: Creates a sunken effect.tk.RAISED: Creates a raised effect.tk.GROOVE: Creates a grooved border effect.tk.RIDGE: Creates a ridged effect.
为了能让 border 有作用,我们需要设置 borderwidth,让他的值大于1。下面我们依次来看一下上面五种不同的效果:
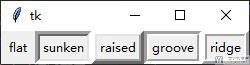
我们对着上面的图像,简单解释一下这五种属性值的不同效果:
tk.FLATcreates a frame that appears to be flat.tk.SUNKENadds a border that gives the frame the appearance of being sunken into the window.tk.RAISEDgives the frame a border that makes it appear to protrude from the screen.tk.GROOVEadds a border that appears as a sunken groove around an otherwise flat frame.tk.RIDGEgives the appearance of a raised lip around the edge of the frame.
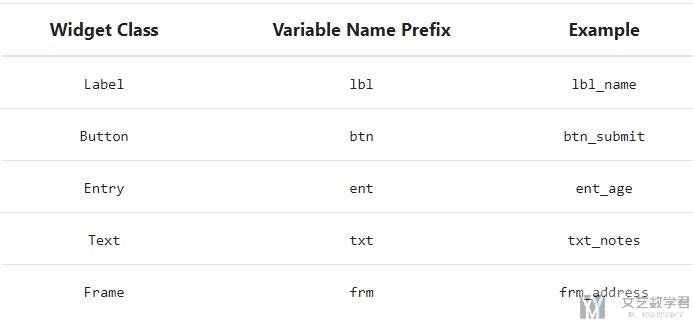
关于组件命名的约定
当我们创建一个组件的时候,我们可以使用任意的名称。但是一个比较好的做法是,我们将组件的名称也设置为与其组件有关的名称。例如,一个 Label 组件是用来显示用户的名称,我们可以使用 label_user_name 来进行命名。
如果不想使用全名,我们可以按照下面的约定使用一些名称的缩写,当然这个也是一种约定,还是以方便阅读代码为主:
Tkinter 中的布局介绍
在上面我们使用 pack 来调整 GUI 的布局。(Application layout in Tkinter is controlled with geometry managers)在 Tkinter 中,除了可以使用 pack 来调整 GUI 的布局之外,还有下面的两种方式来进行调整。
.place().grid()
我们会对上面的三种布局进行一一的介绍。实际在使用的时候,还是.grid()的布局方式使用得会更多一些。
使用 pack 来进行布局
.pack() uses a packing algorithm to place widgets in a Frame or window in a specified order. For a given widget, the packing algorithm has two primary steps:
- Compute a rectangular area called a parcel that's just tall (or wide) enough to hold the widget and fills the remaining width (or height) in the window with blank space.
- Center the widget in the parcel unless a different location is specified.
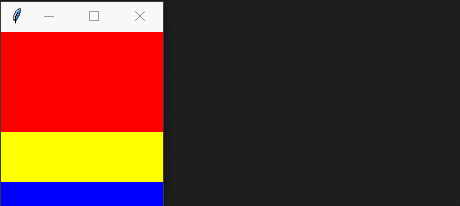
下面简单来看一个 pack 的例子。这里我们在 pack 里设置参数 fill。这个表示 tk.X 表示从水平方向进行填充。需要注意的 pack 会自动把水平的内容全部填充满。
- import tkinter as tk
- window = tk.Tk() # 首先对 tkinter 的 Tk 进行实例化,创建一个 windows
- frame1 = tk.Frame(master=window, height=100, bg="red")
- frame1.pack(fill=tk.X)
- frame2 = tk.Frame(master=window, height=50, bg="yellow")
- frame2.pack(fill=tk.X)
- frame3 = tk.Frame(master=window, height=25, bg="blue")
- frame3.pack(fill=tk.X)
- window.mainloop() # run event loop
可以看到,当我们水平拉伸的时候,会自动填充满。
这里 pack 除了可以水平进行布局之外,还可以垂直进行布局。pack 有下面的一些选项可以选择。
tk.TOPtk.BOTTOMtk.LEFTtk.RIGHT
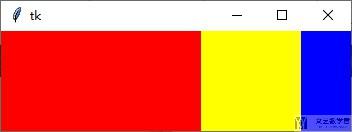
默认情况,是使用tk.TOP来进行布局的。他会将一个新的组件布局到最顶部。例如使用 tk.LEFT 可以将所有的组件,从左到右进行布局。这个时候需要使用 fill=tk.Y,来使得水平方向可以进行填充。
- import tkinter as tk
- window = tk.Tk() # 首先对 tkinter 的 Tk 进行实例化,创建一个 windows
- frame1 = tk.Frame(master=window, width=200, height=100, bg="red")
- frame1.pack(fill=tk.Y, side=tk.LEFT)
- frame2 = tk.Frame(master=window, width=100, bg="yellow")
- frame2.pack(fill=tk.Y, side=tk.LEFT)
- frame3 = tk.Frame(master=window, width=50, bg="blue")
- frame3.pack(fill=tk.Y, side=tk.LEFT)
- window.mainloop() # run event loop
可以看到最终的布局,是从左到右进行布局的。
关于 fill,我们还可以设置 tk.BOTH。同时我们将 expand 设置为 True。(Just like when you set fill=tk.X to make the frames responsive when you resized the window horizontally, you can set fill=tk.Y to make the frames responsive when you resize the window vertically. To make the layout truly responsive, you can set an initial size for your frames using the width and height attributes. Then, set the fill keyword argument of .pack() to tk.BOTH and set the expand keyword argument to True.)
使用 place 来进行布局
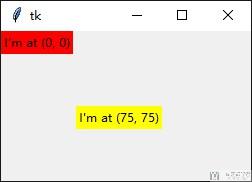
我们可以使用 place 来控制详细的位置。使用 place 来进行控制的时候,我们必须给出两个参数,分别是 x 和 y,分别表示 x 和 y 的坐标。(Both x and y are measured in pixels, not text units.)
这里 x 和 y 是相对于左上角的位置。x 可以理解为距离窗口左侧的距离,y 可以理解为距离窗口上册的距离。
- import tkinter as tk
- window = tk.Tk() # 首先对 tkinter 的 Tk 进行实例化,创建一个 windows
- frame = tk.Frame(master=window, width=250, height=150)
- frame.pack()
- label1 = tk.Label(master=frame, text="I'm at (0, 0)", bg="red")
- label1.place(x=0, y=0)
- label2 = tk.Label(master=frame, text="I'm at (75, 75)", bg="yellow")
- label2.place(x=75, y=75)
- window.mainloop() # run event loop
下面是简单的使用 place 的效果:
但是.place() 不经常被使用,他有下面两个缺点:
- Layout can be difficult to manage with
.place(). This is especially true if your application has lots of widgets. - Layouts created with
.place()are not responsive. They don't change as the window is resized. (窗口大小改变之后,布局不会改变,不是响应式的)
使用 grid 来进行布局
在实际使用之中,.grid() 是经常被使用的。他可以完成所有 .pack() 的工作。.grid() 将一个 window 或是 Frame 分成多个行和列。我们可以指定组件(widget)在具体哪一行,哪一列。下面我们创建一个 3 × 3 的网格,将 Label widgets 放在每一个网格里面。同时,我们可以使用下面两个参数控制 grid 之间的间距。(在 pack 中,同样也有这两个参数,我们在下面的例子中进行说明)
padxadds padding in the horizontal direction.padyadds padding in the vertical direction.
- import tkinter as tk
- window = tk.Tk()
- for i in range(3):
- for j in range(3):
- frame = tk.Frame(
- master=window,
- relief=tk.RAISED,
- borderwidth=1
- )
- frame.grid(row=i, column=j, padx=5, pady=5)
- label = tk.Label(master=frame, text=f"Row {i}\nColumn {j}")
- label.pack(padx=5, pady=5)
- window.mainloop()
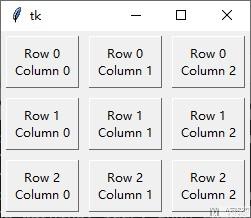
在上面的代码中,我们有 9 个 frame,每一个 frame 我们使用 grid 来给出具体的位置。最后将 Label 使用 pack 到 指定的 frame 上面。关于 grid 的使用,可以看下面例子中登录界面的构造。
最后可以出现如下所示的 GUI 界面:
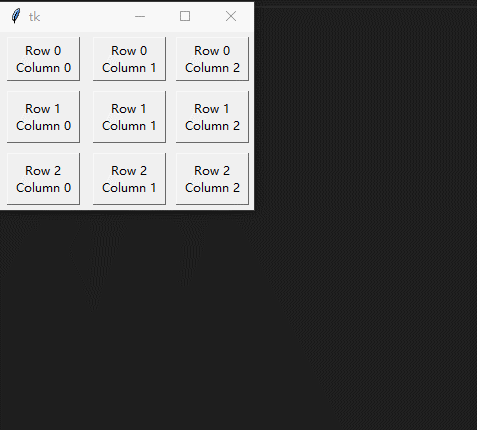
上面的窗口不是自适应的,当我们放大窗口之后,这些 Label 还是在原始的位置。我们可以使用.columnconfigure() 和 .rowconfigure() 来进行窗口的自适应调整。关于这两个方法有下面三个参数可以进行设置:
- The index of the grid column or row that you want to configure (or a list of indices to configure multiple rows or columns at the same time)
- A keyword argument called
weightthat determines how the column or row should respond to window resizing, relative to the other columns and rows. 默认 weight 是 0,也就是不会随着窗口的变化而变化。If every column and row is given a weight of1, then they all grow at the same rate. - A keyword argument called
minsizethat sets the minimum size of the row height or column width in pixels
为了看出效果,我们只对第一行和第一列进行自适应的设置:
- import tkinter as tk
- window = tk.Tk()
- window.columnconfigure(0, weight=1, minsize=75)
- window.rowconfigure(0, weight=1, minsize=50)
- for i in range(3):
- for j in range(3):
- frame = tk.Frame(
- master=window,
- relief=tk.RAISED,
- borderwidth=1
- )
- frame.grid(row=i, column=j, padx=5, pady=5)
- label = tk.Label(master=frame, text=f"Row {i}\nColumn {j}")
- label.pack(padx=5, pady=5)
- window.mainloop()
最终的效果如下图所示:
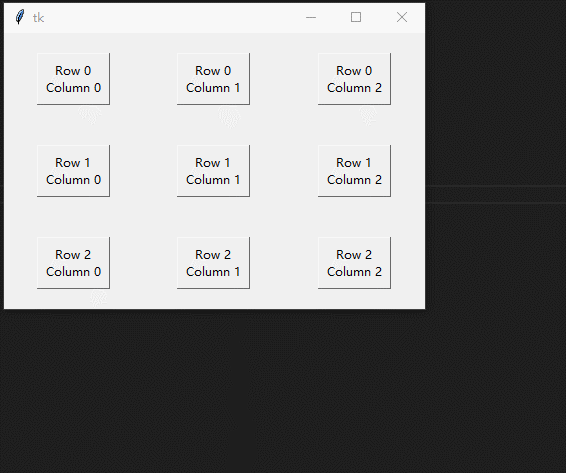
如果我们对所有行和列都进行自适应:
- import tkinter as tk
- window = tk.Tk()
- window.columnconfigure(0, weight=1, minsize=75)
- window.rowconfigure(0, weight=1, minsize=50)
- window.columnconfigure(1, weight=1, minsize=75)
- window.rowconfigure(1, weight=1, minsize=50)
- window.columnconfigure(2, weight=1, minsize=75)
- window.rowconfigure(2, weight=1, minsize=50)
- for i in range(3):
- for j in range(3):
- frame = tk.Frame(
- master=window,
- relief=tk.RAISED,
- borderwidth=1
- )
- frame.grid(row=i, column=j, padx=5, pady=5)
- label = tk.Label(master=frame, text=f"Row {i}\nColumn {j}")
- label.pack(padx=5, pady=5)
- window.mainloop()
会有如下的效果:
进一步理解 gird 布局-固定位置
在 grid 中, 有一个 sticky 的参数,可以设置组件的位置。都可以接受下面的参数:
"n"or"N"to align to the top-center part of the cell"e"or"E"to align to the right-center side of the cell"s"or"S"to align to the bottom-center part of the cell"w"or"W"to align to the left-center side of the cell
这里除了可以接受一个参数之外,还可以接受多个字母的组合:
- You can specify
"ns"to force the widget to fill the cell in the vertical direction; - You can specify
"ew"to fill the cell in the horizontal direction; - To fill the entire cell, set
stickyto"nsew";
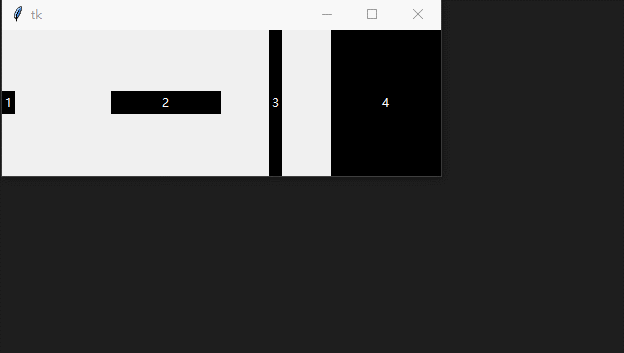
这里我们创建一个 1 × 4 的网格,来看一下上面的效果:
- import tkinter as tk
- window = tk.Tk()
- window.rowconfigure([0], weight=1, minsize=100)
- window.columnconfigure([0, 1, 2, 3], weight=1, minsize=100)
- label1 = tk.Label(text="1", bg="black", fg="white")
- label2 = tk.Label(text="2", bg="black", fg="white")
- label3 = tk.Label(text="3", bg="black", fg="white")
- label4 = tk.Label(text="4", bg="black", fg="white")
- label1.grid(row=0, column=0, sticky='w')
- label2.grid(row=0, column=1, sticky="ew")
- label3.grid(row=0, column=2, sticky="ns")
- label4.grid(row=0, column=3, sticky="nsew")
- window.mainloop()
可以出现下面的效果,其中:
- Label 1 是靠在左侧;
- Label 2 是填充了整个的水平的方向;
- Label 3 是填充了整个垂直的方向;
- Label 4 是填充满了整个 cell;
Tkinter 程序可交互设计
上面我们已经知道了如何创建一个窗口,并且知道了如何添加一些组件,同时来控制整个应用的布局。下面我们会来介绍如何使得这些组件可以进行交互。
Using Events and Event Handlers
当我们使用 Tkinter 的应用的时候,我们会在最后使用 window.mainloop() 来开始 event loop。在 event loop 的时候,我们的应用会检查是否有 event (事件)发生,如果检测到一些事件发生,那么一些代码会执行。在 Tkinter 中,我们写的函数 event handlers 来响应相关的 event。
例如下面是一个简单的例子,我们创建一个函数(event handlers)来处理event。
- import tkinter as tk
- # Create a window object
- window = tk.Tk()
- # Create an event handler
- def handle_keypress(event):
- """Print the character associated to the key pressed"""
- print(event.char)
- # Run the event loop
- window.mainloop()
.bind() -指定触发条件和触发函数
上面我们定义了一个函数,那么什么时候会调用此函数呢。我们使用 .bind() 来将一个函数与组件进行绑定。例如下面我们将其与 keypress 进行绑定。当我们按下键盘的时候,会进行打印。
- import tkinter as tk
- window = tk.Tk()
- def handle_keypress(event):
- """Print the character associated to the key pressed"""
- print(event.char)
- # Bind keypress event to handle_keypress()
- window.bind("<Key>", handle_keypress)
- window.mainloop()
.bind() 也需要两个参数的输入:
- An event that's represented by a string of the form
"<event_name>", whereevent_namecan be any of Tkinter's events (一个 Tkinter 中对应的 event,可以理解为触发下面函数的条件。这里是键盘上输入任何字母进行触发) - An event handler that's the name of the function to be called whenever the event occurs (自定义函数的名称)
上面我们将其绑定在 windows 上面。我们也可以将其绑定在任意的组件上面。下面我们将其绑定在 Button 上面。
- import tkinter as tk
- window = tk.Tk()
- def handle_click(event):
- print("The button was clicked!")
- button = tk.Button(text="Click me!")
- button.bind("<Button-1>", handle_click)
- button.pack()
- window.mainloop()
我们这里使用 "<Button-1>" 进行触发函数。这里 "<Button-1>" 表示鼠标左键点击。关于鼠标的 event 有以下几个:
"<Button-1>"for the left mouse button."<Button-2>"for the middle mouse button."<Button-3>"for the right mouse button.
关于更多的 event,可以查看下面的链接,Tkinter 8.5 reference: a GUI for Python
command的使用-Button 触发
每一个 Button 组件有一个 command 的属性,我们可以指定一个函数。每当这个按钮被点击的时候,这个函数都会被触发。
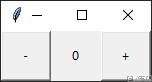
下面我们创建一个小的应用。一个窗口中间有一个数字,左侧和右侧都有一个 Button,点击左侧的按钮,中间的数字减一,点击右侧的按钮,中间的数字加一。
我们首先做出窗口的样子:
- import tkinter as tk
- window = tk.Tk()
- window.rowconfigure(0, minsize=50, weight=1)
- window.columnconfigure([0, 1, 2], minsize=50, weight=1)
- btn_decrease = tk.Button(master=window, text="-")
- btn_decrease.grid(row=0, column=0, sticky="nsew")
- lbl_value = tk.Label(master=window, text="0")
- lbl_value.grid(row=0, column=1)
- btn_increase = tk.Button(master=window, text="+")
- btn_increase.grid(row=0, column=2, sticky="nsew")
- window.mainloop()
效果图如下所示:
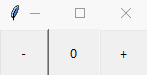
下面我们给这两个 Button 设置相应的函数,这里的函数需要有两个功能:
- 获得 Label 的值;
- 修改 Label 的值;
首先我们看一下加号按键函数的定义,每次点击加号,Label 数字都会增加1。
- def increase():
- value = int(lbl_value["text"])
- lbl_value["text"] = f"{value + 1}"
同样,减号也可以使用同样方式来进行定义:
- def decrease():
- value = int(lbl_value["text"])
- lbl_value["text"] = f"{value - 1}"
在定义好这两个函数之后,我们需要将其与 Button 进行绑定。直接在 Button 上使用 command 即可。
- btn_decrease = tk.Button(master=window, text="-", command=decrease)
- btn_increase = tk.Button(master=window, text="+", command=increase)
最后的效果如下所示:
最终完整的代码如下所示:
- import tkinter as tk
- window = tk.Tk()
- def increase():
- value = int(lbl_value["text"])
- lbl_value["text"] = f"{value + 1}"
- def decrease():
- value = int(lbl_value["text"])
- lbl_value["text"] = f"{value - 1}"
- window.rowconfigure(0, minsize=50, weight=1)
- window.columnconfigure([0, 1, 2], minsize=50, weight=1)
- btn_decrease = tk.Button(master=window, text="-", command=decrease)
- btn_decrease.grid(row=0, column=0, sticky="nsew")
- lbl_value = tk.Label(master=window, text="0")
- lbl_value.grid(row=0, column=1)
- btn_increase = tk.Button(master=window, text="+", command=increase)
- btn_increase.grid(row=0, column=2, sticky="nsew")
- window.mainloop()
获得坐标
我们可以使用 x.event 或是 y.event 来获得当前窗口的坐标,但是如果我们在 canvas 中有滚动的时候(scroll down),上面只能获得相对的位置。我们需要使用下面的方法来获得绝对的位置。
- x = canvas.canvasx(event.x)
- y = canvas.canvasy(event.y)
参考资料,Python, Tkinter: How to get coordinates on scrollable canvas
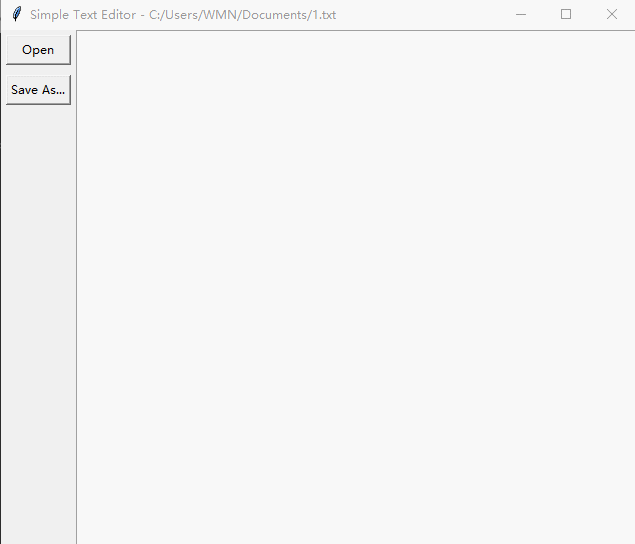
使用 Tkinter 完成一个文本编辑器
在这一部分我们会编辑一个文本编辑器,包含创建,打开,编辑和保存 text files 的功能。这个文本编辑器有下面的三个主要的元素:
- A
Buttonwidget calledbtn_openfor opening a file for editing - A
Buttonwidget calledbtn_savefor saving a file - A
TextBoxwidget calledtxt_editfor creating and editing the text file
这三个部分的分布如下图所示,两个 Button 安排在 window 的左侧,一个 text box 在 window 的右侧(一些其他详细的要求,The whole window should have a minimum height of 800 pixels, and txt_edit should have a minimum width of 800 pixels. The whole layout should be responsive so that if the window is resized, then txt_edit is resized as well. The width of the Frame holding the buttons should not change, however.):
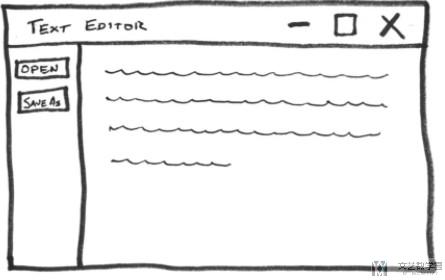
应用布局的设计
为了设置窗口的窗口的最小大小,我们在.rowconfigure() 和 .columnconfigure() 设置最小值 800。为了使得窗口是响应式的,我们设置 weight 的值是1。下面是关于布局部分的代码:
- import tkinter as tk
- window = tk.Tk()
- window.title("Simple Text Editor")
- window.rowconfigure(0, minsize=800, weight=1) # 设置第一行的高度是800
- window.columnconfigure(1, minsize=800, weight=1) # 设置第一列的宽度是800
- # 定义右侧文本输入区域
- txt_edit = tk.Text(window)
- # 定义左侧的按钮区域
- fr_buttons = tk.Frame(window)
- btn_open = tk.Button(master=fr_buttons, text="Open")
- btn_save = tk.Button(master=fr_buttons, text="Save As...")
- # -------- GUI ---------
- fr_buttons.grid(row=0, column=0, sticky="ns") # 设置按钮的布局
- txt_edit.grid(row=0, column=1, sticky="nsew") # 设置文本编辑框的布局
- btn_open.grid(row=0, column=0, sticky='ew', padx=5, pady=5)
- btn_save.grid(row=1, column=0, sticky='ew', padx=5, pady=5)
- window.mainloop()
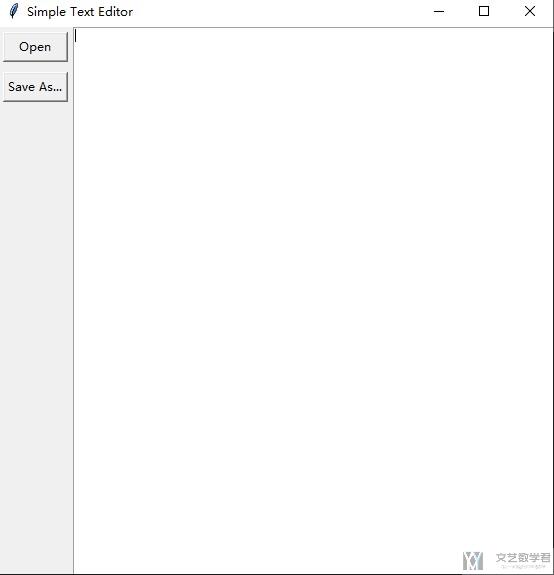
在上面代码中,我们首先定义了不同的组件,接着我们定义了组件之间的布局。最终的效果图如下所示:
打开文件功能的设计
在完成了上面的布局的设计之后,我们需要设计一些功能。首先我们定义一个打开文件的功能,这个需要可以打开一个对话框,可以使得用户进行文件的选择。下面是一个打开文件部分的代码:
- 首先调用 askopenfilename 来显示文件选择的对话框;
- 接着确认用户是否选择了对应的文件,还是把选择的对话框关闭了;
- 在打开文件之前,会对编辑区域的所有内容进行清空;
- 接着打开文件,把文件的所有内容插入到编辑器中;
- from tkinter.filedialog import askopenfilename
- def open_file():
- """Open a file for editing."""
- filepath = askopenfilename(
- filetypes=[("Text Files", "*.txt"), ("All Files", "*.*")]
- )
- if not filepath: # 判断用户是否选择了文件
- return
- txt_edit.delete("1.0", tk.END) # 清空当前的区域
- with open(filepath, "r") as input_file:
- text = input_file.read()
- txt_edit.insert(tk.END, text)
- window.title(f"Simple Text Editor - {filepath}")
最后将此函数与上面的 Button 进行绑定即可。
- btn_open = tk.Button(master=fr_buttons, text="Open", command=open_file)
文件保存功能的设计
下面我们设计保存文件的 Button。这个需要也需要打开一个文件的对话框,用户选择哪里进行保存。这个可以使用 tkinter.filedialog 中的 asksaveasfilename 来完成。接着,这个方法需要提取 txt_edit 中的文字内容,将其保存到指定的文件中。
- def save_file():
- """Save the current file as a new file."""
- filepath = asksaveasfilename(
- defaultextension="txt",
- filetypes=[("Text Files", "*.txt"), ("All Files", "*.*")],
- )
- if not filepath:
- return
- with open(filepath, "w") as output_file:
- text = txt_edit.get("1.0", tk.END)
- output_file.write(text)
- window.title(f"Simple Text Editor - {filepath}")
同样,我们也要将这个函数绑定到指定的 Button 中去。
- btn_save = tk.Button(master=fr_buttons, text="Save As...", command=save_file)
文本编辑器完整操作
下面是上面介绍的文本编辑器完整的代码:
- import tkinter as tk
- from tkinter.filedialog import askopenfilename, asksaveasfilename
- def open_file():
- """Open a file for editing."""
- filepath = askopenfilename(
- filetypes=[("Text Files", "*.txt"), ("All Files", "*.*")]
- )
- if not filepath: # 判断用户是否选择了文件
- return
- txt_edit.delete("1.0", tk.END)
- with open(filepath, "r") as input_file:
- text = input_file.read()
- txt_edit.insert(tk.END, text)
- window.title(f"Simple Text Editor - {filepath}")
- def save_file():
- """Save the current file as a new file."""
- filepath = asksaveasfilename(
- defaultextension="txt",
- filetypes=[("Text Files", "*.txt"), ("All Files", "*.*")],
- )
- if not filepath:
- return
- with open(filepath, "w") as output_file:
- text = txt_edit.get("1.0", tk.END)
- output_file.write(text)
- window.title(f"Simple Text Editor - {filepath}")
- window = tk.Tk()
- window.title("Simple Text Editor")
- window.rowconfigure(0, minsize=800, weight=1) # 设置第一行的高度是800
- window.columnconfigure(1, minsize=800, weight=1) # 设置第一列的宽度是800
- # 定义右侧文本输入区域
- txt_edit = tk.Text(window)
- # 定义左侧的按钮区域
- fr_buttons = tk.Frame(window)
- btn_open = tk.Button(master=fr_buttons, text="Open", command=open_file)
- btn_save = tk.Button(master=fr_buttons, text="Save As...", command=save_file)
- # -------- GUI ---------
- fr_buttons.grid(row=0, column=0, sticky="ns") # 设置按钮的布局
- txt_edit.grid(row=0, column=1, sticky="nsew") # 设置文本编辑框的布局
- btn_open.grid(row=0, column=0, sticky='ew', padx=5, pady=5)
- btn_save.grid(row=1, column=0, sticky='ew', padx=5, pady=5)
- window.mainloop()
最后我们看一下完整的操作流程,这里包括输入文字,保存文件,打开文件:
更多关于 tkinter
ImportError: No module named 'Tkinter'
需要安装如下的内容即可:
- sudo apt-get install python3-tk
设置窗口大小和固定窗口大小
有的时候我们不需要程序是可以自适应窗口大小的,我们可以直接将窗口大小进行固定,如下所是:
- mw.geometry("500x500") #You want the size of the app to be 500x500
- mw.resizable(0, 0) #Don't allow resizing in the x or y direction
Tkinter 更加现代化的界面
直接使用 tkinter 的界面会比较原始,我们可以使用 CustomTkinter 使其变得「现代化」一些。真的是只有一些。
CustomTkinter的大部分用法与 tkinter 是一样的,我们只需要使用他定义好的组件即可。详细的内容可以参考仓库说明,Github-CustomTkinter。
- 微信公众号
- 关注微信公众号
-

- QQ群
- 我们的QQ群号
-


评论