文章目录(Table of Contents)
介绍
关于图像的风格迁移,最早是来源与论文 A Neural Algorithm of Artistic Style,在这篇论文中,作者给出了一种模仿图像 content 和 style 的方式,他原文做出的效果如下所示:
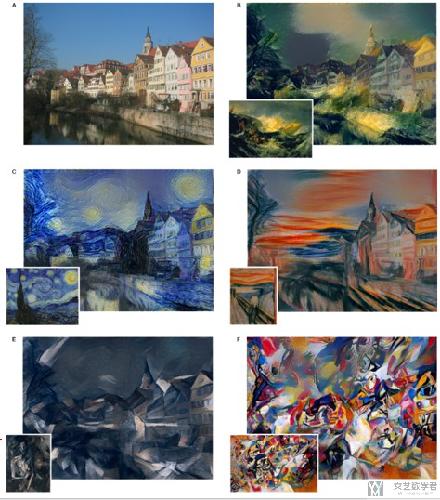
下面简单说明一下原理,最后会给出详细的实现的过程。这里有一篇文章也是介绍风格迁移的原理的,我觉得写的很不错,链接放在这里,大家可以看一下。
参考资料
- Neural Networks Intuitions: 2. Dot product, Gram Matrix and Neural Style Transfer
- Github : Image Style Transform,本文完整的代码;
原理介绍
首先整个网络的构成大概如下面所示,CNN 的层是可以更深,我这里为了方便就画了一层。输入有三个,Content Image,Style Image 和 Random Image,我们希望最后 Random Image 在内容上可以接近 Content Image,在风格上可以接近 Style Image。
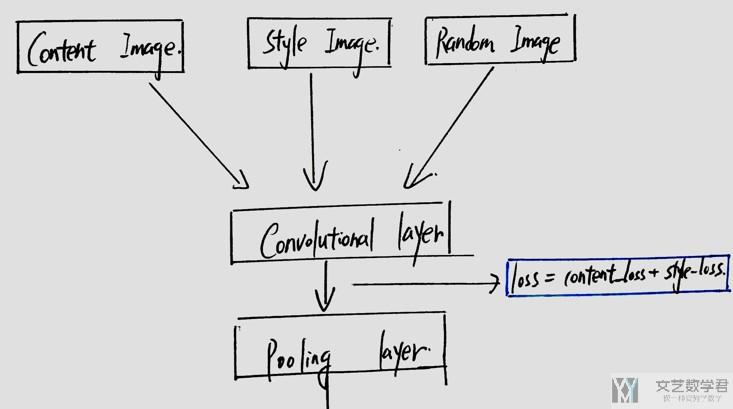
于是我们就会即希望 Loss=ContentLoss+StyleLoss 可以尽量小。下面我们看一下如何定义 ContentLoss 和 StyleLoss。
Content Loss
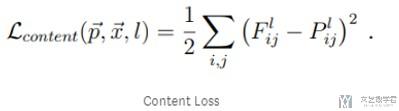
关于 ContentLoss 的计算,是 Content Image 和 Random Image 在 Convolutional Layer 的输出逐像素点相减的平方(MSE)。这个还是比较好理解的。简单看一下下面的式子。(一会可以看下面的代码来进行分析)
Style Loss
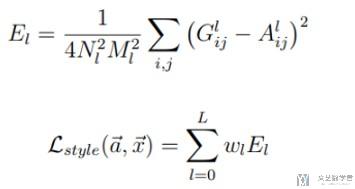
关于 Style Loss 是这样计算的,计算卷积层输出的 Gram Matrix (Style Image 和 Random Image 的 Gram Matrix 都会计算);最后计算两者 Gram Matrix 的差值,希望越接近越好。
关于 Gram Matrix 的计算如下所示。
我们看一个例子来理解一下 Gram Matrix 是如何进行计算的。
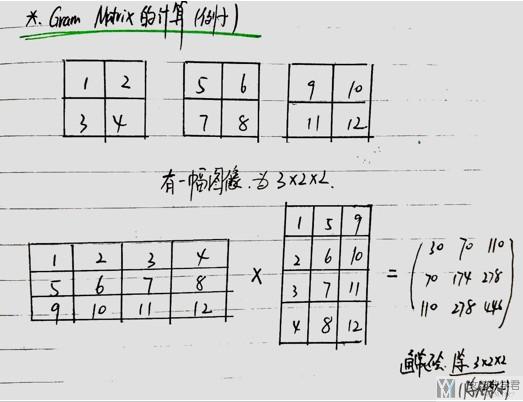
- 我们看到,
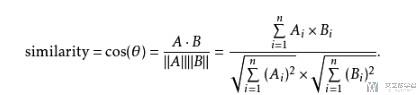
Gram Matrix是没有考虑像素点之间的关系的,最后输出大小只和 filter 的个数有关。(上面的例子是三通道的,所以最后的输出是 3×3 的矩阵) - 他只考虑了两个 feature map 的距离的远近。其实仔细看计算,这个就是在计算余弦距离。关于余弦距离的计算看下面图片,可以看到也是两个向量的相乘,再除模长,与这里的计算是一样的。
- 我们可以认为一个 filter 其实表示一个特征,于是 Gram Matrix 可以表示出特征出现的关系。
- 所以说,我们可以通过计算 Gram Matrix 的差,来计算两张图片风格上的差距。
- 有了两个 Loss 之后,就是进行梯度下降即可。下面看一下详细的实现过程。
下面是余弦距离的计算公式。
代码实现
准备工作
首先做好准备的工作,导入相应要使用的库和定义device。
- import torch
- import torch.nn as nn
- import torch.nn.functional as F
- import torch.optim as optim
- from PIL import Image
- import matplotlib.pyplot as plt
- import torchvision.transforms as transforms
- import torchvision.models as models
- import numpy as np
- import copycopy
- import os
定义device, 判断是否使用cuda
- device = torch.device('cuda' if torch.cuda.is_available() else 'cpu')
定义一些工具函数
下面函数主要是为了加载图片来使用的,将图片转为tensor,同时进行放缩。
- def image_loader(image_name,imsize):
- """图片load函数
- """
- # 转换图片大小
- loader = transforms.Compose([
- transforms.Resize(imsize), # scale imported image
- transforms.ToTensor()]) # transform it into a torch tensor
- image = Image.open(image_name)
- # fake batch dimension required to fit network's input dimensions
- image = loader(image).unsqueeze(0)
- return image.to(device, torch.float)
- def image_util(img_size=512,style_img="./images/picasso.jpg", content_img="./images/dancing.jpg"):
- """返回style_image和content_image
- 需要保证两张图片的大小是一样的
- """
- imsize = img_size if torch.cuda.is_available() else 128 # use small size if no gpu
- # 加载图片
- style_img = image_loader(image_name=style_img, imsize=img_size)
- content_img = image_loader(image_name=content_img, imsize=img_size)
- # 判断是否加载成功
- print("Style Image Size:{}".format(style_img.size()))
- print("Content Image Size:{}".format(content_img.size()))
- assert style_img.size() == content_img.size(), \
- "we need to import style and content images of the same size"
- return style_img, content_img
定义Content Loss
我们上面介绍了,Content Loss是Content Image和Random Image在卷积层的输出计算MSE,即像素两两相减,于是可以很容易写出Content Loss。
- class ContentLoss(nn.Module):
- def __init__(self, target,):
- super(ContentLoss, self).__init__()
- # we 'detach' the target content from the tree used
- # to dynamically compute the gradient: this is a stated value,
- # not a variable. Otherwise the forward method of the criterion
- # will throw an error.
- self.target = target.detach()
- def forward(self, input):
- self.loss = F.mse_loss(input, self.target)
- return input
定义Style Loss
上面见过,计算Style Loss的,其实就是计算Style Image和Random Image两个图片的Gram Matrix的MSE,所以我们先定义如何计算Gram Matrix.
下面对原始数据做view,是为了做一次矩阵乘法就可以得到Gram Matrix,与我上面画的Gram Matrix的计算的例子相同的意思。
- # 我们首先定义 Gram Matrix
- def gram_matrix(input):
- a, b, c, d = input.size() # a=batch size(=1)
- # b=number of feature maps
- # (c,d)=dimensions of a f. map (N=c*d)
- features = input.view(a * b, c * d) # resise F_XL into \hat F_XL
- G = torch.mm(features, features.t()) # compute the gram product
- # print(G)
- # 对Gram Matrix做正规化, 除总的大小
- return G.div(a * b * c * d)
接着我们就可以计算Style Loss了。
- # 接着我们就可以定义Style Loss了
- class StyleLoss(nn.Module):
- def __init__(self, target_feature):
- super(StyleLoss, self).__init__()
- self.target = gram_matrix(target_feature).detach()
- def forward(self, input):
- G = gram_matrix(input)
- self.loss = F.mse_loss(G, self.target)
- return input
修改VGG网络
我们在这里是使用预训练好的VGG16的网路,但是因为我们要获取中间网络的输出,所以我们可以重新写一下。
首先定义一个标准化的类,因为VGG16对所有输入进行了标准化,我们也要进行同样的操作。
- # -------------------
- # 模型的标准化
- # 因为原始的VGG网络对图片做了normalization, 所在要把下面的Normalization放在新的网络的第一层
- # -------------------
- class Normalization(nn.Module):
- def __init__(self, mean, std):
- super(Normalization, self).__init__()
- # .view the mean and std to make them [C x 1 x 1] so that they can
- # directly work with image Tensor of shape [B x C x H x W].
- # B is batch size. C is number of channels. H is height and W is width.
- self.mean = mean.view(-1, 1, 1)
- self.std = std.view(-1, 1, 1)
- def forward(self, img):
- # normalize img
- return (img - self.mean) / self.std
我们将上面定义的ContentLoss和StyleLoss这两个类,加到网络指定的层后面,为了方便我们获取输出的值,其实我们也可以可以使用hook来完成相同的操作,具体可以看,CNN可视化Convolutional Features。
- # --------------------------------
- # 网络结构的修改, 生成一个style的网络
- # --------------------------------
- def get_style_model_and_losses(cnn, normalization_mean, normalization_std,
- style_img, content_img,
- content_layers,
- style_layers):
- # 复制cnn的网络部分
- cnn = copy.deepcopy(cnn)
- # normalization module
- normalization = Normalization(normalization_mean, normalization_std).to(device)
- # just in order to have an iterable access to or list of content/syle
- # losses
- content_losses = []
- style_losses = []
- # assuming that cnn is a nn.Sequential, so we make a new nn.Sequential
- # to put in modules that are supposed to be activated sequentially
- # 之后逐层向model里面增加内容
- model = nn.Sequential(normalization)
- i = 0 # increment every time we see a conv
- for layer in cnn.children():
- if isinstance(layer, nn.Conv2d):
- i += 1
- name = 'conv_{}'.format(i)
- elif isinstance(layer, nn.ReLU):
- name = 'relu_{}'.format(i)
- # The in-place version doesn't play very nicely with the ContentLoss
- # and StyleLoss we insert below. So we replace with out-of-place
- # ones here.
- layer = nn.ReLU(inplace=False)
- elif isinstance(layer, nn.MaxPool2d):
- name = 'pool_{}'.format(i)
- elif isinstance(layer, nn.BatchNorm2d):
- name = 'bn_{}'.format(i)
- else:
- raise RuntimeError('Unrecognized layer: {}'.format(layer.__class__.__name__))
- model.add_module(name, layer)
- if name in content_layers:
- # add content loss:
- target = model(content_img).detach()
- content_loss = ContentLoss(target)
- model.add_module("content_loss_{}".format(i), content_loss)
- content_losses.append(content_loss)
- if name in style_layers:
- # add style loss:
- target_feature = model(style_img).detach()
- style_loss = StyleLoss(target_feature)
- model.add_module("style_loss_{}".format(i), style_loss)
- style_losses.append(style_loss)
- # now we trim off the layers after the last content and style losses\
- # 只需要算到最后一个style loss或是content loss用到的layer就可以了, 后面的可以去掉
- for i in range(len(model) - 1, -1, -1):
- if isinstance(model[i], ContentLoss) or isinstance(model[i], StyleLoss):
- break
- model = model[:(i + 1)]
- # 返回的是修改后的Model, style_losses和content_losses的list
- return model, style_losses, content_losses
定义优化函数
- def get_input_optimizer(input_img):
- # 这里要对图片做梯度下降
- optimizer = optim.LBFGS([input_img.requires_grad_()])
- return optimizer
定义传播函数
这一步即,我们对输入的图片进行修改,使得ContentLoss+StyleLoss可以变小。
- def run_style_transfer(cnn, normalization_mean, normalization_std, content_img, style_img, input_img, content_layers,style_layers, num_steps=300, style_weight=1000000, content_weight=1):
- print('Building the style transfer model..')
- model, style_losses, content_losses = get_style_model_and_losses(cnn, normalization_mean, normalization_std, style_img, content_img, content_layers, style_layers)
- optimizer = get_input_optimizer(input_img)
- print('Optimizing..')
- run = [0]
- while run[0] <= num_steps:
- def closure():
- # correct the values of updated input image
- input_img.data.clamp_(0, 1)
- optimizer.zero_grad()
- model(input_img) # 前向传播
- style_score = 0
- content_score = 0
- for sl in style_losses:
- style_score += sl.loss
- for cl in content_losses:
- content_score += cl.loss
- style_score *= style_weight
- content_score *= content_weight
- # loss为style loss 和 content loss的和
- loss = style_score + content_score
- loss.backward() # 反向传播
- # 打印loss的变化情况
- run[0] += 1
- if run[0] % 50 == 0:
- print("run {}:".format(run))
- print('Style Loss : {:4f} Content Loss: {:4f}'.format(
- style_score.item(), content_score.item()))
- print()
- return style_score + content_score
- # 进行参数优化
- optimizer.step(closure)
- # a last correction...
- # 数值范围的纠正, 使其范围在0-1之间
- input_img.data.clamp_(0, 1)
- return input_img
进行训练
做完所有工作之后,我们就可以开始进行训练了。
- # 加载content image和style image
- style_img,content_img = image_util(img_size=444,style_img="./images/style/rose.jpg", content_img="./images/content/face.jpg")
- # input image使用content image
- input_img = content_img.clone()
- # 加载预训练好的模型
- cnn = models.vgg19(pretrained=True).features.to(device).eval()
- # 模型标准化的值
- cnn_normalization_mean = torch.tensor([0.485, 0.456, 0.406]).to(device)
- cnn_normalization_std = torch.tensor([0.229, 0.224, 0.225]).to(device)
- # 定义要计算loss的层
- content_layers_default = ['conv_4']
- style_layers_default = ['conv_1', 'conv_2', 'conv_3', 'conv_4', 'conv_5']
- # 模型进行计算
- output = run_style_transfer(cnn, cnn_normalization_mean, cnn_normalization_std, content_img, style_img, input_img, content_layers=content_layers_default, style_layers=style_layers_default, num_steps=300, style_weight=100000, content_weight=1)
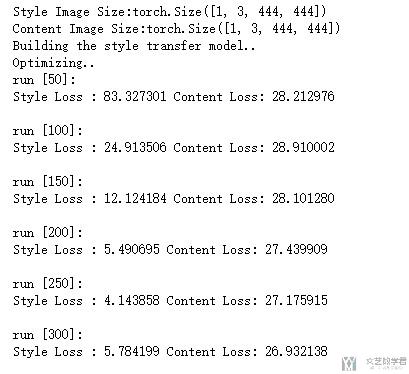
显示结果
最后把结果打印出来即可。
- image = output.cpu().clone()
- image = image.squeeze(0)
- unloader = transforms.ToPILImage()
- unloader(image)

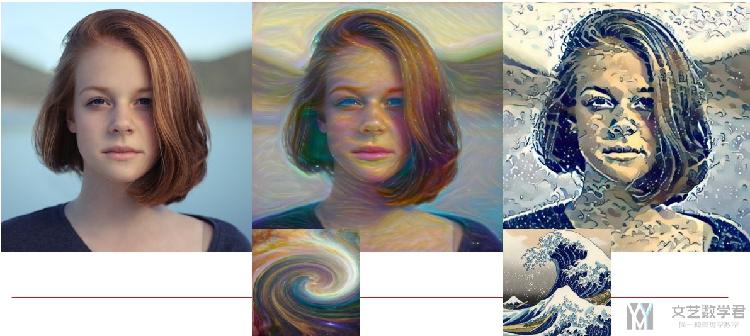
一些其他结果
尝试了转换为其他的一些风格,把一些结果放在下面。


- 微信公众号
- 关注微信公众号
-

- QQ群
- 我们的QQ群号
-


评论