文章目录(Table of Contents)
简介
前面我们介绍了注意力机制和注意力分数的内容。在这一部分,我们会将「注意力机制」用在 Seq2Seq 模型上面。这样在预测词元时,如果不是所有输入词元都相关,模型将仅对齐(或参与)输入序列中与当前预测相关的部分。
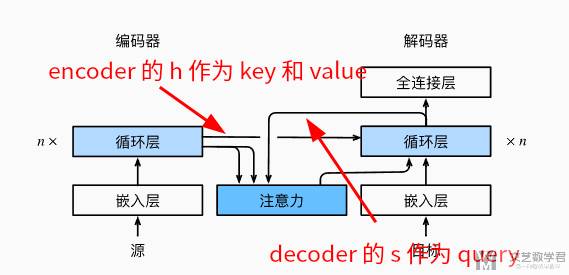
注意力机制的关键就是搞明白,什么作为 key 和 value,什么作为 query。在这里 key 和 value 是 encoder 网络对每个词的 output(这里文档中说的是使用 encoder 的 hidden state,但是代码中好像是 output)。query 是 decoder 将输入的词的 hidden state。
参考资料
- Bahdanau 注意力,D2L 中文版文档;
- 66 使用注意力机制的seq2seq【动手学深度学习v2】,B 站视频;
- 代码仓库,Attention-mechanisms-and-transformers,本文对应的代码
seq2seq_attention开头的代码。
Seq2Seq with Attention
模型结构介绍
整体的模型结构如下所示。注意看下面「注意力模块」的三个输入,两个来自「编码器」,作为 key 和 value(这个是编码器对每个字的 hidden state)。一个来自「解码器」,作为 query(这个是解码器对输入字的 hidden state)。
于是将数据流的表达转换为公式,如下所示。其中 h 为 encoder 对输入的每个词计算的 hidden state。而 s 是 decoder 对输入的上个词计算的 hidden state(作为 query,注意这里 s 是 t-1,也就是计算的上一个词)。
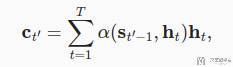
上面式子的含义就是,我们将当前词的 hidden state 与 encoder 里面每一个词的hidden state 计算相似度,然后在乘encoder 里面上一个词的hidden state,最终得到的值作为当前这个字的表示。最后再会和这个词 embedding 的结果拼接起来。
Seq2Seq with Attention 代码实现
上面我们介绍了使用注意力机制的 seq2seq 的模型结构。这里我们来看一下相关的代码实现。可以看到上面的结构部分,加入「注意力机制」之后,encoder 部分是没有变化的,需要变化的是 decoder 的部分。下面是完整的 decoder 部分的代码(几乎都写了非常详细的注释了):
- class Seq2SeqAttentionDecoder(AttentionDecoder):
- """Encoder 部分是没有改变的, Decoder 部分加入了 Attention.
- """
- def __init__(
- self,
- vocab_size,
- embed_size,
- num_hiddens,
- num_layers,
- dropout=0
- ):
- super().__init__()
- self.attention = AdditiveAttention(num_hiddens, dropout) # 加性 Attention
- self.embedding = nn.Embedding(vocab_size, embed_size) # Embedding 层
- self.rnn = nn.GRU(
- embed_size + num_hiddens,
- num_hiddens,
- num_layers,
- dropout=dropout
- )
- self.dense = nn.LazyLinear(vocab_size) # 输出每一个词的概率
- self.apply(init_seq2seq)
- def init_state(self, enc_outputs, enc_valid_lens):
- # Shape of outputs: (num_steps, batch_size, num_hiddens). 为 encoder 中的 output, 大小为, torch.Size([9, 128, 256])
- # Shape of hidden_state: (num_layers, batch_size, num_hiddens), 初始化为 encoder 中的 hidden state, 大小为 torch.Size([2, 128, 256])
- # enc_valid_lens, 表示 encode 句子中哪些是 padding 的
- outputs, hidden_state = enc_outputs
- return (outputs.permute(1, 0, 2), hidden_state, enc_valid_lens) # output 大小转换后为 torch.Size([128, 9, 256])
- def forward(self, X, state):
- # 这里 num_steps 是原始句子的长度
- # Shape of enc_outputs: (batch_size, num_steps, num_hiddens). 每一的 output --> 作为 key 和 value, torch.Size([128, 9, 256])
- # Shape of hidden_state: (num_layers, batch_size, num_hiddens), torch.Size([2, 128, 256])
- enc_outputs, hidden_state, enc_valid_lens = state
- # Shape of the output X: (num_steps, batch_size, embed_size)
- X = self.embedding(X).permute(1, 0, 2) # torch.Size([9, 128, 256])
- # #########################
- # 下面用到了 Attention 的机制
- # #########################
- outputs, self._attention_weights = [], []
- for x in X: # decoder 中每一个字需要依次输入
- # Shape of query: (batch_size, 1, num_hiddens), torch.Size([128, 1, 256])
- # query 是上一个时间的 RNN 的输出, 其实就是上一个字 Embedding 的结果
- query = torch.unsqueeze(hidden_state[-1], dim=1) # 只取最后一个 layer 的结果
- # Shape of enc_outputs: (batch size, num_steps, h), torch.Size([128, 9, 256])
- # Shape of context: (batch_size, 1, num_hiddens), torch.Size([128, 1, 256]), 加权之后的结果
- # query, key, value
- context = self.attention(query, enc_outputs, enc_outputs, enc_valid_lens) # Attention 的关键, context 的计算
- # Concatenate on the feature dimension
- x = torch.cat((context, torch.unsqueeze(x, dim=1)), dim=-1) # context 和 x 合并起来
- # 最终 x 的大小为, torch.Size([128, 1, 512])
- # Reshape x from (batch_size, 1, embed_size + num_hiddens) to (1, batch_size, embed_size + num_hiddens), 此时是为了适应 gru 输入的大小
- out, hidden_state = self.rnn(x.permute(1, 0, 2), hidden_state) # 这里 out 的大小为 torch.Size([1, 128, 256])
- outputs.append(out)
- self._attention_weights.append(self.attention.attention_weights) # 存储 attention weights
- outputs = self.dense(torch.cat(outputs, dim=0)) # cat 之后大小为 torch.Size([9, 128, 256])
- # After fully connected layer transformation, shape of outputs:
- # (num_steps, batch_size, vocab_size), 也就是 torch.Size([9, 128, 214])
- return outputs.permute(1, 0, 2), [enc_outputs, hidden_state, enc_valid_lens]
- @property
- def attention_weights(self):
- return self._attention_weights
接下来我们来过一下上面的代码。通过一个具体的例子,看一下每行输入的是什么。首先先说明一下相关的参数:
embedding size = 256,每个字符变为长度为256的向量;- 每句话都填充为
9个词(最大长度为9); - 使用
GRU,其中输出大小为512,共有两层; batch size是128;
Encoder 部分数据解释
选择一个 batch 的数据,经过 encoder 之后,分别输出 output 和 hidden state,大小分别是(这里 output 包含 9 个词的信息,之后会作为 key 和 value):
output:torch.Size([9, 128, 512]),其中 (num_steps, batch_size, num_hiddens);hidden state:torch.Size([2, 128, 512]),其中 (num_layers, batch_size, num_hiddens);
Decoder 部分数据解释
接着就到了 decoder 的部分。首先是 init_state,这里的作用就是得到 encoder 输出的 output 和 hidden state。
接着到了 forward 部分。传入两个信息:
- 一个是
X,也就是decoder的输入的字(比如是英文翻译法语,那这里就是翻译后的每个法语的单词)。此时X的大小为torch.Size([128, 9]),因为句子长度为9,所以有9个单词; - 一个就是
state,包含init_state返回的值,用于计算权重。enc_outputs,(batch_size, num_steps, num_hiddens),torch.Size([128, 9, 512])。这里是包含9个单词的信息的,后面会作为key和value;hidden_state,(num_layers, batch_size, num_hiddens),torch.Size([2, 128, 512])。作为第一个query。
接着对于 X 中的每一个字,分别计算权重:
- 首先得到
query,就是上面的hidden_state[-1],变换大小后为 torch.Size([128, 1, 512]); enc_outputs作为key和value,计算attention,得到context,torch.Size([128, 1, 512]),也就是 (batch_size, 1, num_hiddens),这是这个词的结果。- 将
context与这个x的embedding的结果合并,得到信息,此时的大小为 torch.Size([128, 1, 768]),也就是 (batch_size, 1, embed_size + num_hiddens)。 - 将得到的信息放入
rnn中,得到output(在过一个全连接层,得到对词的预测)和hidden state,作为下一个的query(替换上面的hidden state)。这样循环往复,得到所有词的预测。
- 微信公众号
- 关注微信公众号
-

- QQ群
- 我们的QQ群号
-


评论