文章目录(Table of Contents)
简介
这里主要记录一些 LaTeX 的使用的小方法, 之前也是有记录使用的方法, 在LaTeX指南信息中. 但是这一篇的内容有些多了, 所以自己重新再开一篇文章来进行记录.
关于Latex中表格的相关操作, 我们更多的是写在了: LaTeX完成Scientific Papers的一些说明
小技巧记录
LaTeX 代码高亮
关于代码高亮的相关介绍, 我之前在LaTeX指南信息中有所提及, 在这里就直接给出链接.
- 关于Python代码高亮: LaTeX中Python代码高亮
- 关于LaTeX代码高亮: LaTeX中LaTeX代码高亮
- 关于抄录环境: LaTeX抄录环境介绍
将文字使用 Box 包起来-tcolorbox
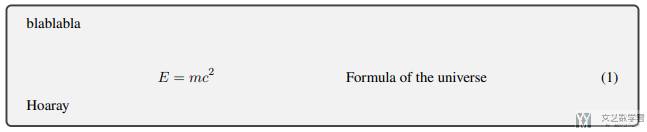
有的时候我们希望将文字使用框包裹起来,具体效果如下所示:

这个时候我们可以使用 tcolorbox 来实现。下面看一个简单的例子,在 tcolorbox 中显示数学公式和文字(参考资料,How to put a framed box around text + math environment):
- \documentclass{article}
- \usepackage{amsmath}
- \usepackage{tcolorbox}
- \begin{document}
- \begin{tcolorbox}
- blablabla
- \begin{align}
- E &= mc^2 & \text{Formula of the universe}
- \end{align}
- Hoaray
- \end{tcolorbox}
- \end{document}
最终的效果如下所示:
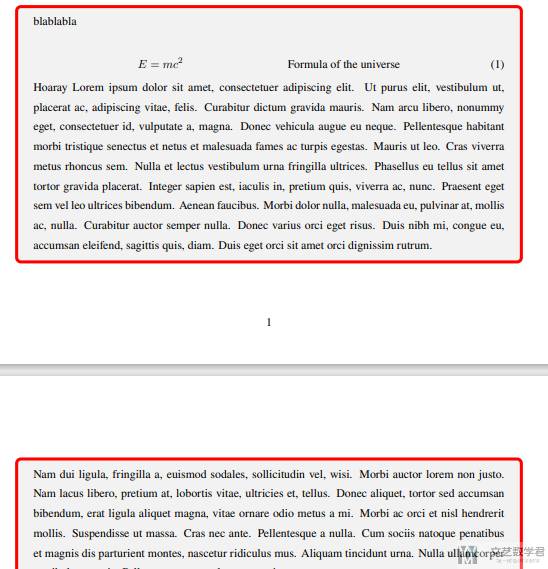
tcolorbox 分页
如果有的时候一页放不下所有的内容需要分页,只需要在 tcolorbox 上加上参数即可。注意这里 usepackage 的时候就会有所不同:
- \usepackage[most]{tcolorbox}
下面是一个分页的例子,同时我们还可以定义分页时候边框的颜色粗细等(参考资料,Multi-page tcolorbox with complete box on each page)
- \usepackage{lipsum} % 用来随机生成文字
- \begin{tcolorbox}[%
- enhanced,
- breakable,
- frame hidden,
- overlay broken = {
- \draw[line width=1mm, red, rounded corners]
- (frame.north west) rectangle (frame.south east);},
- ]
- blablabla
- \begin{align}
- E &= mc^2 & \text{Formula of the universe}
- \end{align}
- Hoaray
- \lipsum[1-15] % 随机生成文字
- \end{tcolorbox}
最终的效果如下所示,可以看到可以正常分页,同时边框变为红色:
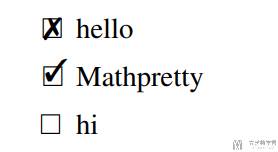
完成带有 checkbox 的列表
如果我想想要有类似 todo list 形式的列表(如下图所示),原本的 itemize 可能无法满足我们,这个时候我们就可以自定义一些样式。参考资料,How to create checkbox todo list?
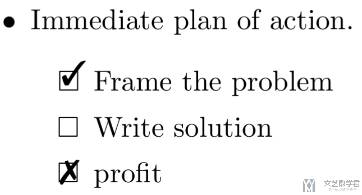
我们首先定义一些样式,这里 done 就是上面的对勾,wontfix 就是上面的叉。todolist 将 itemize 前面改成了方形:
- \usepackage{enumitem,amssymb}
- \newlist{todolist}{itemize}{2}
- \setlist[todolist]{label=$\square$}
- \usepackage{pifont}
- \newcommand{\cmark}{\ding{51}}%
- \newcommand{\xmark}{\ding{55}}%
- \newcommand{\done}{\rlap{$\square$}{\raisebox{2pt}{\large\hspace{1pt}\cmark}}\hspace{-2.5pt}}
- \newcommand{\wontfix}{\rlap{$\square$}{\large\hspace{1pt}\xmark}}
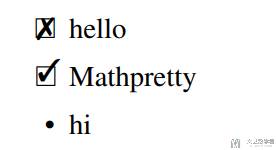
使用起来也是十分方便,可以直接在 itemize 的基础上进行添加,在 \item 后面添加 wontfix 或是 done 即可。
- \begin{itemize}
- \item[\wontfix] hello
- \item[\done] Mathpretty
- \item hi
- \end{itemize}
最终的效果如下所示。使用了 wontfix 或是 done 的前面就会有对勾或是叉。
如果要出现方框,只需要将 itemize 替换为 todolist 即可,如下所示:
- \begin{todolist}
- \item[\wontfix] hello
- \item[\done] Mathpretty
- \item hi
- \end{todolist}
最终的效果如下所示,可以看到 hi 前面的「点」变成了「方框」:
改变边缘距离
参考链接: Is there any other margin I must set to reduce margin to zero?
- \documentclass{article}
- \usepackage[margin=0pt]{geometry}
这个可以使得生成的pdf的边缘距离变为0, 效果图如下所示:

我们也可以按比例进行调整, 如下所示
- \usepackage{geometry}
- \geometry{a4paper,scale=0.8}
这个表示设置了纸张为a4 纸,并且版心占页面长度的比例为80%.
参考链接: latex设置页面边距,页面大小,页边距,geometry宏包
使得目录每一段有缩进
有的时候我们想要使得目录中不同的 section 都有缩进,这个时候可以采用下面的方式来进行实现。参考链接:How can I get legal style indentation on section, subsection, subsubsec.. using titlesec?
- % %%%%%%%%%%%%%%%%%%%%%%%%%
- % 下面的可以使得section有缩进
- % %%%%%%%%%%%%%%%%%%%%%%%%%
- \usepackage{changepage,lipsum,titlesec}% http://ctan.org/pkg/{changepage,lipsum,titlesec}
- \titleformat{\section}[block]{\bfseries}{\thesection.}{1em}{}
- \titleformat{\subsection}[block]{}{\thesubsection}{1em}{}
- \titleformat{\subsubsection}[block]{}{\thesubsubsection}{1em}{}
- \titlespacing*{\subsection} {2em}{3.25ex plus 1ex minus .2ex}{1.5ex plus .2ex}
- \titlespacing*{\subsubsection} {3em}{3.25ex plus 1ex minus .2ex}{1.5ex plus .2ex}
下面就是正常使用section等就会出现缩进的效果, 效果图其实就是上面那张, 我在下面再贴一下.
创建问答类型的模板
有的时候, 我们会遇到问答类型的文档需要书写, 例如采访之类的. 这个时候我们可以使用下面的格式来进行书写. 我们可以使用下面的代码来创建问答模板:
- \usepackage{enumitem}
- \newenvironment{QandA}{\begin{enumerate}[label=\bfseries\alph*.]\bfseries}
- {\end{enumerate}}
- \newenvironment{answered}{\par\normalfont}{}
- \begin{QandA}
- \item question one
- \begin{answered}
- this is my answer: XXXXX
- \end{answered}
- ~\newline
- \item question two
- \begin{answered}
- YYYYYY
- \end{answered}
- \end{QandA}
最终的结果如下所示:

参考资料: How can I create a Question/Answer format for reports?
LaTeX绘制分割线
参考链接: Horizontal Line Options in LaTeX
这里介绍一下在 LaTeX 中绘制分割线, 分别有绘制虚线和绘制实线.
- 虚线: dotfill
- 实线: hrulefill
下面简单看一下使用和最终的效果:
- \subfile{sections/1.tex}
- \dotfill % 虚线
- \hrulefill % 实线

去除每一个段落前的空格
有的时候, 我们不需要段落前的空格, 于是我们可以在段落前面加上下面的内容.
- % 这是正常的段落, 段首有空格
- This is 1 and is indented. Blah blah blah.
- % 这样写段首就没有空格了
- \noindent
- This is 2 but is not indented since it was started with noindent. Blah blah blah.
参考文献: Remove Indentation for a Single Paragraph
但是, 有的时候文章很长, 每一段加很麻烦. 同时, 我们需要修改段间距来使得段与段之间看起来明显一些, 这个时候我们就可以使用下面的这个包. 可以去掉每一段段首的空白和修改段与段之间的间距.
- \usepackage{parskip} % 去除每一段首的空格
LaTeX插入pdf
我们可以在LaTeX中进行pdf的插入. 使用下面的package就可以进行插入pdf.
- \usepackage{pdfpages} % 插入pdf文件
下面是最基本的插入pdf的用法. 其中pages表示插入的pdf的页面, 如这里表示插入pdf的第1和第2页.
- \includepdf[pages={1,2}]{./doc/sample.pdf}
我们还可以对插入的pdf进行缩放. 我们使用如下的方式进行缩放. scale后面是缩放的比例.
- \includepdf[pages=2, scale=0.95]{./doc/sample.pdf}
最后, 对于插入的pdf, 默认情况下他是会新起一个page的, 我们可以直接通过pagecommand的方式来插入表题等内容.
- \includepdf[scale=0.8,pages=1,pagecommand=\section{blub}]{sample.pdf}
参考资料: How to include PDF pages without a newpage before the first page?
我们也可以将pdf按照图片的样子进行插入, 比如下面的例子.
- \begin{figure*}[htb]
- \centering
- \includegraphics[width=7.16in]{sample.pdf}
- \caption{sample}
- \label{fig4-Proposed-1}
- \end{figure*}
Latex插入换行
在正常情况下, 我们可以通过在一句话的末尾插入下面两种形式来完成换行.
- - \\
- - \newline
但是, 我们不能直接在前面没有内容的时候使用上面的换行的方式, 否则会出现如下的报错:
- Error message: There's no line here to end
我们可以使用下面的方式来解决这个报错, 即在命令前插入~, 来表示插入空白的区域 (Some people use a quick fix and insert some empty space like in ~\ to repair that):
- ~\newline
- ~\newline
- ~\newline
参考资料: Error message: There's no line here to end
latex文章插入行号
我们使用lineno来完成文章行号的插入。
- \usepackage{lineno}
- \linenumbers
下面是几个常用的选项
Options
Some of the options the package provides include:
- [left]: Line numbers in left margin (default)
- [right]: Line numbers in right margin
- [switch]: Line number in outer margin (left for even, right for odd pages)
- [switch*]: Line numbers in inner margin
- [pagewise]: Restart numbering on every page
- [running]: Continuously number lines (default)
- [modulo]: Pyourint only multiples of five
- [displaymath, mathlines]: Line numbers for math environments (both needed)
其中, switch和pagewise是两个比较常用的选项。其中switch可以在双栏的情况下,让左侧的行号靠左, 右侧的行号靠右(就是都靠外侧). pagewise是可以使得每一页进行重新标注, 每一页的行号都重新开始.
- \usepackage[switch, pagewise]{lineno}
- \linenumbers
关于一些其他的用法, 例如只对某一段表行号, 表行号的时候将公式计算进去等问题, 可以参考下面的官方网址.
官方网址: lineno文档
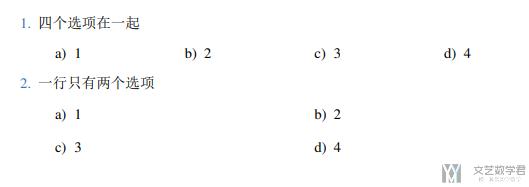
实现课后习题的样式
有的时候我们在使用 LaTeX 的时候,希望可以实现下面的形式,做出试卷上类似选择题的效果。这个可以使用 tasks 这个 package 来完成。下面看一下具体的例子。

首先我们需要在最开始的位置导入 tasks 这个 package。
- \usepackage{tasks} % 选择题
接着我们定义两个题目,下面 tasks 后面跟着的数字表示多少个选项在一行。
- \begin{enumerate}[itemsep=\baselineskip]
- \item 四个选项在一起
- \begin{tasks}(4)
- \task 1
- \task 2
- \task 3
- \task 4
- \end{tasks}
- \end{enumerate}
- \begin{enumerate}[start=2, itemsep=\baselineskip]
- \item 一行只有两个选项
- \begin{tasks}(2)
- \task 1
- \task 2
- \task 3
- \task 4
- \end{tasks}
- \end{enumerate}
最终的输出结果如下所示,第一个四个选项是在一行的,第二个每两个选项是在一行的:
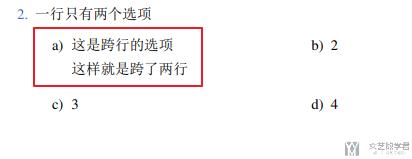
同样的,我们的选项也是可以跨行的,下面的例子使用两个反斜杠进行跨行。
- \begin{enumerate}[start=2, itemsep=\baselineskip]
- \item 一行只有两个选项
- \begin{tasks}(2)
- \task 这是跨行的选项 \\
- 这样就是跨了两行
- \task 2
- \task 3
- \task 4
- \end{tasks}
- \end{enumerate}
最终的输出的结果如下所示:
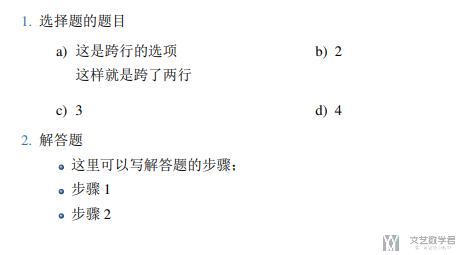
于是,我们可以使用 tasks 结合 enumerate 来制作出选择题与解答题,如下面的例子所示:
- \begin{enumerate}[itemsep=\baselineskip]
- \item 选择题的题目
- \begin{tasks}(2)
- \task 这是跨行的选项 \\
- 这样就是跨了两行
- \task 2
- \task 3
- \task 4
- \end{tasks}
- \end{enumerate}
- \begin{enumerate}[start=2, itemsep=\baselineskip]
- \item 解答题
- \begin{itemize}
- \item 这里可以写解答题的步骤;
- \item 步骤1
- \item 步骤2
- \end{itemize}
- \end{enumerate}
最终的效果如下所示:
参考资料,Encoding with the tasks package
Logo 的插入
这一部分我们在介绍模板, Latex模版--ElegantLaTeX, 的时候介绍过了. 但是我觉得放在这里更加合适. 所以我在这里放一下相同的介绍.
我们想要在这里实现在文章标题前插入一个图片, 实现类似水印(logo)的作用, 一会直接看效果吧.
- \title{XXXXXXXX}
- \author{{Wang}}
- \institute{{Management of Information System Projects}}
- \begin{document}
- % \maketitle
- \vbox{
- \raggedright
- \includegraphics[width=45mm]{./figure/UiA.png} % 在标题前面插入一个logo
- \maketitle %this typesets the contents of \title, \author and \date
- }
- \section{A}
- \end{document}
最终的实现效果如下图所示, 我们可以通过修改上面图片的width来修改图片的大小.

参考资料: Add a picture before book title
关于引用的格式
同样, 这一部分我们在介绍模板, Latex模版--ElegantLaTeX, 的时候介绍过了. 但是我觉得放在这里更加合适. 所以我在这里放一下相同的介绍.
我们使用下面的方式来完成引用的实现.
- \usepackage{csquotes}
- \renewcommand{\mkbegdispquote}[2]{\itshape}
- % 加双引号的引用
- \blockquote{
- Technology assists with the uncertainty done by nature with new developments. Law defends the uncertainty of behavior by the people with rules that are set. Religion accepts the uncertainty people cannot get protected from. Individuals use their beliefs to get through their uncertainties” (Wikipedia).
- }
- % 这是斜体
- \begin{displayquote}
- Technology assists with the uncertainty done by nature with new developments. Law defends the uncertainty of behavior by the people with rules that are set. Religion accepts the uncertainty people cannot get protected from. Individuals use their beliefs to get through their uncertainties” (Wikipedia).
- \end{displayquote}
最终的实现效果如下图所示:
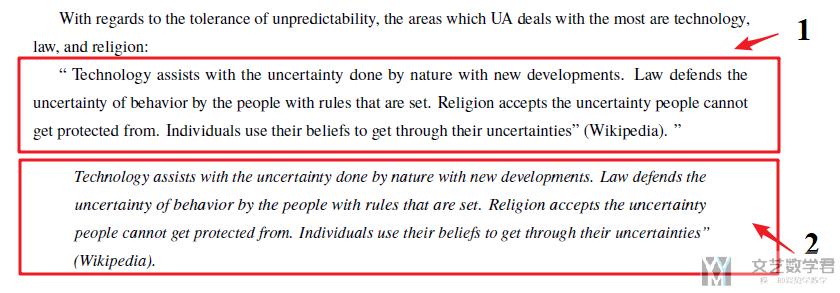
参考文献: change quote-command to display text in italics
引用时引用标题
有的时候, 我们进行section引用的时候, 希望引用section的标题, 而不是section的号码, 这个时候我们就需要使用\nameref来进行引用. 我们下面看一个简单的例子.
- \section{Me, myself and I}
- \label{intro}
- Hi, my name is Bart.
- \section{Summary}
- I introduced myself in section: \nameref{intro}.
最终的结果如下所示:
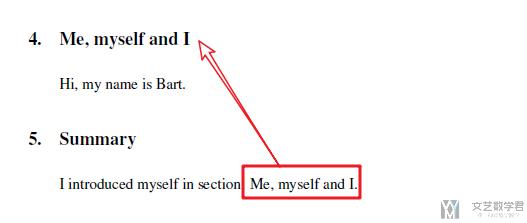
参考文献: \ref Chapter Name in LaTeX
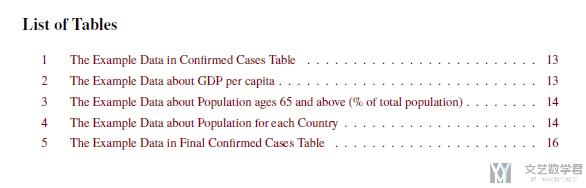
关于增加表格和图片的目录
有的时候, 我们需要在文章前面增加表格和图片的目录.
- \listoffigures
- \clearpage
- \listoftables
- \clearpage
最后的结果如下所示:
作者信息,机构邮箱信息
我们有的时候需要作者信息像下面这个样子.

首先是一个作者可以对应多个机构 (这个参考Adding more than one author with different affiliation)
- \usepackage{authblk}
- \author[1]{Author A\thanks{A.A@university.edu}}
- \author[1]{Author B\thanks{B.B@university.edu}}
- \author[1]{Author C\thanks{C.C@university.edu}}
- \author[1,2]{Author D\thanks{D.D@university.edu}}
- \author[2]{Author E\thanks{E.E@university.edu}}
- \affil[1]{Department of Computer Science, \LaTeX\ University}
- \affil[2]{Department of Mechanical Engineering, \LaTeX\ University}
- \renewcommand\Authands{ and }
除了上面的信息之外, 我们还需要添加邮件的信息, 这一部分参考Custom positions of author names, affiliations and emails in LaTeX article
下面的写法可以使得邮件是两行的.
- \affil[ ]{\textit{e-mail: wangmaonan@bupt.edu.cn, zkf\_bupt@163.com, luodan@bupt.edu.cn,}}
- \affil[ ]{\textit{qing0991@163.com, xjwang@bjut.edu.cn}}
同时显示作者名和邮箱
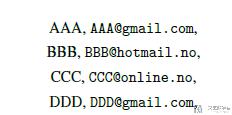
有的时候, 我们不仅需要写作者名, 还需要写作者的邮箱. 这个时候, 我们就有下面的几种方式来增加邮箱内容.
首先是最简单的, 我们直接将邮箱放在名字的后面, 就像下面这样. 注意我们每一个名字和邮箱后面都是有换行的.
- \author{AAA, \texttt{AAA@gmail.com}, \\
- BBB, \texttt{BBB@hotmail.no}, \\
- CCC, \texttt{CCC@online.no}, \\
- DDD, \texttt{DDD@gmail.com},
- }
最后显示的结果如下所示.
对于上面的内容, 我们可以稍微做一下改进, 可以给邮箱加上链接, 我们使用下面的方式进行操作:
- \usepackage{hyperref} % 这个是邮件的链接
- \author{AAA, email \href{AAA@hotmail.no}{AAA@hotmail.no} , \\
- BBB, email \href{BBB@hotmail.no}{BBB@hotmail.no}, \\
- CCC, email \href{CCC@online.no}{CCC@online.no}, \\
- DDD, email \href{DDD@gmail.com}{DDD@gmail.com},
- }
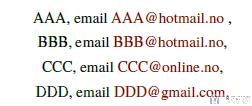
上面就是给邮箱加上链接之后的样子. 之后, 我们再更近一步, 我们希望邮箱出现在名字的下面, 于是, 我们可以进行下面的操作:
- \author{AAA, \\ email \href{AAA@hotmail.no}{AAA@hotmail.no} ,
- \and BBB, \\ email \href{BBB@hotmail.no}{BBB@hotmail.no},
- \and CCC, \\ email \href{CCC@online.no}{CCC@online.no},
- \and DDD, \\ email \href{DDD@gmail.com}{DDD@gmail.com},
- \and EEE, \\ email \href{EEE@gmail.com}{EEE@gmail.com}, \\
- }

参考链接: Adding an email to LaTeX file
关于上面引用的时候, 可能会对institute造成影响, 会导致institute无法居中, 这个时候我们就需要手动调整institute的位置了. 我们使用hspace来进行位置的调整, 下面简单给出示例代码.
- \institute{
- \hspace*{-6cm}
- Management of IS Projects - IS 407
- }
其中:
- \hspace用于水平间距(horizon)
- \vspace用于垂直间距(vertical)
引用链接
有的时候, 我们引用的内容不是论文, 而是一些在线的内容, 这个时候我们可以使用下面的格式进行引用. 只需要在bib文件中按下面格式进行书写即可.
- @misc{workprocessNatter,
- author = {Elisabeth Natter},
- title = {{Effects of Globalization on Human Resources Management}},
- howpublished = "\url{https://smallbusiness.chron.com/effects-globalization-human-resources-management-61611.html}",
- year = {2018},
- note = "[Online; accessed 14-November-2018]"
- }
参考文献: How to add a URL to a LaTeX bibtex file?
参考文献加上页码
有的时候, 我们在引用参考文献的时候, 需要加上页码. 我们可以使用\citep[p.~66]{参考文献}来进行引用.
- Project managers must allow time for the team to develop the common work practices using special tools that can facilitate this process \citep[p.~66]{schwalbe2008information}
最后的效果如下图所示.

我们也可以引用一段范围内的页码, 如下所示:
- Project managers must allow time for the team to develop the common work practices using special tools that can facilitate this process \citep[p.~66--80]{schwalbe2008information}.
最终的效果如下图所示:

参考文献: Referencing page number with only one reference
脚注及相关操作
我们在这里对 latex 添加脚注进行相应的说明。会分为三个部分:
- 最基础的脚注添加
- 脚注添加 url(直接显示 url 或是显示指定内容)
- 引用相同的内容
基础的脚注添加
下面我们就从第一个开始说起. 对于最基础的脚注的添加. 这里加了label是为了后面引用的时候可以进行使用.
- This is a test of footnote\footnote{\label{note1}basic footnote test}.
最终的效果如下图所示:

脚注使用 url
接下来,我们来看一下我们希望引用链接时候的情况。这里可以直接将需要的链接使用 url 包起来即可,如下所示
- \usepackage{url}
- This is a test of footnote\footnote{\label{note1}\url{https://en.wikipedia.org/wiki/Uncertainty_avoidance}}.
最终的结果如下所示:

除此之外,如果我们希望不直接显示网页,而是显示网页的标题。可以使用 href,如下所示:
- This is a test of footnote\footnote{\label{note1}\href{https://en.wikipedia.org/wiki/Uncertainty_avoidance}{Uncertainty Avoidance}}.
最终的结果如下所示,可以看到不会直接显示网页地址了,可以显示自己定义的标题:

参考资料:latex, how to put superscript and link to URL downpage
重复使用脚注
我们再看最后的一种情况, 我们有一个相同的内容(例如链接), 要在文章的不同位置进行脚注. 如果直接按照上面的方式进行书写, 会出现两个相同的脚注. 所以我们需要使用下面的方式.
- \usepackage{url}
- % 引用脚注使用(在usepackage处进行使用)
- \makeatletter
- \newcommand\footnoteref[1]{\protected@xdef\@thefnmark{\ref{#1}}\@footnotemark}
- \makeatother
- This is a test of footnote\footnote{\label{note11}\url{https://en.wikipedia.org/wiki/Uncertainty_avoidance}}.
- This is another footnote\footnote{\label{note22}another one}.
- We have areference to first footnote\footnoteref{note11}.
- We have areference to second footnote\footnoteref{note22}.
最终的结果显示如下所示:

参考文献: Reference different places to the same footnote
长单词的自动换行
我们可以使用seqsplit来完成长单词的自动换行.
- \usepackage{seqsplit}
我们也是可以进行一些自定义, 例如在换行处使用短横线.
- \usepackage{seqsplit}
- \renewcommand{\seqinsert}{\ifmmode\allowbreak\else\-\fi}
在使用的时候, 我们只需要把单词使用seqsplit包住即可. 注意这里是不可以放词组的, 只能放单词.
- \seqsplit{commemoration}
LaTeX指定字体(IPA的正确显示)
最近想在LaTeX中输入音标, 但是发现如果直接编译会出现编译错误, 需要指定字体. 我在这里简单演示一下如何指定字体, 可以正确显示一些特殊字符.
首先我们使用fontspec, 并指定字体.
- \usepackage{fontspec}
- \newfontfamily\myfont{times.ttf}
在使用的时候, 我们在myfont中输入想要的内容, 这里的就是使用上面定义的字体进行显示. 就可以显示一些特殊字符.
- {\myfont{XXXXXXX}}
一些说明
LaTeX设置支持中文
- \usepackage[UTF8]{ctex}
参考链接: 有没有简单的 LaTeX 中文支持方案?
LaTeX中的宽度
参考链接: LaTeX 中的宽度
下面做一下简单的介绍, 内容来自上面的参考链接中.
\linewidth- 当前行的宽度\columnwidth- 当前分栏的宽度\textwidth- 整个页面版芯的宽度\paperwidth- 整个页面纸张的宽度\hsize- Plain TeX 的宏,是 TeX 在行末考虑分词换行时使用的宽度
这些宽度里,\hsize 是 Plain TeX 的宏,不推荐 LaTeX 用户使用,简单地当它不存在就好了。
在单栏文本中,\columnwidth 和 \textwidth 保持一致;在多栏文本中 \textwidth = n \columnwidth + (n - 1) \columnsep(其中 n 是分栏数)。
- 微信公众号
- 关注微信公众号
-

- QQ群
- 我们的QQ群号
-


评论