文章目录(Table of Contents)
简介
这一篇会介绍Pytorch使用GPU的一些内容. 包括使用多个GPU的例子, 使用多个GPU进行训练的原理, 以及一些措施, 来避免我们在train的时候遇到"CUDA error: out of memory"的报错. 我们来总结一下会出现的问题.
- 模型过于复杂, batchsize只能设置得很小; 解决办法: 梯度累加; 多GPU训练
- 模型过于复杂, 以至于一个GPU都无法进行训练; 解决办法: 使用checkpoint
参考资料(整个文章得结构是参考这一篇文章): Training Neural Nets on Larger Batches: Practical Tips for 1-GPU, Multi-GPU & Distributed setups
这里有一个部分我是没有进行讲(因为暂时自己还是没有用到), Distributed training: training on several machines, 这一份的内容可以参考上面的链接进行了解.
Pytorch大batch size训练指南
有的时候我们的模型过于复杂, 此时我们的batchsize就不能设置的太大. 我们可以使用accumulating gradients来解决这个问题.
所以, 总结一下我们要解决的问题是:
How can you train your model on large batches when your GPU can't hold more than a few samples?
我们知道Pytorch训练过程可以写成下面的5个步骤.
- predictions = model(inputs) # Forward pass
- loss = loss_function(predictions, labels) # Compute loss function
- loss.backward() # Backward pass
- optimizer.step() # Optimizer step
- predictions = model(inputs) # Forward pass with new parameters
在loss.backward()过程中, 我们会对每一个参数来计算梯度, 然后会存储在parameter.grad中. 正常情况下, 我们在使用optimizer.step()进行参数优化之后, 会将梯度清零, 也就是model.zero_grad() or optimizer.zero_grad(). 所以accumulating gradients就是我们不会每次去对梯度清0, 而是会将梯度进行累计. 我们下面来看一个例子.
- model.zero_grad() # Reset gradients tensors
- for i, (inputs, labels) in enumerate(training_set):
- predictions = model(inputs) # Forward pass
- loss = loss_function(predictions, labels) # Compute loss function
- loss = loss / accumulation_steps # Normalize our loss (if averaged)
- loss.backward() # Backward pass
- if (i+1) % accumulation_steps == 0: # Wait for several backward steps
- optimizer.step() # Now we can do an optimizer step
- model.zero_grad() # Reset gradients tensors
- if (i+1) % evaluation_steps == 0: # Evaluate the model when we...
- evaluate_model() # ...have no gradients accumulated
上面的例子中, 每evaluation_steps更新一次参数, 然后进行梯度清零. 同时我们需要注意的是, 我们要将loss去除evaluation_steps, 相当于计算一个平均, 来模拟batch的效果.
Pytorch同时使用多GPU
我们使用DataParallel来实现多GPU同时进行训练. 他会拆分你的batchsize, 分给不同的GPU进行训练. DataParallel使用起来非常简单, 我们只需要加一行就可以了.
- parallel_model = torch.nn.DataParallel(model) # Encapsulate the model
- predictions = parallel_model(inputs) # Forward pass on multi-GPUs
- loss = loss_function(predictions, labels) # Compute loss function
- loss.mean().backward() # Average GPU-losses + backward pass
- optimizer.step() # Optimizer step
- predictions = parallel_model(inputs) # Forward pass with new parameters
上面的例子比较简单, 所以下面我们来看一个同时使用多个GPU进行训练的例子, 这个例子主要参考自下面的链接. 所有的注释都写在代码里了.
- import torch
- import torch.nn as nn
- from torch.utils.data import Dataset, DataLoader
- # --------------
- # 导入库和确定参数
- # --------------
- input_size = 5
- output_size = 2
- batch_size = 25
- data_size = 100
- device = torch.device("cuda:0" if torch.cuda.is_available() else "cpu")
- # -----------
- # 使用的数据集
- # -----------
- # 虚拟数据集
- class RandomDataset(Dataset):
- def __init__(self, size, length):
- self.len = length
- self.data = torch.randn(length, size)
- def __getitem__(self, index):
- return self.data[index]
- def __len__(self):
- return self.len
- # 定义数据集: 这里一共有data_size组数据, 每组数据有input_size个特征, batch_size大小
- dataset = RandomDataset(size=input_size, length=data_size)
- rand_loader = DataLoader(dataset=dataset, batch_size=batch_size, shuffle=True)
- # ------------------------------------------
- # 定义模型(我们使用DataParallel来保证使用多GPU)
- # ------------------------------------------
- class Model(nn.Module):
- def __init__(self, input_size, output_size):
- super(Model, self).__init__()
- self.fc = nn.Linear(input_size, output_size)
- def forward(self, input):
- output = self.fc(input)
- print("\tIn Model: input size: {}, output size: {}".format(input.size(), output.size()))
- return output
- # 创建模型
- model = Model(input_size=input_size, output_size=output_size)
- if torch.cuda.device_count() > 1:
- print("Let's use {} GPUS".format(torch.cuda.device_count()))
- model = nn.DataParallel(model) # 支持多GPU
- print('-'*10)
- model.to(device)
- print(model)
- print('-'*10)
- # ---------
- # 运行模型
- # --------
- for data in rand_loader:
- inputData = data.to(device)
- print(inputData.size())
- outputData = model(inputData)
- print("Outside inputData size: {}, Outside outputData size: {}".format(inputData.size(), outputData.size()))
- print('-'*10)
我们注意一下最终输出的结果.
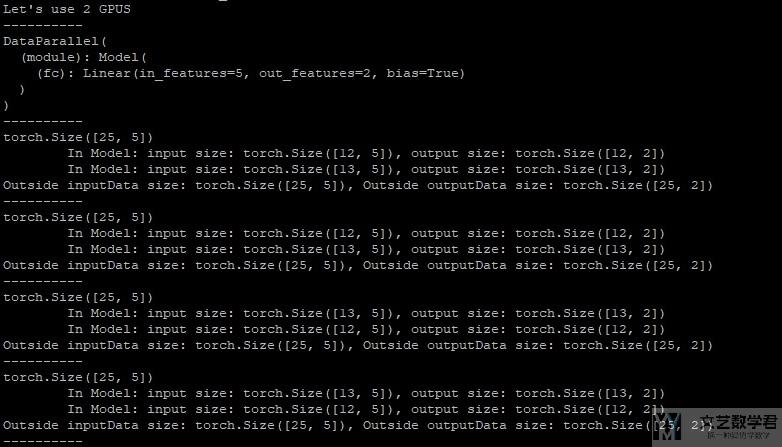
可以注意到, 使用DataParallel之后, 会自动一个batch中的数据分配到多个GPU上进行训练. 最后返回的时候会进行merge. 就像上图所展示的结果, 将两个GPU上的inputsize相加的结果是Outside Inputsize. 这样做就可以同时使用多个GPU来进行训练.
原理总结: DataParallel会自动将数据进行分割, 并放入不同的GPU上. 训练完毕之后, 他会收集和合并最后的结果, 用来更新模型. (DataParallel splits your data automatically and sends job orders to multiple models on several GPUs. After each model finishes their job, DataParallel collects and merges the results before returning it to you.)
多GPU训练的问题--unbalanced GPU usage
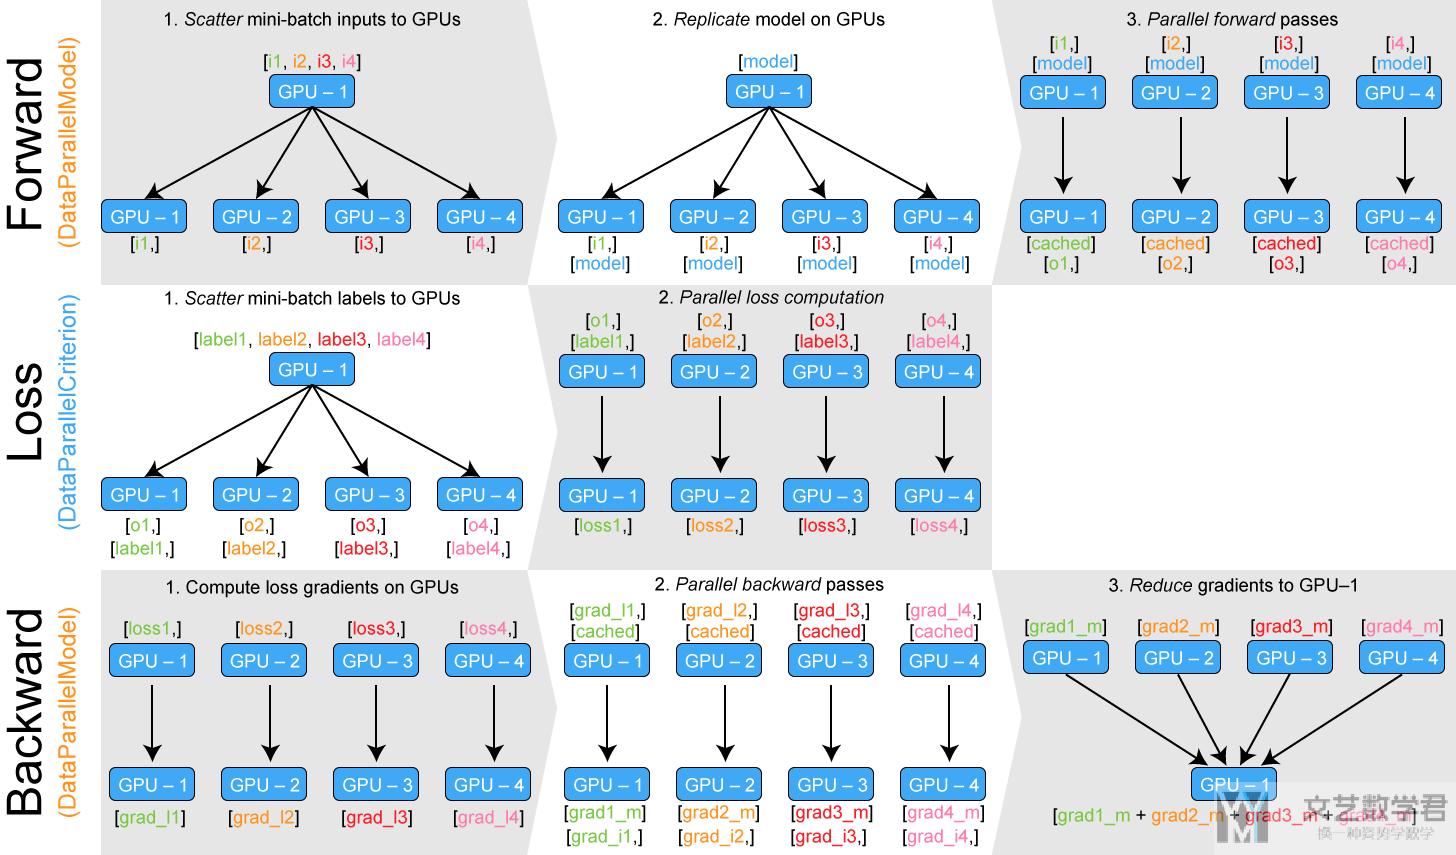
在使用多GPU进行训练的时候, 会出现GPU缓存不均匀的问题, 也就是第一个GPU的显存会高于其他的GPU, 我们通过下图来看一下多GPU训练的原理, 来看一下这个问题出现的原因(原图的链接: Training Neural Nets on Larger Batches: Practical Tips for 1-GPU, Multi-GPU & Distributed setups).

从上图的forward部分的step4(最右侧), 可以看到所有模型的output需要gather到第一块GPU上. 这个时候就会出现第一块GPU的缓存使用比其他的GPU大的情况. 最后模型的更新是在一块GPU上进行更新, 这样到下一轮的时候, 就重新进行模型的复制和数据的分发.
我们有下面的两个方式来解决unbalanced GPU usage的情况(目的就是为了解决loss的计算, 不要在一个GPU上进行计算).
- computing the loss in the forward pass of your model,
- computing the loss in a parallel fashion.
第一种方法使用起来会有一些限制, 同时由于forward变复杂之后使得计算变慢, 所以我们主要来说明一下第二种方式.
在第二种方式中, 我们的解决办法就是每一个GPU分别进行计算loss, 而不是汇总到一起进行计算. (In that case, the solution is to keep each partial output on its GPU instead of gathering all of them to GPU-1. We well need to distribute our loss criterion computation as well to be able to compute and back propagate our loss.)
我们可以通过在下面的链接中下载parallel.py, 并包含在你的代码中, 他主要包含两个部分, 分别是DataParallelModel和DataParallelCriterion, 我们可以通过下面的方式来进行使用.
- from parallel import DataParallelModel, DataParallelCriterion
- parallel_model = DataParallelModel(model) # Encapsulate the model
- parallel_loss = DataParallelCriterion(loss_function) # Encapsulate the loss function
- predictions = parallel_model(inputs) # Parallel forward pass
- # "predictions" is a tuple of n_gpu tensors
- loss = parallel_loss(predictions, labels) # Compute loss function in parallel
- loss.backward() # Backward pass
- optimizer.step() # Optimizer step
- predictions = parallel_model(inputs) # Parallel forward pass with new parameters
下面看一下这种方式的结构图, 可以看到他是将label也进行分发, 使得loss也可以在不同的GPU上来进行计算.
下面有两个注意点, 在我们使用的时候需要进行注意:
- 模型输出, Your model outputs several tensors: you likely want to disentangle them: output_1, output_2 = zip(*predictions)
- 使用同一个GPU进行计算, Sometimes you don't want to use a parallel loss function: gather all the tensors on the cpu: gathered_predictions = parallel.gather(predictions)
参考资料
- Pytorch论坛上的问题: Run Pytorch on Multiple GPUs
- Pytorch官网的例子(上面的例子就是参考这个链接来完成的): OPTIONAL: DATA PARALLELISM
- 一份中文的指南: Pytorch中多GPU训练指北
Pytorch显存使用查看
关于Pytroch显存的查看, 在这个链接: 再次浅谈Pytorch中的显存利用问题(附完善显存跟踪代码)中是提供了一个查看显存的工具. 工具的地址为: Pytorch-Memory-Utils.
其中可以查看总体的运行的显存和每一步的显存, modelsize->查看模型总的显存; gpu_mem_track分布查看每一步显存使用情况(但是我尝试了以下modelsize, 还是和实际的结果有点不同).
所以说, 我还是会使用下面的命令进行查看.
- nvidia-smi
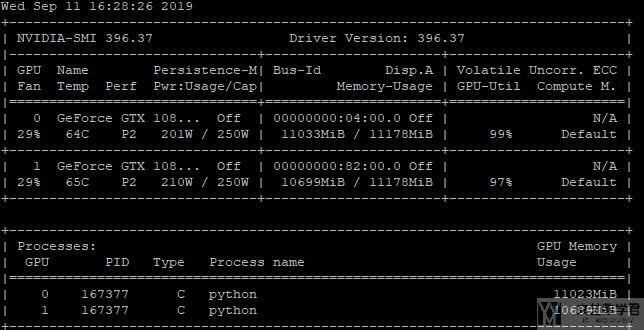
参考资料: 机器学习服务器使用一些命令记录
牺牲计算速度减少显存使用--CHECKPOINT
有的时候, 我们的模型特别深的时候, 会出现一个模型占用的显存就太大了. 这个时候我们可以使用pytorch提供的checkpoint, 可以帮助我们将一个模型分成几个部分来进行计算, 从而可以减少显存的使用, 但是同样代价就是会使得计算速度变慢(他计算完毕之后会进行释放, 之后再次需要的时候会再次进行计算, 所以计算速度会慢一些). 关于checkpoint, 会有两个函数, 一个是checkpoint_sequential, 另一个是checkpoint, 我们可以分别来看一下两者的使用和具体的效果.
checkpoint_sequential
这个函数的作用就是将sequential分成好几个部分来分别进行计算. 我们来看一个例子. 就是我们在定义好模型之后, 传入x的时候使用下面的方式进行传入.
- # ------------------------------
- # 定义模型(这里假设我们的网络很深)
- # ------------------------------
- fc = []
- fc = fc + [nn.Linear(input_size, input_size)]
- fc = fc + [nn.Linear(input_size, input_size) for _ in range(70)]
- fc = fc + [nn.Linear(input_size, output_size)]
- model = nn.Sequential(*fc)
- # 模型的运行
- num_segments = 10
- outputData = checkpoint_sequential(model, num_segments, inputData)
下面是一个完整的例子, 核心还是上面所讲的内容.
- import torch
- import torch.nn as nn
- from torch.utils.data import Dataset, DataLoader
- from torch.utils.checkpoint import checkpoint_sequential
- # --------------
- # 导入库和确定参数
- # --------------
- input_size = 1000
- output_size = 100
- batch_size = 16
- data_size = 30000
- device = torch.device("cuda:0" if torch.cuda.is_available() else "cpu")
- # -----------
- # 使用的数据集
- # -----------
- # 虚拟数据集
- class RandomDataset(Dataset):
- def __init__(self, size, length):
- self.len = length
- self.data = torch.randn(length, size)
- def __getitem__(self, index):
- return self.data[index]
- def __len__(self):
- return self.len
- # 定义数据集: 这里一共有data_size组数据, 每组数据有input_size个特征, batch_size大小
- dataset = RandomDataset(size=input_size, length=data_size)
- rand_loader = DataLoader(dataset=dataset, batch_size=batch_size, shuffle=True)
- # ------------------------------
- # 定义模型(这里假设我们的网络很深)
- # ------------------------------
- fc = []
- fc = fc + [nn.Linear(input_size, input_size)]
- fc = fc + [nn.Linear(input_size, input_size) for _ in range(70)]
- fc = fc + [nn.Linear(input_size, output_size)]
- model = nn.Sequential(*fc)
- model.to(device)
- print(model)
- print('-'*10)
- # ------
- # 优化器
- # ------
- optimizer = torch.optim.Adam(model.parameters(), lr=0.002, betas=(0.5, 0.999))
- # ---------
- # 运行模型
- # --------
- for data in rand_loader:
- inputData = data.to(device)
- print(inputData.size())
- optimizer.zero_grad()
- # 分成两个部分
- num_segments = 10
- outputData = checkpoint_sequential(model, num_segments, inputData)
- # outputData = model(inputData)
- outputData.sum().backward()
- optimizer.step()
- print("Outside inputData size: {}, Outside outputData size: {}".format(inputData.size(), outputData.size()))
- print('-'*10)
我们可以比较一些分成不同部分所占用的显存的大小.
首先是不进行分割, 分割数为0的时候, 直接运行所占用的显存, 为1717MB.
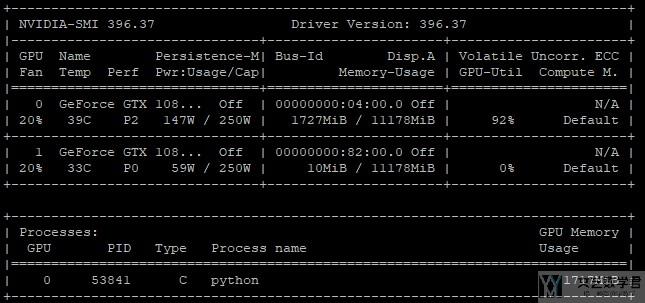
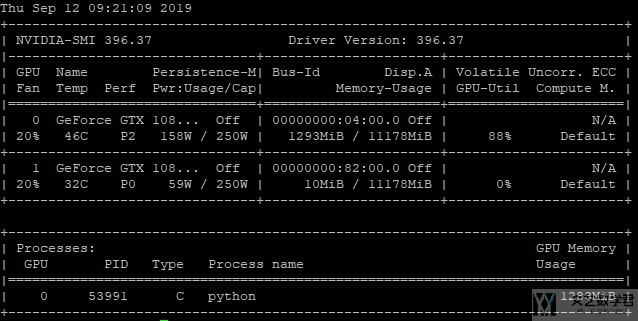
接着是分割为两个部分, 运行时所占用的显存大小为1283MB.
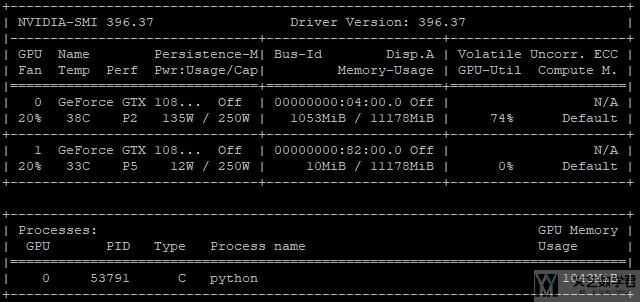
接着是分割为5个部分, 占用显存大小为1043MB.
最后是分割为10个部分, 占用显存大小为959MB.
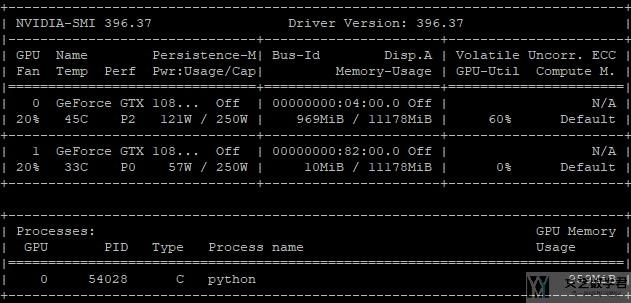
可以看到确实是分割的数量越多, 模型运行的时候所占用的显存大小也是越小的, 但是并不是呈现线性的关系, 后面减小的幅度会是越来越小的.
但是我们在使用checkpoint_sequential的时候限制会比较多, 只能是使用nn.Sequential来定义的模型, 同时也不能使用多GPU同时进行训练. 如果使用checkpoint, 那么限制就会少一些. 下面我们就来看一下checkpoint的用法.
torch.utils.checkpoint.checkpoint
这个checkpoint的用法, 真的是找了好久才找到一个使用的例子. 参考链接为: densenet. 他里面有这样的一段例子.
- import torch
- import torch.nn as nn
- import torch.nn.functional as F
- import torch.utils.checkpoint as cp
- class _DenseLayer(nn.Module):
- def __init__(self, num_input_features, growth_rate, bn_size, drop_rate, efficient=False):
- super(_DenseLayer, self).__init__()
- self.add_module('norm1', nn.BatchNorm2d(num_input_features)),
- self.add_module('relu1', nn.ReLU(inplace=True)),
- self.add_module('conv1', nn.Conv2d(num_input_features, bn_size * growth_rate,
- kernel_size=1, stride=1, bias=False)),
- self.add_module('norm2', nn.BatchNorm2d(bn_size * growth_rate)),
- self.add_module('relu2', nn.ReLU(inplace=True)),
- self.add_module('conv2', nn.Conv2d(bn_size * growth_rate, growth_rate,
- kernel_size=3, stride=1, padding=1, bias=False)),
- self.drop_rate = drop_rate
- self.efficient = efficient
- def forward(self, *prev_features):
- bn_function = _bn_function_factory(self.norm1, self.relu1, self.conv1)
- if self.efficient and any(prev_feature.requires_grad for prev_feature in prev_features):
- bottleneck_output = cp.checkpoint(bn_function, *prev_features)
- else:
- bottleneck_output = bn_function(*prev_features)
- new_features = self.conv2(self.relu2(self.norm2(bottleneck_output)))
- if self.drop_rate > 0:
- new_features = F.dropout(new_features, p=self.drop_rate, training=self.training)
- return new_features
也就是上面第23行的地方, 显示了checkpoint是如何使用的. 所以我就根据上面的例子, 自己做了一个小的例子, 来完成了相关的实验. 所以我们直接来看一个例子.
在说明checkpoint如何运作之前, 有一个地方需要注意的是, 使用checkpoint, 不能放在第一个位置, 或者说放在第一个就要传入一个有梯度的, 不然就无法进行反向传播.
以下的内容参考自, Checkpoint with no grad requiring inputs PROBLEM
他会出现以下的warning.
- UserWarning: None of the inputs have requires_grad=True. Gradients will be None warnings.
我们可以先看下面的一个例子, 看一下具体在说什么问题.
- m = torch.nn.Linear(4,3)
- x = torch.randn(10,4)
- z1 = checkpoint(lambda _:m(_), x)
- print(z1.requires_grad)
- z2 = m(x)
- print(z2.requires_grad)

正常情况下, 网络输出的变量是有梯度的, 因为要进行反向传播, 所以会记住运输的过程. 但是可以看到上面, 如果使用了checkpoint之后, 输入结果是没有梯度的.
我们可以对输入变量直接设置requires_grad=True来保证最后的结果有梯度, 就像下面这样, 最后输出就是True
- x.requires_grad_(True)
- z1 = checkpoint(lambda _:m(_), x)
- print(z1.requires_grad)
但是这样就会存在问题. 首先, 这样会将input和模型参数同等对待, 通常情况下, 我们是要更新模型的参数, 而不是更新input. 这样会增加运算时间和gpu memory.
对于上面出现的问题, 有两种方式可以解决上面的问题, 其实两者的想法是一样的. 都是在最开始的时候, 输入一个有梯度的变量.
也就是下面的这段话.
In case of checkpointing, if all the inputs don't require grad but the outputs do, then if the inputs are passed as is, the output of Checkpoint will be variable which don't require grad and autograd tape will break there. To get around, you can pass a dummy input which requires grad but isn't necessarily used in computation.
上面这段话中的pass a dummy input很重要, 也是后面的方法的思路.
方法一
第一个方法就是在checkpoint之前加入一层网络, 这个网络加上一个数, 再减去一个数, 对最后的结果不影响. 但是此时因为checkpoint没有在前向传播的第一个位置, 所以之后的output就可以有梯度了.
- # ------------------------------
- # 定义模型(这里假设我们的网络很深)
- # ------------------------------
- class DummyLayer(nn.Module):
- def __init__(self):
- super().__init__()
- self.dummy = nn.Parameter(torch.ones(1, dtype=torch.float32))
- def forward(self,x):
- return x + self.dummy - self.dummy #(also tried x+self.dummy)
- class Model(nn.Module):
- def __init__(self, input_size, output_size):
- super(Model, self).__init__()
- fc = []
- fc = fc + [nn.Linear(input_size, input_size)]
- fc = fc + [nn.Linear(input_size, input_size) for _ in range(10)]
- self.model1 = nn.Sequential(*fc)
- fc = []
- fc = fc + [nn.Linear(input_size, input_size) for _ in range(10)]
- fc = fc + [nn.Linear(input_size, output_size)]
- self.model2 = nn.Sequential(*fc)
- self.dummy_layer = DummyLayer()
- def forward(self, input):
- x = self.dummy_layer(input)
- x = checkpoint(self.model1, x)
- output = checkpoint(self.model2, x)
- # x = self.model1(input)
- # output = self.model2(x)
- print("\tIn Model: input size: {}, output size: {}".format(input.size(), output.size()))
- return output
- # 创建模型
- model = Model(input_size=input_size, output_size=output_size).to(device)
- model(dataset[0:1].to(device))
注意看上面的DummyLayer, 和在Model的前向传播中, 我们先进行了dummy_layer的运算. 虽说这个运算很少, 但是这个不是最好的方式, 我们可以通过下面的方式达到同样的目的.
方法二
第二种方法就是在传入的时候, 多传入一个变量, 这个变量是有梯度的, 但是没有参与运算. 可以看到下面的代码中, ModuleWrapperlgnores2ndArg中就会传入x和dummy_arg, 其中x是正常的input, dummy_arg的作用就是传入一个带有梯度的变量.
- class ModuleWrapperIgnores2ndArg(nn.Module):
- def __init__(self, module):
- super().__init__()
- self.module = module
- def forward(self, x, dummy_arg=None):
- # 这里向前传播的时候, 不仅传入x, 还传入一个有梯度的变量, 但是没有参与计算
- assert dummy_arg is not None
- x = self.module(x)
- return x
- class Model(nn.Module):
- def __init__(self, input_size, output_size):
- super(Model, self).__init__()
- fc = []
- fc = fc + [nn.Linear(input_size, input_size)]
- fc = fc + [nn.Linear(input_size, input_size) for _ in range(10)]
- self.model1 = nn.Sequential(*fc)
- fc = []
- fc = fc + [nn.Linear(input_size, input_size) for _ in range(10)]
- fc = fc + [nn.Linear(input_size, output_size)]
- self.model2 = nn.Sequential(*fc)
- self.dummy_tensor = torch.ones(1, dtype=torch.float32, requires_grad=True)
- self.module_wrapper = ModuleWrapperIgnores2ndArg(self.model1)
- def forward(self, input):
- # 这里传入三个参数是因为, ModuleWrapperIgnores2ndArg前向传播的时候需要传入两个
- x = checkpoint(self.module_wrapper, input, self.dummy_tensor)
- output = checkpoint(self.model2, x)
- print("\tIn Model: input size: {}, output size: {}".format(input.size(), output.size()))
- return output
- model = Model(input_size=input_size, output_size=output_size).to(device)
- model(dataset[0:1].to(device))
这样上面的代码的输入结果就是有梯度的, 也就是可以进行反向传播了.
总体代码
上面是一些关键的代码(主要是看上面的样例代码中的forward部分). 下面是完整的代码, 包含数据集的定义等, 可以自己实践一下, 我还实践了一下多GPU同时运行的场景.
- import torch
- import torch.nn as nn
- from torch.utils.data import Dataset, DataLoader
- from torch.utils.checkpoint import checkpoint, checkpoint_sequential
- device = torch.device("cuda:0" if torch.cuda.is_available() else "cpu")
- print(device)
- # --------------
- # 导入库和确定参数
- # --------------
- input_size = 1000
- output_size = 100
- batch_size = 64
- data_size = 30000
- # -----------
- # 使用的数据集
- # -----------
- # 虚拟数据集
- class RandomDataset(Dataset):
- def __init__(self, size, length):
- self.len = length
- self.data = torch.randn(length, size)
- def __getitem__(self, index):
- return self.data[index]
- def __len__(self):
- return self.len
- # 定义数据集: 这里一共有data_size组数据, 每组数据有input_size个特征, batch_size大小
- dataset = RandomDataset(size=input_size, length=data_size)
- rand_loader = DataLoader(dataset=dataset, batch_size=batch_size, shuffle=True)
- class ModuleWrapperIgnores2ndArg(nn.Module):
- def __init__(self, module):
- super().__init__()
- self.module = module
- def forward(self, x, dummy_arg=None):
- # 这里向前传播的时候, 不仅传入x, 还传入一个有梯度的变量, 但是没有参与计算
- assert dummy_arg is not None
- x = self.module(x)
- return x
- class Model(nn.Module):
- def __init__(self, input_size, output_size):
- super(Model, self).__init__()
- fc = []
- fc = fc + [nn.Linear(input_size, input_size)]
- fc = fc + [nn.Linear(input_size, input_size) for _ in range(10)]
- self.model1 = nn.Sequential(*fc)
- fc = []
- fc = fc + [nn.Linear(input_size, input_size) for _ in range(10)]
- fc = fc + [nn.Linear(input_size, output_size)]
- self.model2 = nn.Sequential(*fc)
- self.dummy_tensor = torch.ones(1, dtype=torch.float32, requires_grad=True)
- self.module_wrapper = ModuleWrapperIgnores2ndArg(self.model1)
- def forward(self, input):
- # 这里传入三个参数是因为, ModuleWrapperIgnores2ndArg前向传播的时候需要传入两个
- x = checkpoint(self.module_wrapper, input, self.dummy_tensor)
- output = checkpoint(self.model2, x)
- print("\tIn Model: input size: {}, output size: {}".format(input.size(), output.size()))
- return output
- model = Model(input_size=input_size, output_size=output_size).to(device)
- # model结果测试
- model(dataset[0:1].to(device))
- # ---------------------------------
- # 运行模型, 查看模型参数是否改变
- # ---------------------------------
- optimizer = torch.optim.Adam(model.parameters(), lr=2, betas=(0.5, 0.999))
- for data in rand_loader:
- inputData = data.to(device)
- optimizer.zero_grad()
- outputData = model(inputData)
- outputData.sum().backward()
- optimizer.step()
- print("Outside inputData size: {}, Outside outputData size: {}".format(inputData.size(), outputData.size()))
- print('-'*10)
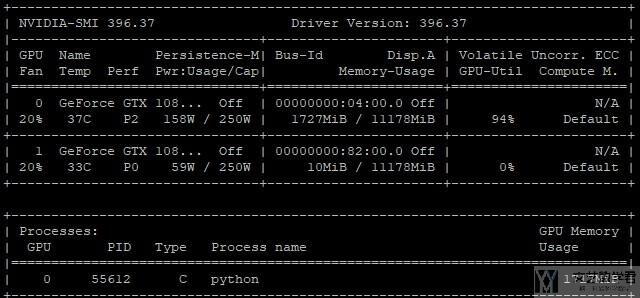
我们看一下各种的测试结果. 首先是不使用checkpoint的时候的显存占用大小, 为1717MB.
接着是使用check_point之后的显存占用大小. 可以看到减小为1283MB.
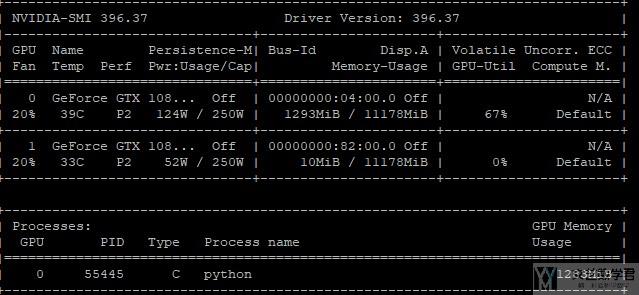
注意, 将preserve_rng_state设置为False的时候, 速度可以加快.
一个综合的例子
下面是一个同时使用check_point和checkpoint_sequential的例子, 可以参考一下.
- class Generator(nn.Module):
- # 输入一张图片, 输出为一张相同大小的图片
- def __init__(self, residualNum=0):
- super(Generator, self).__init__()
- # Initial convolution block
- InitialBlock = []
- InitialBlock = InitialBlock + [nn.ReflectionPad2d(padding=3),
- nn.Conv2d(in_channels=3, out_channels=64, kernel_size=7),
- nn.InstanceNorm2d(64),
- nn.ReLU(),
- # Downsampling
- nn.Conv2d(in_channels=64, out_channels=64*2, kernel_size=3, stride=2, padding=1),
- nn.InstanceNorm2d(64*2),
- nn.ReLU(inplace=True),
- nn.Conv2d(in_channels=64*2, out_channels=64*4, kernel_size=3, stride=2, padding=1),
- nn.InstanceNorm2d(64*4),
- nn.ReLU(inplace=True)]
- self.InitialBlock = nn.Sequential(*InitialBlock)
- # Residual blocks
- residualBlock = []
- for _ in range(residualNum):
- residualBlock.append(ResidualBlock(64*4))
- self.residualblock = nn.Sequential(*residualBlock)
- # Upsampling
- UpsamplingBlock = []
- UpsamplingBlock = UpsamplingBlock + [nn.ConvTranspose2d(in_channels=64*4, out_channels=64*2, kernel_size=3, stride=2, padding=1, output_padding=1),
- nn.InstanceNorm2d(64*2),
- nn.ReLU(inplace=True),
- nn.ConvTranspose2d(in_channels=64*2, out_channels=64*1, kernel_size=3, stride=2, padding=1, output_padding=1),
- nn.InstanceNorm2d(64*1),
- nn.ReLU(inplace=True),
- # Output layer
- nn.ReflectionPad2d(padding=3),
- nn.Conv2d(in_channels=64, out_channels=3, kernel_size=7),
- nn.Tanh()]
- self.UpsamplingBlock = nn.Sequential(*UpsamplingBlock)
- def forward(self, x):
- x.requires_grad_()
- x = checkpoint(self.InitialBlock, x)
- x = checkpoint_sequential(self.residualblock, 2, x)
- x = checkpoint(self.UpsamplingBlock, x)
- return x
参考链接
- 官方指南(这个没有使用例子): TORCH.UTILS.CHECKPOINT
- check_point的使用例子(一个别人实现的网络, 用到了check_point): densenet
- 当时从这个issue上找到了上面的链接: Checkpointing is slow on nn.DataParallel models
- 这一篇文章也是介绍了这两个方法的使用, 但是例子比较简单: 如何在Pytorch中精细化利用显存
一些存在的问题
with torch.no_grad()
我们在验证集的时候, 可以使用with torch.no_grad()来结语memory, 这样可以在计算的时候不需要计算梯度. 详细的说明参考: model.eval()与torch.no_grad()的区别
下面是一个用法的例子, 当我们在验证集的时候, 可以在前面加上with torch.no_grad().
- with torch.no_grad():
- correct = 0
- total = 0
- for data, labels in test_dataset:
- data = data.to(device)
- labels = labels.to(device)
- outputs = model(data)
- _, predicted = torch.max(outputs.data, 1)
- total += labels.size(0)
- correct += (predicted == labels).sum().item()
'CUDA error: out of memory' after several epochs
有的时候我们会在训练了几个epoch之后, 出现"CUDA error: out of memory"的报错, 这可能是因为我们在计算loss的时候, 直接将loss加了上去. 如下所示:
- iter_loss += loss
但是这样进行相加的时候, 我们会每一个epoch都会存储计算图, 所以memory会一直进行增加. ( If that's the case, you are storing the computation graph in each epoch, which will grow your memory.)
我们需要将loss提取出来, 这样计算图会被自动释放. (You need to detach the loss from the computation, so that the graph can be cleared.)
所以我们应该使用下面的方式进行loss的相加.
- iter_loss += loss.item()
- # 或者下面这种方式
- iter_loss += loss.detach().item()
参考链接: 'CUDA error: out of memory' after several epochs
这个链接讲得比较详细: CUDA error: out of memory
- 微信公众号
- 关注微信公众号
-

- QQ群
- 我们的QQ群号
-


2021年1月14日 上午1:11 1F
请问在使用checkpoint的方法一中,self.dummy可以是全零参数吗?让输入加上零?