文章目录(Table of Contents)
介绍
之前在介绍CNN的文章中,Convolutional Neural Networks(CNN)介绍–Pytorch实现,介绍了关于逆卷积的一些内容,但是感觉没有讲的很好。这次查到一篇文章,正好结合理解详细说一下,贴一下自己实验的结果。
参考链接 : Up-sampling with Transposed Convolution
建议可以看一下原文,我的理解可能还是会和原文有些偏差。
逆卷积介绍
上面文章,强调的卷积和逆卷积的核心是:
- 卷积是有一种,多对一的关系;
- 逆卷积是有一种,一对多的关系;
可以简单看一下下面的示意图:
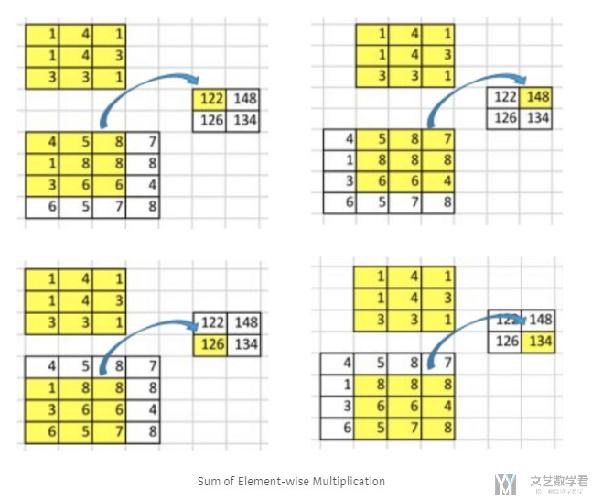
下面是进行卷积的过程,如卷积结果中122会和原来的9个数字有关系。
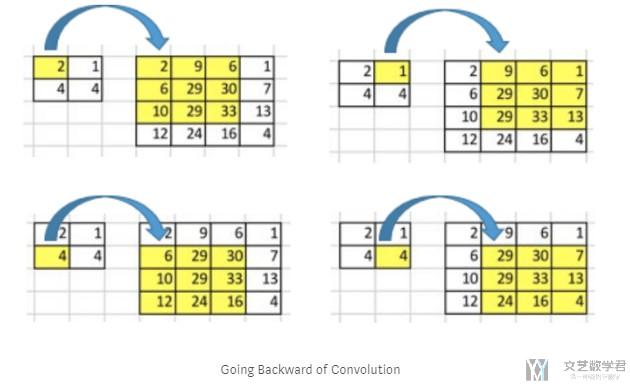
下面是逆卷积的过程,我们希望2通过逆卷积能与后面的9个数字有关。也就是说,进行逆卷积操作后,我们希望左上角的数字2希望和2和1有关系。那么如何达到这样的效果呢。
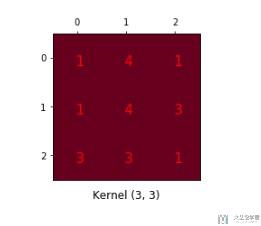
对于卷积的运算,其实我们可以转换为下面的矩阵乘法。我们将kernel排成下面的矩阵(4x16)。
这是原始的kernel,我们将其重新进行排列。(这里的图像有些不清楚,可以查看上面链接的原文结合进行查看)
重新排列后得到下面的矩阵:
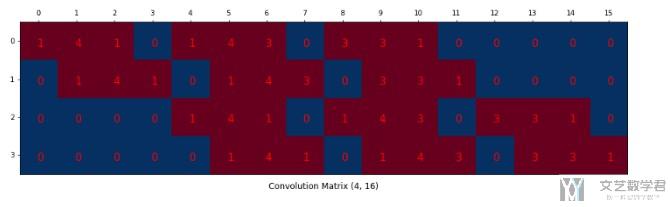
具体关于下面矩阵的生成方法,其实就是把原始的kernel每一行展平,横着进行放置。
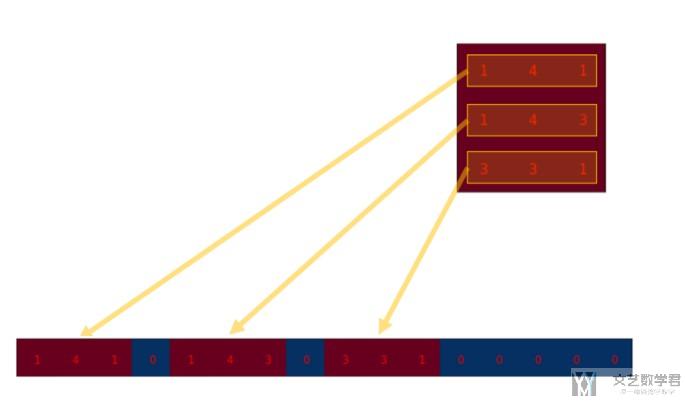
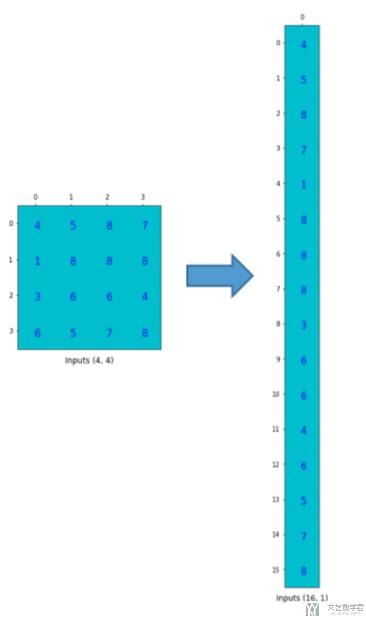
接着,我们把图像数据也进行展平,得到下面的数据。
最后,原始的进行卷积的操作,就相当于是下面的矩阵运算的操作了。最后只需要将结果的41还原回22的即可。(图片不清楚,建议查看原文)
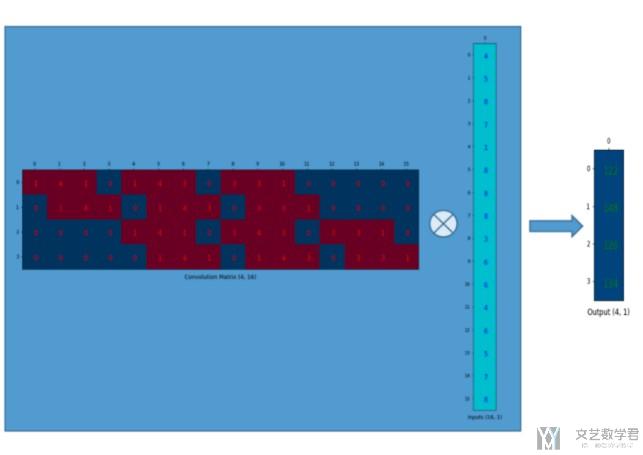
上面的卷积过程,是一个416 × 161 = 41的过程。且我们可以看到,输出的每一个值都与原来的9个值有关,可以看到416的矩阵中有9个数字不为0,即每一行红色的个数。
于是,我们想到逆卷积的操作,相当于是164 × 41 = 16*1的一个过程,我们将上面的矩阵进行转置操作,在进行乘法。
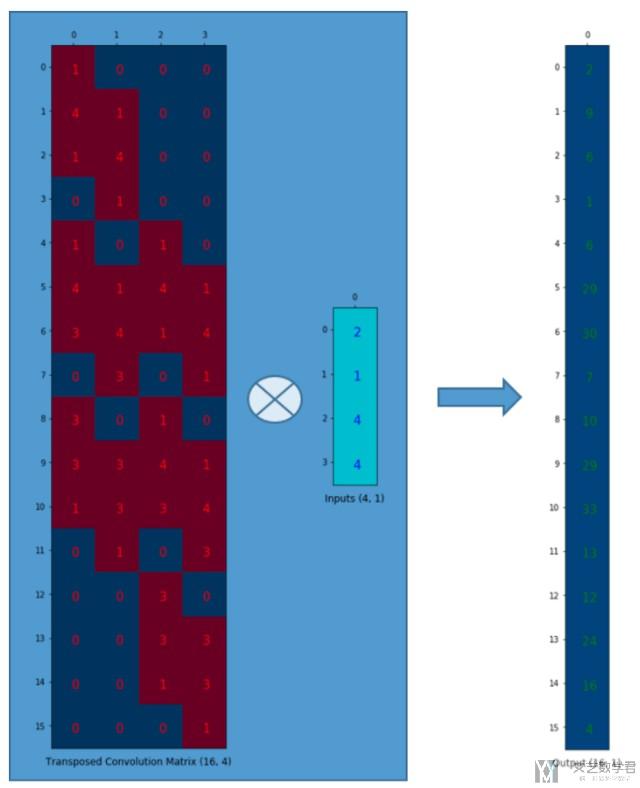
上面的结果相当于是一个逆卷积的过程,可以看到input中的4个数字,如2会影响到最后output的9个数字,因为第一列有9个值不是0.
上面的过程,主要还是再强调,我们逆卷积和卷积是为了保持一个一对多和多对一的关系。卷积和逆卷积的系数都是要分别进行学习的,不是简单的转置的关系(下面的实验会有讲到)
在实际进行逆卷积的操作的时候,我们是会在input周围填充0,我们可以看下面的动图。动图来源 : https://github.com/vdumoulin/conv_arithmetic
可以看到,在填充后,input左上角的方框会被计算9次,相当于是和output的9个数字是有关系的。
nn.MaxUnpool介绍
在使用MaxUnpool的时候要特别注意, 需要在maxpool的时候保存indices. 否则会出现如下的报错:
- typeError: forward() missing 1 required positional argument: 'indices'
同时, 我们不可以把nn.MaxUnpool2d写在nn.Sequential里面, 因为这个需要有两个输入的参数.
我们下面看一个例子, 有一个MaxUnpool的情况:
- class ConvDAE(nn.Module):
- def __init__(self):
- super().__init__()
- # input: batch x 3 x 32 x 32 -> output: batch x 16 x 16 x 16
- self.encoder = nn.Sequential(
- nn.Conv2d(3, 16, 3, stride=1, padding=1), # batch x 16 x 32 x 32
- nn.ReLU(),
- nn.BatchNorm2d(16),
- nn.MaxPool2d(2, stride=2, return_indices=True)
- )
- self.unpool = nn.MaxUnpool2d(2, stride=2, padding=0)
- self.decoder = nn.Sequential(
- nn.ConvTranspose2d(16, 16, 3, stride=2, padding=1, output_padding=1),
- nn.ReLU(),
- nn.BatchNorm2d(16),
- nn.ConvTranspose2d(16, 3, 3, stride=1, padding=1, output_padding=0),
- nn.ReLU()
- )
- def forward(self, x):
- print(x.size())
- out, indices = self.encoder(x)
- out = self.unpool(out, indices)
- out = self.decoder(out)
- print(out.size())
- return out
当有两个MaxUnpool的情况.
- class autoencoder(nn.Module):
- """这就是原始论文的结构
- """
- def __init__(self):
- super(autoencoder, self).__init__()
- # -------
- # encode
- # -------
- self.encode1 = nn.Sequential(
- # 第一层
- nn.Conv1d(kernel_size=25, in_channels=1, out_channels=32, stride=1, padding=12), # (1,784)->(32,784)
- nn.BatchNorm1d(32), # 加上BN的结果
- nn.ReLU(),
- nn.MaxPool1d(kernel_size=3, stride=3, padding=1, return_indices=True), # (32,784)->(32,262)
- )
- self.encode2 = nn.Sequential(
- # 第二层
- nn.Conv1d(kernel_size=25, in_channels=32, out_channels=64, stride=1, padding=12), # (32,262)->(64,262)
- nn.BatchNorm1d(64),
- nn.ReLU(),
- nn.MaxPool1d(kernel_size=3, stride=3, padding=1, return_indices=True), # (batchsize,64,262)->(batchsize,64,88)
- )
- self.encode3 = nn.Sequential(
- nn.Linear(in_features=88*64, out_features=1024),
- nn.Linear(in_features=1024, out_features=30)
- )
- # -------
- # decode
- # -------
- self.unpooling1 = nn.MaxUnpool1d(kernel_size=3, stride=3, padding=1) # (batchsize,64,262)<-(batchsize,64,88)
- self.unpooling2 = nn.MaxUnpool1d(kernel_size=3, stride=3, padding=1) # (32,784)<-(32,262)
- self.decode1 = nn.Sequential(
- # 第一层
- nn.ReLU(),
- nn.BatchNorm1d(64),
- nn.ConvTranspose1d(kernel_size=25, in_channels=64, out_channels=32, stride=1, padding=12), # (32,262)<-(64,262)
- )
- # 第二层
- self.decode2 = nn.Sequential(
- nn.ReLU(),
- nn.BatchNorm1d(32), # 加上BN的结果
- nn.ConvTranspose1d(kernel_size=25, in_channels=32, out_channels=1, stride=1, padding=12), # (1,784)<-(32,784)
- )
- self.decode3 = nn.Sequential(
- nn.Linear(in_features=30, out_features=1024),
- nn.Linear(in_features=1024, out_features=88*64)
- )
- def forward(self, x):
- # encode
- x = x.view(x.size(0),1,-1) # 将图片摊平
- x,indices1 = self.encode1(x) # 卷积层
- x,indices2 = self.encode2(x) # 卷积层
- x = x.view(x.size(0), -1) # 展开
- x = self.encode3(x) # 全连接层
- # decode
- x = self.decode3(x)
- x = x.view(x.size(0), 64, 88)
- x = self.unpooling1(x, indices2)
- x = self.decode1(x)
- x = self.unpooling2(x, indices1)
- x = self.decode2(x)
- return x
参考资料
实现结果
其实具体的实现的方式可以参考使用CNN在MNIST上实现简单的攻击样本,这里就是进行了简单的修改。
加载数据集
首先我们加载这次测试使用的数据集,使用MNIST的数据集;
- import torch
- import torch.nn as nn
- import torchvision
- import torchvision.transforms as transforms
- # Device configuration
- device = torch.device('cuda' if torch.cuda.is_available() else 'cpu')
- # Hyper-parameters
- num_epochs = 5
- batch_size = 100
- learning_rate = 0.001
- # MNIST dataset
- train_dataset = torchvision.datasets.MNIST(root='./',
- train=True,
- transform=transforms.ToTensor(),
- download=True)
- test_dataset = torchvision.datasets.MNIST(root='./',
- train=False,
- transform=transforms.ToTensor())
- # Data loader
- train_loader = torch.utils.data.DataLoader(dataset=train_dataset,
- batch_size=batch_size,
- shuffle=True)
- test_loader = torch.utils.data.DataLoader(dataset=test_dataset,
- batch_size=batch_size,
- shuffle=False)
定义网络结构
我们使用下面一个简单的网络结构,我们先将图片通过卷积后池化进行压缩,接着希望通过逆卷积和逆池化进行还原。最后查看卷积的weight和逆卷积的weight.
- Conv->MaxPool->MaxUnpool->UnConv
- 每一层图像大小的变化 28*28(input)->26*26(conv)->13*13(pool)->26*26(unpool)->28*28(output)
- # 搭建网络
- class CNNMNIST(nn.Module):
- def __init__(self):
- super(CNNMNIST,self).__init__()
- self.conv1 = nn.Conv2d(in_channels=1,out_channels=1,kernel_size=3,stride=1,padding=0)
- self.pool1 = nn.MaxPool2d(kernel_size=2,stride=2,padding=0,return_indices=True)
- self.unpool1 = nn.MaxUnpool2d(kernel_size=2,stride=2,padding=0)
- self.unconv1 = nn.ConvTranspose2d(in_channels=1, out_channels=1, kernel_size=3, stride=1, padding=0)
- def forward(self,x):
- # encode
- out1 = self.conv1(x)
- out = out1.clone()
- out,indices = self.pool1(out)
- # deocde
- out = self.unpool1(out,indices,output_size=out1.size())
- out = self.unconv1(out)
- return out
- # 网络的初始化
- model = CNNMNIST().to(device)
- print(model)

网络的训练
- # 定义优化器和损失函数
- criterion = nn.MSELoss(reduction='mean')
- optimizer = torch.optim.Adam(model.parameters(), lr=learning_rate)
- # 进行训练
- model.train()
- total_step = len(train_loader)
- for epoch in range(num_epochs):
- for i, (images, labels) in enumerate(train_loader):
- # Move tensors to the configured device
- images = images.to(device)
- # Forward pass
- outputs = model(images)
- loss = criterion(outputs, images)
- # Backward and optimize
- optimizer.zero_grad()
- loss.backward()
- optimizer.step()
- if (i+1) % 100 == 0:
- # 计算Loss
- print ('Epoch [{}/{}], Step [{}/{}], Loss: {:.4f}'
- .format(epoch+1, num_epochs, i+1, total_step, loss.item()))
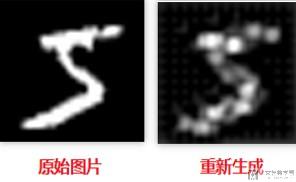
重构的效果
我们使用网络进行重构,看一下最终的效果如何。
看卷积和逆卷积的系数
我们验证一下卷积和逆卷积的系数是否是转置的关系。
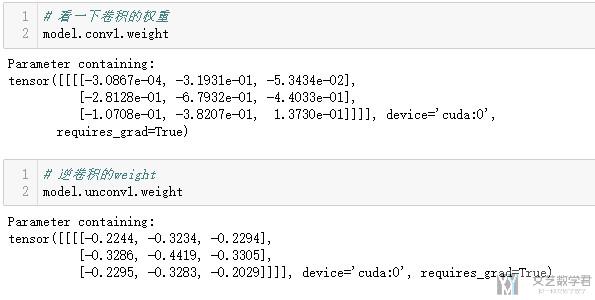
可以看到逆卷积的系数也是要进行训练得到的。
最后,还是十分建议阅读原文的,原文的链接如下:Up-sampling with Transposed Convolution
- 微信公众号
- 关注微信公众号
-

- QQ群
- 我们的QQ群号
-


2019年8月1日 下午7:00 1F
正被卷积玩得死去活来….
话说卷积是组合数学的内容吧?还是具体数学…
2019年8月1日 下午9:14 B1
@ clatterrr 这个分类我也不是很懂, 我之前看卷积是与图像处理有关. 我这里写的是介绍关于深度学习中(CNN)中卷积的操作.