文章目录(Table of Contents)
介绍
这个的想法来自下面的这篇文章,Fizz Buzz in Tensorflow,作者写成了一个面试的故事(还是很有趣的,可以看一下原文)。
大致的意思如下:
面试官有一题有这样的要求:I need you to print the numbers from 1 to 100, except that if the number is divisible by 3 print "fizz", if it's divisible by 5 print "buzz", and if it's divisible by 15 print "fizzbuzz".
然后我们使用神经网络来做解答。大致的思路是下面这样的,主要是train data的表示
- Train Data : 101-1024, 转换为二进制, 每个数使用10个0或1来进行表示.
- Label : 使用one-hot表示四种格式.
其实,这个做法看起来是没什么道理的,就是我们有更加简单的方法可以解决这个问题。不过,All Models Are Wrong, Some Are Useful。最终能实现目的即可。

下面贴一下详细的实现的过程。
Pytorch详细实现过程
Start with some standard imports
- import numpy as np
- import torch
- import torch.nn as nn
- import torch.utils.data as Data
- from torch.autograd import Variable
定义encode函数
我们在这里先定义两个函数:
- binary_encode : 将十进制转为二进制
- fizz_buzz_encode : 将数字转为最后需要预测的四个类别
- def binary_encode(i, num_digits):
- """将每个input转换为binary digits(转换为二进制的表示, 最多可是表示2^num_digits)
- """
- return np.array([i >> d & 1 for d in range(num_digits)])
- def fizz_buzz_encode(i):
- """将output转换为lebel
- """
- if i % 15 == 0: return 3
- elif i % 5 == 0: return 2
- elif i % 3 == 0: return 1
- else: return 0
产生训练数据
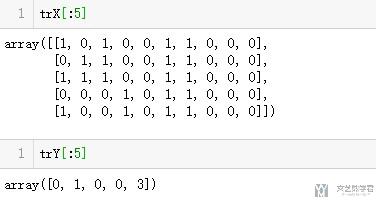
我们使用101-1024作为训练数据。
- NUM_DIGITS = 10
- trX = np.array([binary_encode(i, NUM_DIGITS) for i in range(101, 2**NUM_DIGITS)])
- trY = np.array([fizz_buzz_encode(i) for i in range(101, 2**NUM_DIGITS)])
我们看一下数据的内容

定义模型
接下来,我们就可以定义我们需要使用的model了。
- class FizzBuzzModel(nn.Module):
- def __init__(self, in_features, out_classes, hidden_size, n_hidden_layers):
- super(FizzBuzzModel,self).__init__()
- layers = []
- for i in range(n_hidden_layers):
- layers.append(nn.Linear(hidden_size,hidden_size))
- # layers.append(nn.Dropout(0.5))
- layers.append(nn.BatchNorm1d(hidden_size))
- layers.append(nn.ReLU())
- self.inputLayer = nn.Linear(in_features, hidden_size)
- self.relu = nn.ReLU()
- self.layers = nn.Sequential(*layers)
- self.outputLayer = nn.Linear(hidden_size, out_classes)
- def forward(self,x):
- x = self.inputLayer(x)
- x = self.relu(x)
- x = self.layers(x)
- out = self.outputLayer(x)
- return out
模型的训练
模型初始化, 定义loss和优化器
- # Device configuration
- device = torch.device('cuda' if torch.cuda.is_available() else 'cpu')
- # define the model
- simpleModel = FizzBuzzModel(10,4,150,3).to(device)
- print(simpleModel)
- # Loss and optimizer
- learning_rate = 0.05
- criterion = nn.CrossEntropyLoss()
- optimizer = torch.optim.Adam(simpleModel.parameters(), lr=learning_rate)
定义DataLoader
- # 使用batch进行训练
- FizzBuzzDataset = Data.TensorDataset(torch.from_numpy(trX).float().to(device),
- torch.from_numpy(trY).long().to(device))
- loader = Data.DataLoader(dataset=FizzBuzzDataset,
- batch_size=128*5,
- shuffle=True)
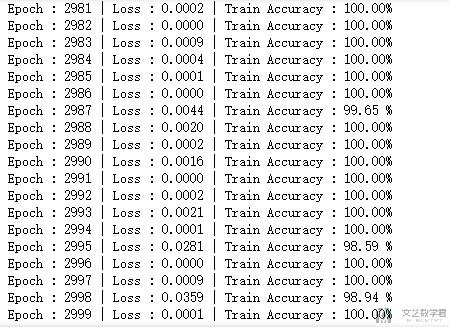
进行训练
- # 进行训练
- simpleModel.train()
- epochs = 3000
- for epoch in range(1,epochs):
- for step,(batch_x, batch_y) in enumerate(loader):
- out = simpleModel(batch_x) # 前向传播
- loss = criterion(out, batch_y) # 计算损失
- optimizer.zero_grad() # 梯度清零
- loss.backward() # 反向传播
- optimizer.step() # 随机梯度下降
- correct = 0
- total = 0
- _, predicted = torch.max(out.data, 1)
- total += batch_y.size(0)
- correct += (predicted == batch_y).sum().item()
- acc = 100*correct/total
- print('Epoch : {:0>4d} | Loss : {:<6.4f} | Train Accuracy : {:<6.2f}%'.format(epoch,loss,acc))
这里我们进行了3000个epoch的训练,最后准确率可以到100%

模型的测试
最后我们在测试集(也就是1-100)上进行测试,看一下测试集上的准确率是多少。
我们首先定义一个格式转换的函数
- def fizz_buzz_decode(i, prediction):
- return [str(i), "fizz", "buzz", "fizzbuzz"][prediction]
接着我们进行预测, 注意模型使用的时候需要进行模式的切换(切换为eval模式), 具体可以查看这篇文章, Batch Normalization技术介绍
- simpleModel.eval()
- # 进行预测
- testX = np.array([binary_encode(i, NUM_DIGITS) for i in range(1, 101)])
- predicts = simpleModel(torch.from_numpy(testX).float().to(device))
- # 预测的结果
- _,res = torch.max(predicts,1)
- res
- # 格式的转换
- predictions = [fizz_buzz_decode(i,prediction) for (i,prediction) in zip(range(1,101),res)]
- print(predictions)
看一下输出的结果:
- ['1', '2', 'fizz', '4', 'buzz', 'fizz', '7', '8', 'fizz', 'buzz', '11', 'fizz', '13', '14', 'fizzbuzz', '16', '17', 'fizz', '19', 'buzz', 'fizz', '22', '23', 'fizz', 'buzz', '26', 'fizz', '28', '29', 'fizzbuzz', '31', '32', 'fizz', '34', 'buzz', 'fizz', '37', '38', 'fizz', 'buzz', '41', 'fizz', '43', '44', 'fizzbuzz', '46', '47', 'fizz', '49', 'buzz', 'fizz', '52', '53', 'fizz', 'buzz', '56', 'fizz', '58', '59', 'fizzbuzz', '61', '62', 'fizz', '64', 'buzz', 'fizz', '67', '68', 'fizz', 'buzz', '71', 'fizz', '73', '74', 'fizzbuzz', '76', '77', 'fizz', '79', 'buzz', 'fizz', '82', '83', 'fizz', 'buzz', '86', 'fizz', '88', '89', 'fizzbuzz', '91', '92', 'fizz', '94', 'buzz', 'fizz', '97', '98', 'fizz', 'buzz']
这个准确率是100%的,我就不在这里贴代码了,可以自己实现一下,还是很简单的。
总结
其实我做完这个例子,觉得这是一个很好的练手的例子。因为他的数据量较小, 所以训练的速度比较快。而且数据和这个问题比较好理解,所以还是可以用来熟悉一下整体的架构和流程的。
关于详细的代码可以查看下面的连接, 下载notebook进行运行 : Fizz Buzz in Pytorch
- 微信公众号
- 关注微信公众号
-

- QQ群
- 我们的QQ群号
-


评论