文章目录(Table of Contents)
简介
因为自己最近在外面交换, 没了实验室的机器来跑实验, 所以开始尝试使用一下Colaboratory. 这里就简单记录一下使用过程中的一些内容, 例如如何连接google drive.
一些参考资料
简单记录
插入代码和文本
关于代码的插入, 和markdown的插入. 在界面左上角, 可以看到下面两个按钮
- +代码 => 插入代码
- +文本 => 插入文本

连接Google Drive
在做数据分析的时候, 很重要的一步就是数据的导入. 一般情况下, 我们会将数据保存到Google Drive中, 这个时候, 如果要使用其中的数据, 就需要与Drive进行连接.
Google Drive的连接
我们使用下面的方式进行连接:
- from google.colab import drive
- drive.mount('/content/drive')
连接后常见linux命令
之后, 比如列出目录下的文件, 就可以进行下面的操作(这个也是可以执行linux的命令的):
- !ls '/content/drive/My Drive'
我们也可以找出所有png结尾的文件
- !find '/content/drive/My Drive' -name "*.png"
删除找出的文件(这里有个要注意的地方, 就是路径中是有空格的, 所以看一下如何进行删除的)
- # 当文件路径中存在空格的处理方式
- # 参考链接: https://blog.csdn.net/ice1976/article/details/3191734
- !find '/content/drive/My Drive' -name "*.png" -print0|xargs -0 rm -r
有的时候上传的是压缩包, 我们要进行解压缩(实际使用的时候解压缩会比较慢, 不是很推荐使用)
- # q表示quiet
- !unzip -q "./dataset/breast-histopathology-images.zip" -d "./dataset/breast-histopathology-images"
数据分析时导入
在连接Google Drive之后, 我们需要使用下面的方式来进行导入, 来进行我们之后的数据分析. 此时数据导入就和平时在本地是一样的, 只不过路径要改为google drive的路径地址. 比如下面这个例子.
- # 导入数据
- data = pd.read_csv('/content/drive/My Drive/Machine Learning/dataset/heart-disease-uci.csv')
使用GPU
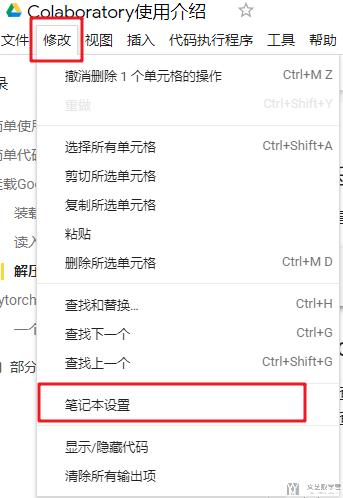
使用Colaboratory的最大的一个优点就是可以免费使用GPU. 我们使用下面的方式来开启GPU的使用. 我们在"修改->笔记本设置"中进行修改.
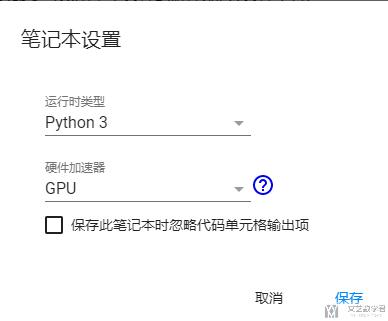
点击之后出现下图的选项, 我们选择GPU即可.
之后可以通过下面方式查看GPU是否启动成功.
- import torch
- # 查看相关的版本
- torch.__version__
- # --------------------
- # Device configuration
- # --------------------
- device = torch.device('cuda' if torch.cuda.is_available() else 'cpu')
- device
- """
- device(type='cuda')
- """
关于Colaboratory Pro
关于是否要升级为Colaboratory Pro版本, 我觉得如果不是有很大的需求, 或是因为GPU memory不够的问题, 是不用考虑升级的. 我自己尝试升级了一个月. 升级之后, 左侧的图标就有Pro了, 看上去就变厉害了.

升级之后会弹出一个文档, 来说明升级之后的好处. 不过总体来说就是更好的GPU和更大的内存(注意这里不是显存, 就只是内存, 所以升级的时候考虑清楚)
关于GPU信息的查看, 可以使用以下的命令.
- gpu_info = !nvidia-smi
- gpu_info = '\n'.join(gpu_info)
- if gpu_info.find('failed') >= 0:
- print('Select the Runtime → "Change runtime type" menu to enable a GPU accelerator, ')
- print('and then re-execute this cell.')
- else:
- print(gpu_info)
可以使用下面的命令切换为高RAM模式.
- from psutil import virtual_memory
- ram_gb = virtual_memory().total / 1e9
- print('Your runtime has {:.1f} gigabytes of available RAM\n'.format(ram_gb))
- if ram_gb < 20:
- print('To enable a high-RAM runtime, select the Runtime → "Change runtime type"')
- print('menu, and then select High-RAM in the Runtime shape dropdown. Then, ')
- print('re-execute this cell.')
- else:
- print('You are using a high-RAM runtime!')
- 微信公众号
- 关注微信公众号
-

- QQ群
- 我们的QQ群号
-


评论