文章目录(Table of Contents)
文章简介
这一篇主要会介绍 Seq2Seq 模型,并使用其实现一个简单的翻译(英语到法语的翻译)的功能。主要参考自 Pytorch 官方的一个例子,TRANSLATION WITH A SEQUENCE TO SEQUENCE NETWORK AND ATTENTION。这个我会拆成两篇文章,一篇使用传统的 Seq2Seq,另一篇加入Attention。
主要参考的论文 : Sequence to Sequence Learning with Neural Networks
Seq2Seq介绍
在之前的几篇文章里,RNN for Image Classification(RNN图片分类–MNIST数据集),RNN完成姓名分类,我们介绍的都是多对一的情况(也就是只有一个 output),但在面对翻译这个问题的时候,传统的 RNN 结构可能就不在适用了,因为我们需要让模型输出多个值。
However, it is not clear how to apply an RNN to problems whose input and the output sequences have different lengths with complicated and non-monotonic relationships. (input 和 output 没有对应关系, 且长度不一致时, 传统的RNN结构无法处理)。为了解决上面的问题,因此提出了 Sequence-to-Sequence(Seq2Seq) 模型。
Seq2Seq介绍
为了解决上面提出的问题,人们提出了关于 Seq2Seq 模型,这个模型的主要思路如下:
- Encoder : Uses a multilayered Long Short-Term Memory (LSTM) to map the input sequence to a vector of a fixed dimensionality. (将输入序列映射为一个向量)
- Decoder : And then another deep LSTM to decode the target sequence from the vector. (接着使用另外一个 LSTM 网络,将上面的向量还原为一个序列)
整体的结构如下图所示(其实感觉论文里这张图片讲解的不是很清晰,后面再贴几张我觉得比较好的解释 Seq2Seq 的图片)
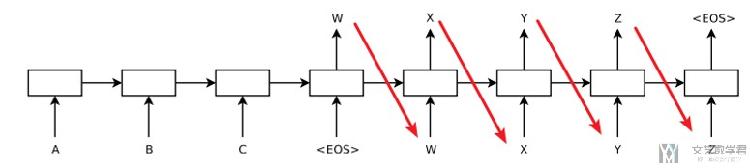
这里再详细说明一下。对于 Seq2Seq 来说,整个系统分为两个部分,分别是 Encoder 和 Decoder。以下有三个注意点:
Encoder部分将输入的一句话转为一个 vector;Decoder负责将这个 vector 展开,变为翻译后的句子。Decoder会将Encoder最后的 hidden state 作为自己的初始的 hidden state。Decoder初始输入为一个标志符, 之后每次将自己这次的输出作为下一次的输入。
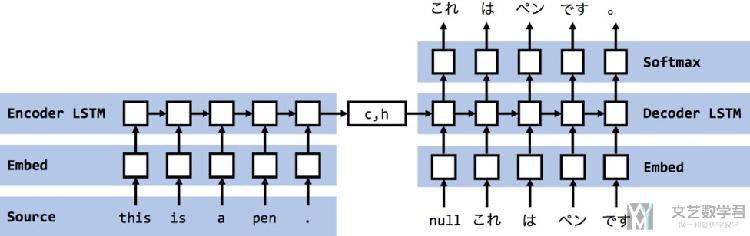
下面的这几张图片来自:Encoder-decoderモデルとTeacher Forcing,Scheduled Sampling,Professor Forcing,很好的对 Seq2Seq 进行了解释。首先我们再来看一下整个流程:
- 输入一个英文句子,通过 Encoder 将其转换为一个 vector;
- 将这个 vector 作为 Decoder 的初始 hidden state(h),同时初始输入为「句子开头符号」(x);
- 有了 h 和 x 之后 decoder 就会返回新的 h 和 output(每个 word 的概率,选择最大的);
- 接着将新的 h 与上面预测得到的 word(x)作为新的输入,接着得到 h 与 output;
- 直到整个句子预测完毕;
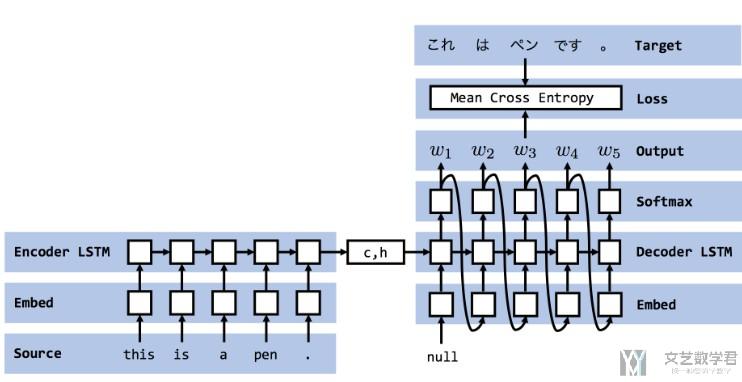
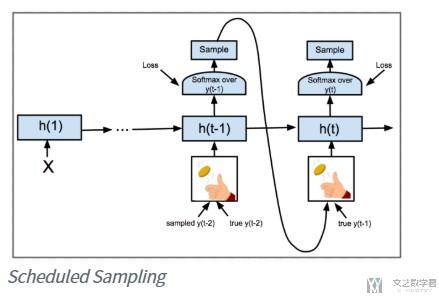
对于上面的 x,也就是每次 Decoder 的输入,有两种形式。第一种是普通的形式,直接将 Decoder 每一次的输出(predict)作为下一次的输入:
第二种是 Teacher Forcing 模式,他会每次将正确答案(ground truth)作为输入。
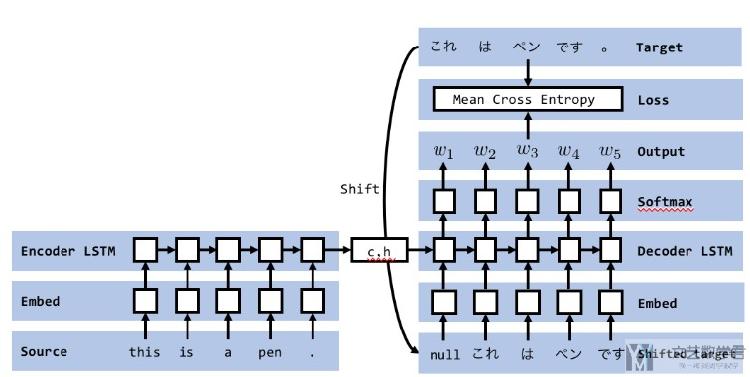
在实际使用中,会同时用到上面的两种方式。每一次训练前会产生一个随机数,若大于某个值,则使用普通的模式,否则使用 Teacher Forcing 模式。
Seq2Seq 中 Decoder 的扩展
Scheduled Sampling
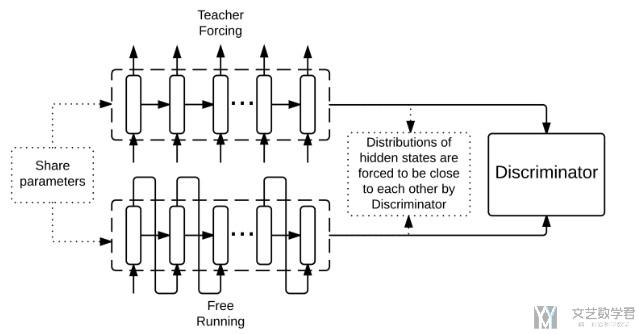
Professor Forcing
还有一种方式会做模型的融合,这个具体可以查看这篇论文, Professor Forcing: A New Algorithm for Training Recurrent Networks
论文的一些发现
这一部分是在论文,Sequence to Sequence Learning with Neural Networks,中作者最后的一些总结。
- First, we used two different LSTMs: one for the input sequence and another for the output sequence, because doing so increases the number model parameters at negligible computational cost and makes it natural to train the LSTM on multiple language pairs simultaneously.
- Second, we found that deep LSTMs significantly outperformed shallow LSTMs, so we chose an LSTM with four layers. (深的LSTM效果会更好)
- Third, we found it extremely valuable to reverse the order of the words of the input sentence. So for example, instead of mapping the sentence a, b, c to the sentence α, β, γ, the LSTM is asked to map c, b, a to α, β, γ, where α, β, γ is the translation of a, b, c.(将input的sequence逆序输入)—这个后来被证明只对部分语言有效, 即翻译前后单词的语义有对应的关系.
关于最后一部分, 作者发现将训练的句子按逆序的顺序输入网络会有更好的效果。
关于Vector的可视化结果
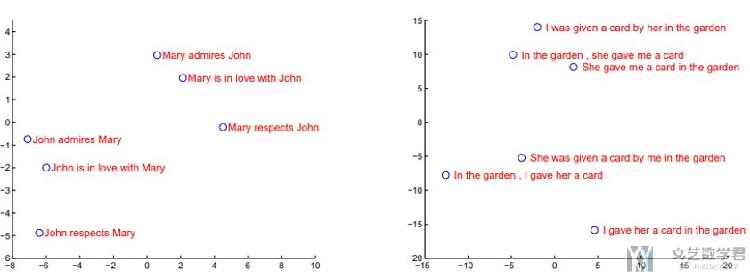
One of the attractive features of our model is its ability to turn a sequence of words into a vector of fixed dimensionality. (作者将encoder之后的vector降维后进行可视化,效果图如下所示)
The two-dimensional projections are obtainedusing PCA. (原文是使用了PCA的降维方法)
于是他得到了下面的一些结论:
The figure clearly shows that the representations are sensitive to the order of words while being fairly insensitive to the replacement of an active voice with a passive voice. (对语句的顺序是敏感的, 如左侧的图, 交换 Mary 和 John 之后聚类的结果是不同的;但是对主动语态与被动语态是不敏感的, 如右图, 只与表达的意思是有关的)
Seq2Seq 实验实现
下面会简单复现一下 Seq2Seq 的实验,主要代码均参考自TRANSLATION WITH A SEQUENCE TO SEQUENCE NETWORK AND ATTENTION,我只简单修改了一下 train 部分的代码。本文的完整代码已经上传 Github,可以参考链接,Seq2Seq模型代码。
这一部分最终想要实现的目标如下,即完成语言的翻译:
- [KEY: > input, = target, < output]
- > il est en train de peindre un tableau .
- = he is painting a picture .
- < he is painting a picture .
- > pourquoi ne pas essayer ce vin delicieux ?
- = why not try that delicious wine ?
- < why not try that delicious wine ?
- > elle n est pas poete mais romanciere .
- = she is not a poet but a novelist .
- < she not not a poet but a novelist .
- > vous etes trop maigre .
- = you re too skinny .
- < you re all alone .
Seq2Seq 主要的思想一句话概括就是: An encoder network condenses an input sequence into a vector, and a decoder network unfolds that vector into a new sequence.
导入需要的库
首先我们导入需要用到的库,以及定义 device,后面可以使用 GPU 进行训练。
- from __future__ import unicode_literals, print_function, division
- from io import open
- import unicodedata
- import string
- import re
- import random
- import torch
- import torch.nn as nn
- from torch import optim
- import torch.nn.functional as F
- device = torch.device("cuda" if torch.cuda.is_available() else "cpu")
数据预处理
接下来定义一些函数,用作数据的预处理。关于数据的下载,可以点击后面的链接,数据下载链接。除此之外,我们还可以进入网站,http://www.manythings.org/anki/,去下载不同语言的数据。
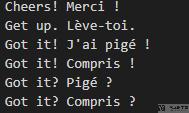
我们这里的例子是「英语与法语」之间的翻译,数据集一行包含英语句子和对应的法语,中间使用空格隔开,如下所示:
首先我们定义一个函数,可以将每一个每个单词都有一个 index 与之对应,其中 SOS_token 表示句子开头, EOS_token 表示句子的结尾.:
- SOS_token = 0
- EOS_token = 1
- class Lang:
- """word → index (word2index) and index → word (index2word) dictionaries
- A count of each word word2count to use to later replace rare words.
- """
- def __init__(self, name):
- self.name = name
- self.word2index = {}
- self.word2count = {}
- self.index2word = {0: "SOS", 1: "EOS"}
- self.n_words = 2 # Count SOS and EOS
- def addSentence(self, sentence):
- for word in sentence.split(' '):
- self.addWord(word)
- def addWord(self, word):
- if word not in self.word2index:
- self.word2index[word] = self.n_words
- self.word2count[word] = 1
- self.index2word[self.n_words] = word
- self.n_words += 1
- else:
- self.word2count[word] += 1
接着我们定义数据预处理的函数,可以将 Unicode 转换为 ASCII,大写变小写,留下重要的标点,去掉大部分的标点。
- """
- we will turn Unicode characters to ASCII, make everything lowercase,
- and trim most punctuation.
- """
- # Turn a Unicode string to plain ASCII, thanks to
- # https://stackoverflow.com/a/518232/2809427
- def unicodeToAscii(s):
- return ''.join(
- c for c in unicodedata.normalize('NFD', s)
- if unicodedata.category(c) != 'Mn'
- )
- # Lowercase, trim, and remove non-letter characters
- def normalizeString(s):
- s = unicodeToAscii(s.lower().strip())
- s = re.sub(r"([.!?])", r" \1", s)
- s = re.sub(r"[^a-zA-Z.!?]+", r" ", s)
- return s
对于上面的数据预处理函数,我们看下面的例子:
- # 转换为ASCII, 大写变小写, 留下重要的标点, 去掉大部分的标点
- normalizeString('I am a Boy!~$%^&')
- """
- 'i am a boy ! '
- """
接着定义函数,来逐行读取文件,并对每一行做预处理。因为我们每一行文件都包含原语言和翻译后的语言,所以返回的 pair。源文件数据格式如下所示:
- I am cold. J'ai froid.
下面是具体读取文件的函数.
- def readLangs(lang1, lang2, reverse=False):
- """逐行读取file, 并将每行分为pair, 并做标准化
- """
- print("Reading lines...")
- # Read the file and split into lines
- lines = open('./data/%s-%s.txt' % (lang1, lang2), encoding='utf-8').\
- read().strip().split('\n')
- # Split every line into pairs and normalize
- pairs = [[normalizeString(s) for s in l.split('\t')] for l in lines]
- # Reverse pairs, make Lang instances
- if reverse:
- pairs = [list(reversed(p)) for p in pairs]
- input_lang = Lang(lang2)
- output_lang = Lang(lang1)
- else:
- input_lang = Lang(lang1)
- output_lang = Lang(lang2)
- return input_lang, output_lang, pairs
为了加快训练的速度, 我们把句子长度最大设置为10, 同时我们过滤句子后使得其开头变为如 i am, he is等词汇。(这一部分只是为了加快训练的速度)
- MAX_LENGTH = 10
- eng_prefixes = (
- "i am ", "i m ",
- "he is", "he s ",
- "she is", "she s ",
- "you are", "you re ",
- "we are", "we re ",
- "they are", "they re "
- )
- def filterPair(p):
- return len(p[0].split(' ')) < MAX_LENGTH and \
- len(p[1].split(' ')) < MAX_LENGTH and \
- p[1].startswith(eng_prefixes)
- def filterPairs(pairs):
- return [pair for pair in pairs if filterPair(pair)]
下面做一个演示,可以看到不是特定开头会被去掉,句子太长会被去掉:
- # 会去掉单词个数超过10个的句子
- # 会去掉不是以特定开头的句子
- filterPairs([['i am a girl','i am a boy'],
- ['how are you','how are you'], # 不是特定开头的会被去掉
- ['i am a girl i am a girl i am a girl','i am a girl i am a girl']]) # 句子太长会被去掉
接下来把上面整个数据处理的流程写成一个函数。整个数据处理的流程如下所示:
- Read text file and split into lines, split lines into pairs;
- Normalize text, filter by length and content;
- Make word lists from sentences in pairs;
- def prepareData(lang1, lang2, reverse=False):
- """开始读取语言的文件
- """
- # 读取文件, 返回的是句子对
- input_lang, output_lang, pairs = readLangs(lang1, lang2, reverse)
- print("Read %s sentence pairs" % len(pairs))
- # 过滤掉句子对中较长的句子, 和
- pairs = filterPairs(pairs)
- print("Trimmed to %s sentence pairs" % len(pairs))
- print("Counting words...")
- for pair in pairs:
- input_lang.addSentence(pair[0])
- output_lang.addSentence(pair[1])
- print("Counted words:")
- print(input_lang.name, input_lang.n_words)
- print(output_lang.name, output_lang.n_words)
- return input_lang, output_lang, pairs
最后,开始读取数据即可。
- # 开始读取数据
- input_lang, output_lang, pairs = prepareData('eng', 'fra', True)
我们看一下最终的效果, paris 中保存了语言对,即法语与对应的英语。
- print(random.choice(pairs))
- """
- ['il a accepte de faire le travail .', 'he s agreed to do the job .']
- """
input_lang 和 output_lang 中分别保存了原始语言和翻译后的语言的单词, 单词对应的 index(word2index), 和每个单词出现的频数(word2count)。
- print(output_lang.word2count.get('ok')) # 不同单词出现的次数
- print(output_lang.word2index.get('ok')) # 每个单词的 index
Seq2Seq 模型
接下来就是来创建 Seq2Seq 模型了。与传统的 RNN 比较, Seq2Seq 可以不需要输入和输出是相同的长度的。这样就会很适合用来进行文本的翻译。下面分开讲一下 Encoder 和 Decoder 的实现。
Encoder 的实现
Encoder 在这里使用单向 LSTM,将要翻译的句子作为输入,输出是一个向量;输出是一个向量包含这个句子中的信息。
- class EncoderRNN(nn.Module):
- def __init__(self, input_size, hidden_size):
- super(EncoderRNN, self).__init__()
- self.input_size = input_size # 包含多少词
- self.hidden_size = hidden_size # 词向量大小
- self.embedding = nn.Embedding(self.input_size, self.hidden_size)
- self.lstm = nn.LSTM(input_size=self.hidden_size, hidden_size=self.hidden_size, num_layers=2, bidirectional=False)
- def forward(self, x):
- self.sentence_length = x.size(0) # 句子的长度
- embedded = self.embedding(x).view(self.sentence_length, 1, -1) # 转换为 [sentence_length, 1, embedding]
- hn, cn = self.initHidden()
- output, (hn, cn) = self.lstm(embedded, (hn, cn))
- return output, (hn, cn)
- def initHidden(self):
- return torch.zeros(2, 1, self.hidden_size).to(device), torch.zeros(2, 1, self.hidden_size).to(device)
我们做一下 Encoder 的测试,随机选取一个句子(下面句子长度为 8)。
- # Encoder 测试
- test_data = tensorsFromPair(random.choice(pairs)) # 随机选取一个例子
- encoder1 = EncoderRNN(input_lang.n_words, 256).to(device) # 初始化 encode
- output, (hn, cn) = encoder1(test_data[0].unsqueeze(1))
- print('句子长度, {}; 输出大小, {}'.format(test_data[0].shape, output.shape)) # shape, [seq_len, batch, ]
- print(hn.shape, cn.shape)
- """
- 句子长度, torch.Size([8, 1]); 输出大小, torch.Size([8, 1, 512])
- torch.Size([2, 1, 256]) torch.Size([2, 1, 256])
- """
Decoder 部分
Decoder 是另外一个单向 LSTM 模型。我们这里使用 Encoder 的最后一个输出,称为 context vector。接下来每一步,Decoder 会得到一个 input token(初始是 SOS_token) 和 hidden state(初始是 Encoder 的最后一个输出)。
- class DecoderRNN(nn.Module):
- def __init__(self, hidden_size, output_size):
- super(DecoderRNN, self).__init__()
- self.hidden_size = hidden_size
- self.output_size = output_size
- self.embedding = nn.Embedding(self.output_size, self.hidden_size)
- self.gru = nn.GRU(self.hidden_size, self.hidden_size)
- self.out = nn.Linear(self.hidden_size, self.output_size)
- self.softmax = nn.LogSoftmax(dim=1)
- def forward(self, x, hidden_state):
- # 这里的hidden_state需要传入, 传入的是encoder最后输出的那个向量
- self.hidden = hidden_state
- # 只能预测一个, 输入下一个
- embedded = self.embedding(x).view(1,1,-1) # 计算词向量
- output, hidden = self.gru(embedded, self.hidden)
- output = self.out(output[0]) # 从 hidden_size 转换为 output_size
- output = self.softmax(output)
- return output, hidden
我们还是测试一下这部分是否存在问题。
- # Decoder的输入
- test_data = torch.tensor([[SOS_token]]).to(device)
- # output_lang.n_words = 2803
- # output的单词数量有2803个
- # 这里的hidden是上面encoder输出的hidden_state
- decoder1 = DecoderRNN(256, output_lang.n_words).to(device)
- output, hidden = decoder1(test_data, hidden)
- # 这里有2803个单词, 每个单词的概率
- output.shape
- """
- torch.Size([1, 2803])
- """
开始训练 Seq2Seq!!!
训练数据的准备
To train, for each pair we will need an input tensor (indexes of the words in the input sentence) and target tensor (indexes of the words in the target sentence). While creating these vectors we will append the EOS token to both sequences.
这一部分主要完成的作用是将每句话都转为 Index, 并且在句末加上终止符.
- def indexesFromSentence(lang, sentence):
- return [lang.word2index[word] for word in sentence.split(' ')]
- def tensorFromSentence(lang, sentence):
- indexes = indexesFromSentence(lang, sentence)
- indexes.append(EOS_token)
- return torch.tensor(indexes, dtype=torch.long, device=device).view(-1, 1)
- def tensorsFromPair(pair):
- input_tensor = tensorFromSentence(input_lang, pair[0])
- target_tensor = tensorFromSentence(output_lang, pair[1])
- return (input_tensor, target_tensor)
我们看一下一个例子的效果,'i am a boy' 会转换为 [2, 16, 42, 472, 1],最后的 1 是结束符号:
- # 将一句话中的每个字母转为Index, 并在结尾加上终止符
- tensorFromSentence(output_lang, 'i am a boy')
- """
- tensor([[ 2],
- [ 16],
- [ 42],
- [472],
- [ 1]], device='cuda:0')
- """
一些辅助函数
下面会定义一些辅助函数,首先是用来打印训练的耗时。
- # helper function
- import time
- import math
- def asMinutes(s):
- """将秒转换为分钟
- """
- m = math.floor(s / 60)
- s -= m * 60
- return '%dm %ds' % (m, s)
- def timeSince(since, percent):
- """打印已经花费的时间和预计花费的时间
- 预计花费的时间, 用 完成百分比的时间/现在完成的百分比 来预测
- """
- now = time.time()
- s = now - since
- es = s / (percent)
- rs = es - s
- return '%s (- %s)' % (asMinutes(s), asMinutes(rs))
接着是最后用来绘制 loss 的下降曲线的函数。
- import matplotlib.pyplot as plt
- plt.switch_backend('agg')
- import matplotlib.ticker as ticker
- import numpy as np
- def showPlot(points):
- plt.figure(figsize=(14,7))
- fig, ax = plt.subplots()
- # this locator puts ticks at regular intervals
- loc = ticker.MultipleLocator(base=0.2)
- ax.yaxis.set_major_locator(loc)
- plt.plot(points)
定义训练函数
接下来就是定义训练使用的函数了,会有两个函数。首先是第一个train, 这个每次训练一个pair,如下所示:
- teacher_forcing_ratio = 0.5 # 50%的概率使用teacher_forcing的模式
- def train(input_tensor, target_tensor, encoder, decoder, encoder_optimizer, decoder_optimizer, criterion, max_length=MAX_LENGTH):
- encoder_optimizer.zero_grad()
- decoder_optimizer.zero_grad()
- input_length = input_tensor.size(0)
- target_length = target_tensor.size(0)
- # encoder_outputs = torch.zeros(max_length, encoder.hidden_size).to(device)
- # Encoder
- encoder_output, encoder_hidden = encoder1(input_tensor.unsqueeze(1))
- # Decoder
- loss = 0
- decoder_hidden = encoder_hidden
- decoder_input = torch.tensor([[SOS_token]]).to(device)
- # 判断是使用哪一种模式
- use_teacher_forcing = True if random.random() < teacher_forcing_ratio else False
- if use_teacher_forcing:
- # Teacher forcing: Feed the target as the next input
- for di in range(target_length):
- decoder_output, decoder_hidden = decoder(decoder_input, decoder_hidden)
- loss = loss + criterion(decoder_output, target_tensor[di])
- decoder_input = target_tensor[di] # Teacher Forcing
- else:
- # Without teacher forcing: use its own predictions as the next input
- for di in range(target_length):
- decoder_output, decoder_hidden = decoder(decoder_input, decoder_hidden)
- topv, topi = decoder_output.topk(1)
- decoder_input = topi.squeeze().detach() # detach from history as input
- loss = loss + criterion(decoder_output, target_tensor[di])
- if decoder_input.item() == EOS_token:
- break
- # 反向传播, 进行优化
- loss.backward()
- encoder_optimizer.step()
- decoder_optimizer.step()
- return loss.item() / target_length
下面是一个整体的训练流程。
- def trainIters(encoder, decoder, n_iters, print_every=1000, plot_every=100, learning_rate=0.01):
- start = time.time()
- plot_losses = []
- print_loss_total = 0 # Reset every print_every
- plot_loss_total = 0 # Reset every plot_every
- # 初始化优化器
- encoder_optimizer = optim.SGD(encoder.parameters(), lr=learning_rate)
- decoder_optimizer = optim.SGD(decoder.parameters(), lr=learning_rate)
- # 初始化样本
- training_pairs = [tensorsFromPair(random.choice(pairs)) for i in range(n_iters)]
- criterion = nn.NLLLoss()
- for iter in range(1, n_iters+1):
- training_pair = training_pairs[iter-1]
- input_tensor = training_pair[0]
- target_tensor = training_pair[1]
- loss = train(input_tensor, target_tensor, encoder, decoder, encoder_optimizer, decoder_optimizer, criterion)
- print_loss_total = print_loss_total + loss
- plot_loss_total = plot_loss_total + loss
- if iter % print_every == 0:
- print_loss_avg = print_loss_total / print_every
- print_loss_total = 0
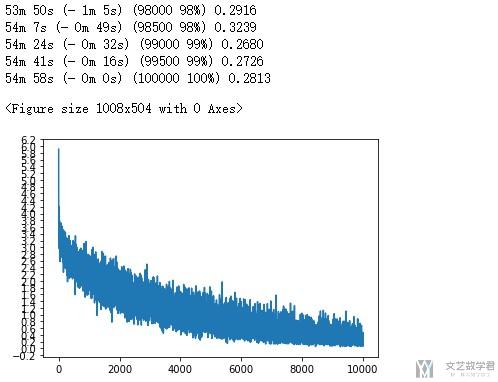
- print('%s (%d %d%%) %.4f' % (timeSince(start, iter / n_iters),
- iter, iter / n_iters * 100, print_loss_avg))
- if iter % plot_every == 0:
- plot_loss_avg = plot_loss_total / plot_every
- plot_losses.append(plot_loss_avg)
- plot_loss_total = 0
- showPlot(plot_losses)
正式开始训练
接下来就是激动人心的时刻了,开始正式的训练。
- hidden_size = 256
- encoder1 = EncoderRNN(input_lang.n_words, hidden_size).to(device)
- decoder1 = DecoderRNN(hidden_size, output_lang.n_words).to(device)
- trainIters(encoder1, decoder1, n_iters=100000, print_every=500, plot_every=10)
最终的结果如下所示,Loss总体来说是一直在下降的。
模型的评测
Evaluation is mostly the same as training, but there are no targets so we simply feed the decoder's predictions back to itself for each step. Every time it predicts a word we add it to the output string, and if it predicts the EOS token we stop there. We also store the decoder's attention outputs for display later.
最后就是模型的评测的阶段了,我们使用他来实际进行一下句子的翻译。
- def evaluate(encoder, decoder, sentence, max_length=MAX_LENGTH):
- with torch.no_grad():
- input_tensor = tensorFromSentence(input_lang, sentence)
- input_length = input_tensor.size()[0]
- # Encoder
- encoder_output, encoder_hidden = encoder1(input_tensor.unsqueeze(1))
- # Decoder
- decoder_input = torch.tensor([[SOS_token]], device=device) # SOS
- decoder_hidden = encoder_hidden
- decoded_words = []
- for di in range(max_length):
- decoder_output, decoder_hidden = decoder(decoder_input, decoder_hidden )
- topv, topi = decoder_output.data.topk(1)
- if topi.item() == EOS_token:
- """遇到终止符就停止
- """
- decoded_words.append('<EOS>')
- break
- else:
- """把decode的word加入数组中
- """
- decoded_words.append(output_lang.index2word[topi.item()])
- # 下一个的输入是上一个的输出
- decoder_input = topi.squeeze().detach()
- return decoded_words
下面是随机挑选一些句子来进行翻译:
- def evaluateRandomly(encoder, decoder, n=10):
- for i in range(n):
- pair = random.choice(pairs)
- print('>', pair[0])
- print('=', pair[1])
- output_words = evaluate(encoder, decoder, pair[0])
- output_sentence = ' '.join(output_words)
- print('<', output_sentence)
- print('')
最后我们看一下最终的效果:
- evaluateRandomly(encoder1, decoder1, n=70)
- """
- > je suis egalement heureuse .
- = i m happy too .
- < i m happy too . <EOS>
- > j attends de toi un travail serieux .
- = i am expecting some serious work from you .
- < i am expecting expecting serious serious serious . <EOS>
- > tu es chanceuse .
- = you re fortunate .
- < you re fortunate . <EOS>
- """
整体来说还是可以的,但是我们仔细看会发现一些问题,如会出现一个单词反复出现很多次,如第二句中的serious. 这一部分的改进就不在这里细说了。
总结
上面就是所有关于简单的 Sequence to Sequence(Seq2Seq) 的介绍了, 介绍了包括原理和一个简单的例子实现。下面有 Notebook 的代码链接,大家可以尝试一下这个模型。
Notebook的代码链接如下 : Seq2Seq模型代码
- 微信公众号
- 关注微信公众号
-

- QQ群
- 我们的QQ群号
-


评论